Powerful do-it-yourself pirate metal detector. Powerful metal detector PIRAT for beginners
Powered by pirat metal detector, from 12 volts, you can use ordinary batteries, but of course it’s better to take a good battery, for example, from a screwdriver. Personally, I use it, or rather the batteries that are in it.
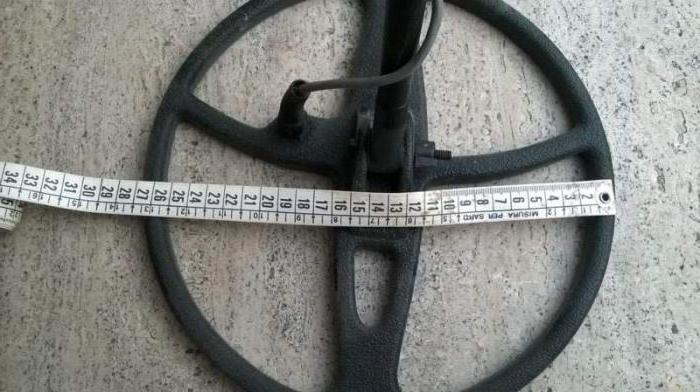
search coil metal detector pirate, wound on a frame 190 mm. and contains 25 wires, PEV wires 0.5 mm.
- Current consumption 30-40 mA
Diagram of the Pirat metal detector:


Chip NE555:

Transistor IRF740:

Variable resistors:


Here's how it should turn out:


For K157UD2 it is better to put an adapter socket, and for NE555 you can put it too, it won't hurt!))


The lady conducted the tests on an average coil with a diameter of 15 cm. So the golden ring caught 18 cm through the air, scissors 30 cm. table lamp 50cm. which is not bad enoughThe scheme of the Pirate metal detector is very simple and understandable even for novice radio amateurs. It consists of two chips that do not need to be flashed or programmed. It is very easy to assemble, you just need to solder all the parts in the right places!))
Attention! I make to order MD "Pirate", write to Skype kavinskiy or write comments! Thanks!
The pirat metal detector is powered by 12 volts, you can use ordinary batteries, but it’s better to take a good battery, for example, from a screwdriver. Personally, I use it, or rather the batteries that are in it.
Pirat metal detector search coil wound on a 190 mm frame. and contains 25 wires, PEV wires 0.5 mm.
Metal detector characteristics:
Current consumption 30-40 mA
Reacts to all metals, no discrimination
Sensitivity 25 mm coin - 20 cm
Large metal objects - 150 cm
All parts are inexpensive and readily available.
Required parts for assembly:
pirate_detali
Diagram of the Pirat metal detector:
ON LE2 (1)
The circuit uses 2 microcircuits (NE555 and K157UD2). They are quite common. K157UD2 - you can pick it out of the old equipment, which I did with success.
pirate_microshema1
Chip NE555:
NE555N
Transistor IRF740:
pirate_transistor_1
Variable resistors:
pirate_resistor_1
Capacitors 100nF must be taken film, like this, we take the voltage as little as possible:
pirate_condensatori
We print a sketch of the board on plain paper:
pirate_pechatka_1
We cut out a piece of textolite to fit its size:
pirate_pechatka_2
We apply it tightly and with a sharp object we push through the places of future holes:
pirate_pechatka_2
Here's how it should turn out:
pirate_pechatka_3
pirate_pechatka_4
pirate_pechatka_5
After drilling, you need to draw tracks. You can do this through photoresist, LUT, or simply paint them with Nitro varnish with a simple brush. The tracks should turn out exactly the same as on the paper template. And we charge a fee.
pirate_pechatka_6
pirate_pechatka_7
pirate_pechatka_8
For K157UD2 it is better to install an adapter socket, and for NE555 you can also install it, it won't hurt!))
pirate_montag_1
pirate_montag_2
pirate_montag_3
To wind the search coil, you need a copper wire with a diameter of 0.5-0.7 mm
pirate_provod
I wound the coil on a simple pan, 190 mm in diameter. after which, wrapped everything with tape:
pirate_katuschka
According to the scheme, the coil is 19 cm in diameter and contains 25 turns. I note right away that the coil must be made of such a diameter based on what you will be looking for. The larger the coil, the deeper the search, but a large coil does not see small details well. The small coil sees small details well, but the depth is not great.
I immediately wound myself three coils 23cm (25 turns), 15cm (17 turns) and 10cm (13-15 turns). If you need to dig up scrap metal, then we put a large one, if you look for small things on the beach, then the coil is smaller, well, you'll figure it out yourself.
pirate_katuschka_3
pirate_katuschka_2
The coil should be as flat as possible. The speaker took the first one that came across.
Now we connect everything and try the circuit for performance.
After applying power, you need to wait 15-20 seconds until the circuit warms up. We put the coil away from any metal, it is best to hang it in the air. After we start twisting the 100K variable resistor until clicks appear. As soon as the clicks appear, twist in the opposite direction, as soon as the clicks disappear, that's enough. After that, we also adjust the 10K resistor.
At the expense of the K157UD2 chip. In addition to the one I dug out, I asked a neighbor for 1 more and bought two at the radio market. I inserted the purchased microcircuits, turned on the device, but it refused to work. I racked my brains for a long time, until I just put another microcircuit (the one that I soldered). And everything immediately worked. So that's what a transitional socket is for, in order to pick up a live microcircuit and do not suffer with soldering and soldering.
Everything is ready, it remains only to make a bar and place the board in the case and in search of treasures)
pirate_ready
And finally, I throw a video of the work of the pirate!
The lady conducted the tests on an average coil with a diameter of 15 cm. So the golden ring caught 18 cm through the air, scissors 30 cm. table lamp 50cm. which is not bad enough for such a metal detector.
You can download the printed circuit board in Sprint-Layout format here!for such a metal detector.
Metal detector circuit board
You can download the printed circuit board in Sprint-Layout format!
Hello! I haven't written here for a long time. There were a lot of things to do ... It's already spring outside the window, the second day the temperature is kept at 9-10 degrees. The snow is slowly melting away. The opening of the season is just around the corner. So, one of the things that would help pass the time and bring the season closer was assembling a metal detector from scratch with your own hands. The result makes me happy :)
Who can not wait, a video with the work of this miracle:
It all started with the fact that I finally got a foil textolite without paying a penny for it)). The first step for testing this textolite) was the assembly of a metal detector.
For assembly, the “Pirate” impulse metal detector scheme was chosen, because it was not a desire to make a device on beats). So, the circuit is loaded, the Sprint Layot program is installed, the printed circuit board is printed on photo paper. I start assembling.
The board was made using the laser iron method (LUT for short). I will not paint in detail, there is Google for this matter :). That's it, the textolite is cut out, the tracks are transferred to the board.

Next, I dilute the pickling solution. And then the electrolyte from the battery helped me again! The solution included table salt, hydrogen peroxide and an electrolyte (in the evening of the same day, a kitten knocked over a jar with a solution).
Well, the board is etched, the holes are drilled. Now it must be tinned. Tinning was done with a soldering iron.
It's time for the longest part of the build. Namely, the collection, search and soldering of parts. Both microcircuits and two transistors were found without difficulty. Capacitors and resistors pulled from old boards. But I did not find a few resistors. They had to go to the TV room for them. They gave it to me for FREE.
The board is assembled, the experimental coil is wound. It's time to turn on. The first inclusion was made from a twelve-volt power supply. I twisted the wires, connected the coil, rechecked the polarity, turn it on ... it doesn’t work ... it’s silent (. The transistor is heating up. I soldered it. I turn it on again ... silence. Subsequent checks revealed a malfunction of the K157UD2 microcircuit. life It works!!! It was a lot of joy :)

The next day, the scheme was adjusted and received a cultural building. Connectors removed. Now I needed a normal coil. I cut it out of a piece of plywood. Then he picked up the number of turns, filled the winding with hot glue and wrapped it blue tape.


Now material for the bar was required, which was the subject of the next day. I bought 4 meters of PVC water pipe and 0.5 meters of sewer pipe. From them, the corresponding parts for the collection of the rod were cut. The pipes were soldered with hot glue and a hair dryer. 


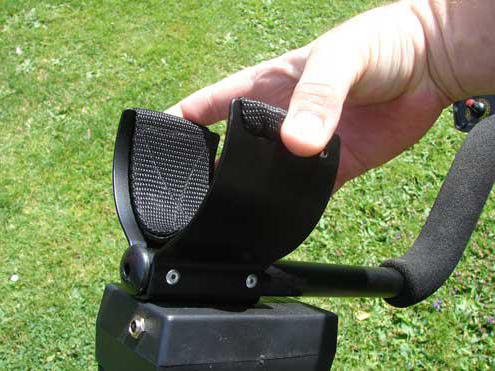
The rod is assembled, the coil is ready, the body of the device has acquired the proper form. It remains to combine everything. The block is attached to the bar with fittings. But for mounting the coil in the store there was no plastic bolt. The coil is still temporarily held on the screed.


It remains only to buy a battery with a charger. Works with a battery from a screwdriver :).
At home, the device begins to respond to a penny from 20 cm, which I think is not bad. I will also say that it does not have discrimination, so it is impossible to cut off the metal garbage so hated by all diggers.
I was completely satisfied with the assembly process and the results obtained, and I think I improved my amateur radio skills a little by applying new methods in my practice.
So, my investment (except for buying a battery) took 230 rubles. With a battery, I think it will be about 1000 rubles. This device can be easily recouped and even earned by searching for scrap metal with it. The search for coins is also possible, but due to the lack of discrimination, it will be difficult.
Let me tell you about the photos. I made them for myself, so their quality is a little watery :)
I also advise you subscribe to the channel "Old Vyatka", where you will find many videos about detecting, metal detectors, navigation, cartography and coin care:
Everyone can assemble such a device, even those who are completely far from electronics, you just need to solder all the details as in the diagram. The metal detector consists of two microcircuits. They do not require any firmware or programming.
Power supply 12 volts, can be from AA batteries but better than a 12v battery (small)
The coil is wound on a 190mm mandrel and contains 25 turns of PEV 0.5 wire
Characteristics:
- Current consumption 30-40 mA
- Reacts to all metals No discrimination
- Sensitivity 25 mm coin - 20 cm
- Large metal objects - 150 cm
- All details are not expensive and easily accessible.
List of required parts:
1) Soldering iron
2) Textolite
3) Wires
4) Drill bit 1mm
Here is a list of required parts

The scheme of the metal detector itself

The circuit uses 2 microcircuits (NE555 and K157UD2). They are quite common. K157UD2 - you can pick it out of the old equipment, which I successfully did


Capacitors 100nF must be taken film, like this, we take the voltage as little as possible

Print out the board sketch on plain paper

Cut out a piece of textolite under its size.

Apply tightly and with a sharp object push through the places of future holes

Here's how it should turn out.

Next, take any drill or drilling machine and drill holes


After drilling, you need to draw tracks. You can do this through, or just paint them with Nitro varnish with a simple brush. The tracks should turn out exactly the same as on the paper template. And we charge a fee.

In the places marked in red, we put jumpers:


Next, just solder all the components in place.
For K157UD2, it is better to put an adapter socket.


To wind the search coil, you need a copper wire with a diameter of 0.5-0.7 mm

If there is none, you can use another. I did not have enough copper varnished wire. I took an old network cable.

Took off the shell. There were enough wires. Two cores were enough for me, they also wound the coil.


According to the scheme, the coil is 19 cm in diameter and contains 25 turns. I note right away that the coil must be made of such a diameter based on what you will be looking for. The larger the coil, the deeper the search, but a large coil does not see small details well. The small coil sees small details well, but the depth is not great. I immediately wound myself three coils 23cm (25 turns), 15cm (17 turns) and 10cm (13-15 turns). If you need to dig up scrap metal, then we put a large one, if you look for small things on the beach, then the coil is smaller, well, you'll figure it out yourself.
We wind the coil on anything of a suitable diameter and wrap it tightly with electrical tape so that the turns are tightly next to each other.


The coil should be as flat as possible. The speaker took the first one that came across.
Now we connect everything and try the circuit for performance.
After applying power, you need to wait 15-20 seconds until the circuit warms up. We put the coil away from any metal, it is best to hang it in the air. After we start twisting the 100K variable resistor until clicks appear. As soon as the clicks appear, twist in the opposite direction, as soon as the clicks disappear, that's enough. After that, we also adjust the 10K resistor.
At the expense of the K157UD2 chip. In addition to the one I dug out, I asked a neighbor for 1 more and bought two at the radio market. I inserted the purchased microcircuits, turned on the device, but it refused to work. I racked my brains for a long time, until I just put another microcircuit (the one that I soldered). And everything immediately worked. So that's what a transitional socket is for, in order to pick up a live microcircuit and do not suffer with soldering and soldering.
Purchased chips
Nowadays, many people are passionate about searching for buried treasures, and sometimes even simple scrap metal. For some, this activity has become an interesting pastime, and for someone - a means of earning.
The first sample of an industrial metal detector was created in the 1960s and has found wide application in the mining industry and in other special work.
The devices are used in mine clearance, to find weapons, in the exploration of geophysicists and archaeologists, in the search for treasures, as well as to find foreign bodies made of metal in food. In the construction industry, they are used to detect reinforcement in concrete blocks and pipelines in walls. Metal detectors also began to be used by miners and prospectors. And the improvement of the device made it possible not to resort to excavations when finding gold.
Many people have become interested in this device over the past decades. The search for treasures and scrap metal has become a popular hobby. Some, for example, walk with such a device on the beach, hoping to find a valuable thing.
Who invented the metal detector
It is difficult to give an unambiguous answer to the question of which device was the first, since at about the same time many inventors in different parts of the world carried out their own developments of the named unit.
But if we talk about one specific person who can be considered the ancestor of the device, then this is undoubtedly the English geologist and Fox. He discovered the property of the passage of electricity through metal ores and objects. Around 1830, he developed the first unified locator, which included a battery, several metal rods and wires of suitable length.
The first methods for finding metal
The first search method was as follows: one metal rod lay in the ground, where the ore was supposed to be. It was connected to one terminal of the battery. The other terminal was connected to the floating wire. Metal rods were hammered into the ground at different points and sequentially touched the wire. When a metal object was found, sparks appeared.
In 1870, two separate rods were already used in the device. The wire connected through the battery was lowered into the ground. Upon contact with metal, an alarm bell sounded.

Device "Pirate"
And now we will consider modern devices. One of them - "Pirate" - a metal detector that operates on the conductivity of electricity, inductive and magnetic properties of the metal. By the way, my interesting name the device received from the inventors: PI - the impulse principle of its operation, RAT - an abbreviation for "Radio Cattle" (the site of the inventors).
The Pirate metal detector, the photo of which is presented in this article, has a unified design. It includes a generator that produces an alternating current that passes through a coil with a magnetic field. If the metal conducting the current is too close to the coil, then the vortex flows will be directed to the metal. This contributes to the formation of a variable magnetic field in metal. To detect the latter makes it possible to use another coil to measure the magnetic field.
Fixture Benefits
"Pirate" (metal detector) has a simple design and a unified setting, does not contain the elements specified by the program, which many radio amateurs are so afraid of. The device is great for beginners. And it should be remembered that he cannot distinguish between metals.
The metal detector "Pirate", the printed circuit board of which is presented (the domestic analogue of KR1006VI1) does not contain expensive or hard-to-get parts. Its technical parameters are in no way inferior to foreign analogues, the price of which reaches 300 USD. e.

And the main advantages of this device over others are the stability of work and the response to metal from a long distance.
The unified "Pirate" (metal detector for beginners) has certain technical characteristics. Its power supply is 9-12 Volts, and the level of energy consumed is 3-40 mA. The device senses objects up to 150 cm in size.
Design
Transmitting and receiving are the main components that make up the Pirate metal detector. The printed circuit board, which is the NE555 model, and the IRF740 high power switch are included in the transmitter assembly. And the receiving unit is assembled on the basis of the K157UD2 microcircuit and the VS547 transistor.
The coil is wound on a mandrel with a diameter of 190 mm and contains 25 turns of PEV 0.5 wire.
NPN replaced the T2 model and has a voltage of at least 200 volts. It can be taken from an economical lamp or a device for charging a mobile phone. In extreme cases, T2 can be replaced by KT817.
As T3, you can use any kind of NPN circuit transistor.
A properly assembled device does not need additional configuration. You may have to resort to using a resistor R12 so that clicks during movement appear in the middle position of R13.
If you have an oscilloscope, you can control the duration of the control pulse at the gate T2 and the frequency level of the generator. The optimal pulse duration is 130-150 µs, and the frequency is 120-150 Hz.
How to operate the device
After turning on the “Pirate” device (metal detector), wait 15 or 20 seconds, after which the sensitivity control is used to set the position at which clicks are heard during movement. This will serve as an indicator of maximum sensitivity.
The device has a unified control system, so acquiring the skills to work with it is not so difficult.
Do-it-yourself metal detector "Pirate"
Many people ask themselves: how to make a Pirate metal detector on your own? Assembling such a unit is within the power of people with basic knowledge in the field of electronics.
The impulse metal detector "Pirate" has the most common and easy-to-copy design. The device contains a number of components and an easy-to-use search coil. If its diameter is 280 mm, then it can detect objects ranging in size from 20 to 150 cm.
Making a Pirate metal detector with your own hands is not a difficult task, which is a huge advantage of this device. Assembly components are accessible and easy to find. They are quite cheap. You can buy them in a radio parts store or in the market.
List of required parts for manufacturing
Let's try to assemble the Pirate metal detector with our own hands. Detailed instructions will help even inexperienced radio amateurs to do this without errors.
The device has two schematic modifications. In the first case, the NE555 microcircuit is used (the domestic analogue of the microcircuit is KR1006VI1) - a timer. But if you could not purchase this component, then the authors provide another version of the circuit based on transistors.
When assembling based on transistors, you should choose the desired frequency and duration, since they have a rather large spread in technical characteristics. To this end, resort to the use of an oscilloscope.

Device printed circuit board
The home-made Pirate metal detector has several wiring options, but the Sprin Layot series board is most often used.
After soldering, power is connected to it. For this purpose, any power source with a voltage indicator of 9-12 Volts will be used. You can resort to using batteries "Krona" (3 or 4 pieces) or a battery. The use of one "Krona" is not recommended, as this will cause a rapid voltage drop, which, in turn, will cause the device settings to freeze permanently.
Making a coil for a metal detector "Pirate"
Like other models of pulse devices for finding metal, the device is undemanding in terms of accuracy in the manufacture of the coil. It is quite acceptable to use the one that is wound on a mandrel with a diameter of 190-200 mm - 25 turns. In this case, a winding enameled wire with a cross section of 0.5 mm is used.
The turns of the coil are wrapped with insulating tape or adhesive tape. By the way, in order to increase the search depth of the device, you can resort to winding the named part, with a diameter of 260-270 mm, 21-22 turns with the same wire.
The device coil is fixed in a rigid housing, which must be made of plastic, for example. This is necessary in order to protect the device from hitting the ground or grass during operation of the unit. Such a case can be purchased in online stores. In general, when making search coils, the use of metal parts is not recommended.
The conclusions of the mentioned part are soldered to a stranded wire with a cross section of 0.5 - 0.75 mm. Ideally, this is two independent interlaced wires. Your device is ready!

In early childhood, on the basis of watching the movie Indiana Jones, a thirst for discovery and treasure hunting arose, on this wave I had a burning desire to assemble my own metal detector, but since I had only experience in the field of electronics and soldering, I only had the level of dismantling a TV, the dream was remained a dream... up to this day.
In fact, anyone who knows how to hold a soldering iron can assemble the Pirate Metal Detector. You just need to solder all the details and it works.
I stumbled upon this metal detector by accident on the Internet, I was lured by its simplicity and characteristics.
There is simply a lot of data on the Internet with its characteristics and capabilities. Here I want to show my work. For those who are interested, read on.
The parts list is simple, no rare or hard to get.
Having bought, we get a handful of such details
We collect according to this scheme:

The NE555 and K157UD2 microcircuits are used in the circuit; for them, I highly recommend the panels for them, they are not expensive, since the K157UD2 very often defective and soldered microcircuits to the board are problematic to remove.
Capacitors 100nF must be taken film with a voltage of at least 60 volts. They are large red or of blue color. IT MATTERS. Pirate did not work with small capacitors!
The board was made by LUT. The drilled and tinned board looks like this
After soldering we get this look
The next step will be the manufacture of the search coil. It is recommended to wind the coil with a diameter of 190 mm. I used pollen for embroidery as a frame, their diameter is 180 mm. The wire I used was PETV 0.5. The best result was given by 21 turns.
I used a crown as power, but it is advised to be powered by a 12 volt battery. With a battery, the sensitivity increases.
Metal detector "Pirate" the device does not need adjustment. If everything is soldered correctly and all the details are working, then it will immediately work. A very important detail. Adjustment with resistors must be carried out with the removal of the coil from any metals. At first I thought that the Pirate was out of order and was constantly buzzing, but it turned out that the floor was all with metal - reinforced concrete floors.
The wire from the board to the coil must be used with a cross section of at least 1.5 mm and preferably without plugs, it is better to just solder.
The body was an electrical box. But here you can use anything. I even saw that a soap dish served as the body.
I drilled holes in the case for controls, buttons and headphone jacks.
Now let's start making the bar. I used a plastic pipe with a diameter of 20 mm as a barbell. You need to buy 4 clips for it. Remember! Do not use metal-plastic or any other metal pipe. The coil will react to it.
I glued the floor of a 6 mm PVC circle onto the coil. We attach clips to this part.
We get a search coil with a simple mount.
The bar will be attached to the coil with this.
We connect everything and get a finished Pirate metal detector
This do-it-yourself pulse metal detector showed the following characteristics:
coin 2 rub. - 8 cm
gold ring - 11 cm
scissors - 19 cm
But if you replace the crown with a 12 volt battery, then the sensitivity will increase markedly.
If someone liked this metal detector, then I can make one to order.
That's all! Leave comments, all the best.
Post Views: 200