Crochet capes for chairs and stool. Knitting covers for stools Rug for a chair in the shape of a heart crochet
Every woman wants to add comfort to her home. And various cute knitted things are designed to help with this. After all, they immediately fill an ordinary room with warmth, family happiness. In this article, we will look at how to crochet a square rug for a stool. It turns out that it is quite simple and suitable even for beginners! We will provide step by step instructions, diagrams and photo descriptions.
Before you start knitting chair rugs yourself, you need to turn to useful tips and recommendations from already experienced needlewomen.
First of all, of course, you need to take care of the yarn. And there are many options! A beautiful rug can be made even from old things or rags. The result will not look worse.
If you prefer to work with purchased yarn, then it is better to choose synthetic. The most popular are acrylic or cotton with synthetic fibers. Please note that the threads must be thick. Then the finished rug will be dense and warm. When knitting openwork patterns, it is better to choose, on the contrary, thin yarn.
Before knitting the rug itself, knit a small square with the same pattern and yarn that will be used in the planned product. Then wash it and iron it. This will help you find out the number of loops needed to knit the rug. Just count the loops in ten centimeters and multiply by the desired size!
The scheme itself can be anything. It is not necessary to look for patterns for stools, you can take a description of a rug on the floor or a pillow cover and simply substitute your measurements.
No need to buy new yarn if you have leftovers of different colors at home. It is easy to make a beautiful product out of them. However, remember that the thickness of the yarn should be the same, so carefully collect the threads.
If it seems to you that the finished rug will quickly lose its shape, then you can make the base of a dense fabric. Just sew them on to each other. Be sure to eventually tie the rug with additional rows to make the product look finished and beautiful.
Rectangular

A simple option, whose knitting we will consider step by step.
- In the first row, you need to knit a chain of double crochets of the length that the finished product should be. Then turn inside out.
- In the second, there are single crochets, the hook is wound under the front wall. When you finish the row, turn the piece over again.
- In the third, knit single crochets, the hook starts under the walls of the loops.
- The fourth duplicates the second row.
- In the fifth, return to the double crochets. The hook is also under the back wall.
Then simply continue the pattern from the second to the fifth row until you get the desired size.
square seat

A square can be knitted in the same way as a rectangular one, or you can make a more original color version. In this case, the knitting goes from the middle in a circle.
Make rows with single crochets under the front wall. In each row, add loops in the corners to get a square shape. In the second row in the corners, bring the hook under the air loops.
According to the same pattern, you can even knit a hexagonal rug, the main thing is to evenly add loops at the corners.
The diagram below will help guide you. If you do not follow it, then some difficulties may arise. For example, uneven expansion of the rug, bumps or depressions. Wrong proportions.

With tight knit

Very bright and interesting option that can be used to decorate a nursery. Of course, if you choose more calm colors, then such a seat will look beautiful in the kitchen or in the living room.
Please note that the yarn should be thick - from 5 mm. If you didn’t find one, then knit in two threads.
First, dial the chain, the length of the desired finished product. All rows are knitted with half-columns without crochets. You need to finish knitting when the length is equal to the width. The edges can be decorated with matching color or contrasting ribbons.
"Grandma's Square"

The essence of this technique is the constant alternation of threads of different colors. You can take five shades of the same color or five completely different colors. The choice depends entirely on your imagination, the main thing is that together they look beautiful and harmonious. Below we give a few schemes from this technique that will help you figure it out.

Please note that the yarn should not be very thick, as in the previous version. In this case, the finished rug will look rough, and the pattern is inexpressive. You can use acrylic or wool mixture, and take the hook one and a half times thicker than the thread.
According to this scheme, you can knit individual squares. Then they are carefully connected and get a cute and beautiful rug.


There is also an openwork version in the "grandmother's square" technique.

If you do not want to mess around for a long time and connect different elements, then you can knit a rug from one piece. The diagram shows this clearly. It can be used for both single-color and multi-color products. But the pattern looks more beautiful and expressive when using several colors or shades.

As you yourself saw, knitting a seat mat for a chair or stool is not difficult at all. In addition, it has a small size, so you can finish knitting very quickly. But the result will please and warm for a long time!
A person who loves to knit always surrounds himself with wonderful little things. The bed will not be left without attention - for it we will create a lovely bedspread or plaid. On sofas and armchairs - special capes. You can even knit charming covers. But this article will talk about a stool and a chair. And how to make them cozier with a hook.
Seats on a stool crochet: an overview of models
Let's get started and start with a stool. So, esteemed stools are found round and square. Accordingly, capes can be in the form of a circle or a square. And there are just no patterns for these capes. From the usual "grandmother's square" to fabulous openwork. Additionally, there may be bumpers that will fix the product.


Overview of knitted chair covers
 The abundance of new models of chairs, the presence of a clear frame, magnificent wood carvings and other charms of civilization do not exclude the need for an accessory. Remember the best English films - there is not a single event where the chairs are not dressed up. And how cozy would a cafe in your city be if you were greeted by such elegant chairs.
Of all the existing models of crochet chairs, only two types can be distinguished:
- whole;
- separate.
From what threads to knit chair covers
 For clothes on furniture, you can use various threads. But not desirable with a high content of wool. A very warm thread will be inappropriate in the summer. The thickness should be above average. There are no restrictions in color and cannot be. Creator - designer and magician.
Special attention to barbed threads. They can be used. As pharmacologists say, this place will endure everything (this is about drugs and injections). An exception may be highchairs.
Which hook is suitable for knitting capes on a stool
Furniture does not require a special hook. But the size must be greater than 3 in any case. It is better to knit in several threads, so any product will be stronger. Yes, you need to keep in shape. The main hook should be comfortable for the master.
Important! When knitting accessories for furniture, the hook should be selected strictly according to size. It should fit the thread. Loose knitting should not be allowed. If the hook is chosen correctly, then the canvas from it will always be strong. Ideally, the thinnest point of the hook should be exactly half the thickness of the thread.
Knitting seats on stools: patterns with descriptions
 A small selection of models with the most interesting ideas for home comfort. Basic models in different presentation. A convenient description, diagrams and a list of necessary materials will help everyone cope with the "difficult craft".
Square stool cover
Another revival of the "grandmother's square". It looks very charming on a wooden stool. The ease of knitting this pattern, its endless compositions - all this is very flattering to the masters.

For work you will need:
- yarn of different colors, 50 gr;
- hook number 3.

This product is created from small motifs. Each element should be done separately. Make squares as shown. Start at the center of the square. You can easily adjust the size of one square.
Important! All motifs must be square and strictly the same size.
The final touch in the work will be the assembly. The connection is made with a contrasting thread. The hook is inserted into the symmetrical loops of the edge of the squares and a connecting column is made.
Important! In order for the squares to fit snugly against each other and not to form waves, it is better to make the connection with a crochet one size smaller (than the one with which such motifs themselves were knitted).
Round cover with sides for a stool
It is most convenient to create a round case with single crochets. In addition, weaving with this pattern is much denser and thicker. For variety, you can combine several colors.

For work you will need:
- white yarn;
- hook number 4.

Knitting a lovely circle starts from the center.
- It is advisable to make the first loop like an amigurumi toy (it is called: amigurumi loop). This will result in a very dense center without a hole.
- Next, in the loop, knit the required number of single crochets according to the scheme.
- Lift loop and then knit single crochets with additions.
- According to the scheme, make as many rows so that the diameter matches the model of the stool.
- Further, several rows (depending on the thickness of the stool) without changes.
Important! It is better to make the diameter of the cape one cm smaller so that the product wraps around the seat more tightly. When the cape is ready, tied, you can use an elastic thread to go through simple connecting posts along the edge of the rim. With this approach, nothing will fly off the seat, along with the person getting up.
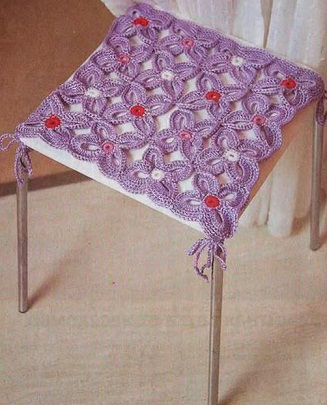
How to crochet a square stool rug
A square rug can be knitted in a circle, no matter how ridiculous it may sound. This model will tell you more about this.

For work you will need:
- thick yarn;
- hook number 4.
The diagram clearly shows how all the symbols lay down and formed a square. But the technique itself is knitting in a circle.
- Begins the product with several air loops. You can cheat and avoid the "hole" in the product. So, you will need to start not with a ring of air loops, but with an amigurumi loop.
- Further knitting occurs strictly according to the scheme.
- The additions go to four points - these are the corners of the square. That is why the figure is a square, not a circle.
Rug of an interesting shape for a stool
Capes with impossible weaves have always attracted attention. If you study the scheme closer, it is immediately clear that there is practically nothing complicated here. The colors of the rings are very original, matching, but with a frank contrast.

For work you will need:
- yarn of black, gray and white colors;
- hook number 4.
Yarn for such a cape should be of good quality, you can use natural fibers. It is important that the black yarn is dark without scuffs and other defects.

According to the scheme, you need to connect three rings of white, three black and three gray. Moreover, it is necessary to knit at a break: first white, then black, then gray. One important point - each new ring, its first chain of air loops (33 loops) should close the previous ring. The ring itself has only two rows of double crochets. Separately, knit the base for the rings according to the scheme. The collection consists in stitching two parts.
Important! The base is not rounded, therefore, when sewing, you should pay attention to the bends of the rings and the base.
Sewn, smoothed, slightly moistened and dried. These are the last verbs that will prepare the cape for the first exit and the covering of the chair.
Crochet chair covers: diagrams and description
Needlewomen and chairs did not bypass the attention. How beautiful they are with capes. It's just a celebration and why doesn't every home decorate their chairs with such exquisite knits. Even old wooden models with such wonderful capes can shine again. Several models for chairs that the master can make for himself and his loved ones. Description and diagrams accompany each product.

Crochet chair back cover
Charming and such bright chairs. This flower is just something. Lace adds tenderness. You immediately see a happy family in this house, rich in children's laughter. No one will refuse to have breakfast behind such a flower garden.

For work you will need:
- yarn of medium thickness;
- hook number 3.

The base is the colored fabric of the cape. It is made with pattern number 1. These are openwork elements. It is necessary to measure the back of the chair and the height. Knit the fabric along the width of the back and 2 heights. Fold the product and sew the side seams. Flowers to perform according to the above scheme in white.

After along the edge of the canvas, without pulling it too hard, knit lace.

It remains a little: moisten and dry, smooth the product. You can dress up chairs and drink tea.
Crochet Chair Seat Cover
Elegant seat covers. Capes with tassels. Each brush makes the product heavier, and it does not slip off the chair.

For work you will need:
- red cotton yarn;
- hook number 3.

Attractive models become even more attractive after studying the pattern. This is an ordinary sirloin mesh, on which lush columns (bumps along the diagonal of the figure) are further created. Two flowers, one in the center with rather lush leaves and a large flower. These flowers are created with single crochets. Therefore, they practically do not have holes. Separately create flowers and a grid, then sew on and you can decorate with tassels.
Important! The brushes should be heavy. You can put metal balls in the base of the brush.
One piece chair cover
Case in dark blue with a common ornament. A very comfortable product. Knitting is pretty easy. And this can be easily seen after reading the description.

For work you will need:
- yarn;
- hook number 3.

- Measure the width of the seat and back. In this model of the chair, these indicators are the same.
- It is necessary to dial the air loops of the required width.
- Next, knit according to the scheme - these are simple double crochets.
- It is necessary to knit the length from the hem along the seat, then through the seat, through the back and to the hem at the back. That is, the canvas should spread across the entire chair.
- Separately, cast on air loops equal to the width of the hem and knit three sides of the hem in the same pattern.
- Sew on sides and back. Here is the finished one-piece cape on the chair. Two parts and one long seam and the product is ready.
For the ornament, you can choose any pattern you like.

How to decorate a knitted cover on a chair and stool
 A pattern from the canvas itself, various flowers, lace and other borders (for example, tassels) can also act as decoration for the cover. Pompoms are often used.
You can use embroidery, but not with beads and not voluminous. Everything that is beautiful and soft is suitable to become an ornament.
 Getriks have become very fashionable and popular for decorating a chair and stool - these are socks on the legs of a chair. They will greatly complement the picture of the knitted fabric for the seat if they are also crocheted.
Not only the fringe around the perimeter of the cape is charming, but also various hanging knitted things.
 Beads and large beads can be used, as an exception, and only for the back of the back. It is she who serves as a great canvas for creativity. After all, the body practically does not come into contact with this part. It could be a huge bow. Moreover, the bow itself can be made of a single-colored fabric, or just suitable for a knitted product in color. The most interesting thing is that you can tie the bow yourself with the same crochet. Such a small tool, but ready to do both big things and big things. Do not forget about the limits, or you can spoil the canvas with unnecessary details. Everything should be in the same style. No need to sculpt from each style for a fashionable little thing.
Perhaps someone likes bows or something from ribbons. Why not. After all, this is a matter of taste and the designer here is the creator himself.
Crocheted capes are widely used in everyday life, as this thing is quite practical and can decorate any home interior. Seats for chairs or a crocheted chair are a very simple and necessary thing. It is worth noting that when making the cover, it must be taken into account that it must fully correspond to the shape of the seat of the chair or stool on which it is made.
Before proceeding with the manufacture of a round-shaped cover, it is necessary to prepare the yarn. In this case, you can use all sorts of shades that harmonize with each other. For example, for a chair where the seat diameter is 35 centimeters across, you will need to knit with 3 skeins, at the rate of 110 grams per 50 meters, of the main flesh-colored yarn. And also 1 riot of other 14 colors. If you use fewer shades, then in this case you need to purchase 2 skeins of threads of 7 colors. For knitting the product you will need a hook, the thickness of which is 3 mm.
Cape knitting pattern
Crocheting a chair cape for beginners is best done using patterns. They describe the principle most clearly. Having prepared yarn and tools for work, you can start knitting a cover for a stool with your own hands.
Detailed description of the process of making a knitted chair cape:

petal pattern
You need to make the petals for the rug for the front half loops. Description:

Thanks to this scheme, you should get an excellent cape on a stool. It is worth noting that such capes on stools resemble a rather beautiful bright flower. Moreover, these covers are able to create a warm and pleasant atmosphere in the house. In the same way, you can knit a bedding, two-color pillows.
Chair cover with square seat
 A square chair cape can be knitted from leftover yarn. The main requirement for crocheting rugs for chairs is that the same threads, preferably in light colors, are enough for the sides of the cover being made. Also, to complete the work, you will need a hook, the thickness of which should be 4 mm. The peculiarity of the cape is that that it is formed from intertwined knitted, multi-colored stripes. Moreover, the strips for the rug are knitted quite simply, namely with double crochets.
Stripes are knitted from yarn of different colors. The number of strips is determined by the size of the seat of the chair or stool on which the cover is knitted. Mostly 22 strips are used.
Having prepared all the blanks, a canvas is laid out from half, which must be tied on one side along the edge. Tying is done with a column without using yarn.
The remaining strips should also be laid out in the canvas and similarly fastened along the edge on one side. After the procedure, fragments from two panels should be interlaced in a checkerboard pattern, resulting in a continuous canvas of multi-colored squares. The resulting product must be tied around the entire perimeter with columns without knitting a crochet. Having received a solid rug, you should lift with the help of 2 air loops, continue a new row with double crochets. To prevent the cover from slipping on the seat of the chair, it is recommended to knit tightly enough, and you do not need to add columns in the corners.
 Having tied the cover around the perimeter, you need to knit another row, the last one, with small arches, this is done like this 3 air loops, 4 columns without using a crochet, and so on until the end of the row.
You can decorate the resulting cape with a fringe. And also the design of the cover can be different, for example, not 11 strips, but 4 canvases can be used for joining.
The rugs and capes made of hexagons will look original on the chairs. For the manufacture of such covers, as in the previous version, you will need the remnants of multi-colored tones of yarn and a hook, the thickness of which should be 4 mm. For tying, you can use both multi-colored threads and plain ones. The principle of operation is to interconnect previously prepared round parts and semicircles. Using thread and a hook, you can create a unique rug for the seat of a chair or stool. The main thing is to have schemes in front of your eyes, and desire in your head.
Beautiful two-tone stool cape for an unusual and stylish decor
Do you want to update the interior, add new shades, want to quickly cover up slightly worn furniture? You just need to knit or sew the item with your own hands. Hand-made products will help to give the atmosphere an individuality.

Crocheted stool cover “Chamomile”
We all have in the house or cottage (where boring or outdated furniture is usually brought) a couple of stools that move further away or are pulled out of the pantry when a lot of guests come and there are not enough seats. I'm tired of their appearance, but they are strong, it's a pity to throw them away. In such a situation, there is an original way out - to make a crochet cover for a stool.

Knitted cover for a stool for the kitchen with your own hands

Bright handmade wicker seat mats

A set of identical covers for stools, made by hand
Almost always in the house there are leftovers of yarn of different colors, the more, the more elegant and brighter the cover will turn out. If there are no unnecessary balls, you can buy yarn. Such a stool will ideally "fit" into a rustic, country interior. It will create the feeling that you have come to visit your beloved grandmother.

Knitted covers for stools of different shapes in the same style

Knitted round seat covers
Even a beginner in needlework can knit such a cape. The main thing is to learn how to knit simple elements of the pattern, which are made from air loops, simple columns, columns with loop loops. There are many instructions on the Internet, follow them and you will succeed.

Beautiful chair covers using an African flower knitting motif

Square cover for kitchen stool
For a crochet stool cover, it is best to use thick acrylic yarn and a large crochet hook. The thing will turn out to be voluminous, softer, it will be a pleasure to sit on such a stool.

Do-it-yourself voluminous cover for a stool

Airy and lightweight case with floral design
Knitted stool cover: basic methods

Different types of knitted chair covers
The easiest ways to knit a cover for a round stool.

Square seat options

DIY square stool covers

Crochet stool cover: patterns

Crochet pattern for a round stool cover
To make the product beautiful, you must strictly adhere to the scheme. Only then can we talk about the successful receipt of the desired result. Following the instructions, you will not only knit the cover yourself, but you will not remake it.

Knitting pattern for a cape for a square stool
Such funny covers, in addition to beauty and mood, are of practical use. They protect the seat from wear and tear, give comfort to the seated person, are easily removed and washed. The ability to own a crochet gives endless possibilities in creating beautiful, exclusive things for your home.

A simple scheme for a square case that even a beginner can handle
Having mastered crocheting and knitting for a start a simple cover for a stool with your own hands, you will forever remain a fan of this craft. You will definitely want to continue mastering super-complex patterns, making masterpieces to please yourself and your loved ones.

An interesting pattern for a knitted cover

A beautiful set of leftover yarn, made using the freeform technique
Video: DIY Cape for a chair. Crochet
“Knitted rug” - this combination of words sounds rather doubtful at first glance. But after carefully looking at the finished products, there is a desire to repeat. Such rugs will look especially appropriate, for example, in a nursery or bathroom. Crochet technology makes it possible to create many useful things, from a blanket and a blanket to handbags and jewelry. Crocheting a chair rug is easy. This will be possible even for beginner needlewomen. There are many options and schemes, different in complexity of execution. Before starting work, we advise you to familiarize yourself with the recommendations of masters with experience.


In order for a knitted product to serve for many years and please its owners, you should take care of the yarn. For work, it is better to choose synthetic yarn, for example, acrylic or cotton with the addition of synthetic fibers. For the crochet process, it is recommended to use threads that have a thicker thickness. This is necessary in order for the rug to be dense and warm. Accordingly, you need to choose a larger hook. Before starting work, you need to knit a sample, a small square, wash and iron. This technique will help with determining the size of the finished product. When the sample dries, you need to measure it and, making up a simple arithmetic proportion, calculate the number of loops that is necessary to obtain a rug of the desired size.
You can choose any knitting pattern. The main criterion is its attractiveness. You can even use the scheme for a napkin, or any other one you like, as well as use the diagrams and descriptions below.

From small remnants of yarn of different colors, you get a rather attractive and interesting rug. This technique will allow you to use the accumulated remnants of the threads, which are a pity to throw away, but you won’t be able to knit anything from them. But it is worth remembering that the thickness of the thread should be the same over the entire surface of the product.
In order for the product to serve longer and retain its appearance, you need to make a base made of dense fabric for the future rug. If the rug turned out to be of insufficient size, the situation can be quite simply corrected with a border. Around the perimeter, the rug must be tied with the required number of additional rows.
In order not to have to dissolve the knitted rug and redo part of it, you need to carefully follow the icons on the diagram.


Rectangular variant
Knitting is performed in the following order:
- the first - we knit a chain of columns with crochets, a length equal to the length of the product, and turn it over to the wrong side;
- the second - we knit a row of single crochets, winding the hook under the front wall of the loop, and turn it over again;
- the third - we make columns, but already without crochets, winding the hook under the walls of the loop;
- the fourth - knits in the same way as the second;
- fifth - now we knit double crochets, winding the hook under the back wall of the loop.
To continue, you need to repeat the pattern from the second to the fifth row.

Round pad
A round-shaped rug will have a beautiful look, even if you make it from rows of posts, winding the hook under the back wall.
The principle of knitting is quite simple. In the second row, we perform two columns from the loops connected in the previous row. And in the third row we add loops in every second column, in the fourth row in every third column and so on. By analogy, we knit the remaining rows until we get the product of the required size.


square seat
A rug in the shape of a square can be made using the same techniques as when knitting a rectangular one, using reverse rows.
Or you can make a more interesting option, for example, knit from the middle in a circle. Rows can only be made from single crochets under the front wall. To get a square shape of the carpet, you need to add loops in each corner in each ore. In the second row in the corners, the hook must be brought out from below the air loops. By this principle, you can make a rug of a rectangular or hexagonal shape. The loops should be divided evenly, when knitting, add loops in the corners. Focusing on the diagram, it will be easier to knit a rug of the required size and shape.
If you do not follow the scheme, then difficulties may arise: the fabric will expand unevenly, the appearance of tubercles or depressions on the surface, a mismatch in the proportions of the knitted product.