A street lamp crafted from Kinder surprise eggs. Crafts from kinder eggs: what can be done from a container
Hello dear friends and blog readers! The New Year is coming very soon, there are only a few days left, and for a week I have been thinking about what to give the children on this magical holiday. What to make a New Year's gift so that the children are delighted and remember for a long time?
Of course, we will give toys and sweets, but the children play with new gifts for the first days, at least mine, and then they are safely stored on a shelf, from time to time moving around the apartment with the help of small hands. Based on the recently passed birthday, in a month or two they will completely forget what present they were presented with for the celebration, although the toys were long-awaited and desired.
My thoughts, as I mentioned above, have been going on for two weeks for sure, “What to give as a gift?” and then the Universe heard me, an SMS comes from a friend:
- "Hello! Look what I did!!"
This is Kinder made of papier-mache, and inside it is hollow, a door is cut out and this huge egg is filled with a gift or sweets.

Hooray! Now I know how to surprise and delight my kids! They will be delighted! Especially the eldest daughter, she loves these chocolate eggs and traditionally Grandfather Frost Kinder MAXI hands her under the Christmas tree or personally into her hands, and here it’s not just a maxi, here is a Giant Kinder!
I didn’t wait until I completely made my kinders, since it takes 3-5 days, I want to tell you right away! Suddenly, you, like me, are racking your brains on what to give a child to make it unusual, memorable. I found master classes on the Internet, I do them myself and share them with you. In fact, everything here is easy and simple, everyone can handle it! So let's get started...
We make in stages a large Kinder Surprise from paper with our own hands
Huge Kinder is the embodiment of a dream and delight for every child! They are especially loved for the surprises that are hidden inside, and we can fill this egg with those gifts and sweets that your child loves the most. The shell or shell is made using the papier-mâché technique, I think every parent got acquainted with this technique at school, so everyone can create this masterpiece!

We will need:
- Balloon -1 pc.
- Paper (A4 form, newspaper)
- PVA glue
- Starch or flour for the paste
- Paint Gouache
- tassel
- Printout with an inscription
Manufacturing process:
- As you probably already guessed, our Kinder is made of paper and a balloon, we will glue the balloon with paper. As glue, you can use PVA or paste.
Important! To prepare a paste, mix Art. a spoonful of corn starch, with 2 tbsp. spoons of tap water, mix so that there are no lumps. Then pour the mixture with half a glass of boiling water, mix and put the dishes on the fire, stirring continuously until our paste thickens. We take it off the fire. stirring persistently, cool and that's it - our paste is ready!

I use PVA glue, previously diluted with a little water.
2. We inflate the balloon to the size we need, tie it with a thread so that after we can untie it. We put it in a bowl or other container, for the convenience of working with it.
3. 1st layer - paper + water. We cut the paper into small squares or strips, dip them in water and glue our ball over. You need to do everything intensively, since the water dries quickly and the leaves will simply peel off.

Important! Paper can be replaced with newspapers or magazines, and only the last layer can be pasted over with white!
Thus, we glue the entire ball and let it stand for 5 minutes and dry.

4. We already glue the next layer on PVA glue or paste. We glue our ball with glue and glue the second layer of paper.

5. Then generously coat the third layer of paper with glue and glue and leave our egg overnight to dry thoroughly.

Important! Glue should be enough to soak the paper well!
I left the ball to dry near the battery in a container with holes. You can dry it by tying it to a rope, but I found reviews - that when the ball hangs, wrinkles may appear during the drying process and did not take risks.

7. The next day I again glued 3 layers of paper and now my kinders are drying out, although they are quite strong and perhaps 3 layers would be enough.
8. The next step is to paint our craft. Immediately paint the lower part in red, after drawing the waves with a simple pencil, and then the top in white. You can paint with gouache, acrylic paint or water-based emulsion

Important! Add a little PVA to gouache so that the paint does not stick to your hands and does not crack when it dries.
9. Then you need to glue the inscription or draw the letters yourself. The easiest way, of course, is to print it out, you can print it in color or in black and white, and then color it yourself, so it will turn out the most realistic. Or attach a white sheet to the monitor and circle the letters.
For you, I will leave the inscription in 2 versions, and you choose the one that is convenient for you:
- in color

- black and white

10. Now you need to cut each word and glue it separately.

11. This is how the Kinder ends up

12. Now you need to make a door in the egg and fill it with a gift. We cut it out with a stationery knife of a square or round shape, for beauty you can tie it with a ribbon.


Or you can completely carefully cut off the top of the kinder, this is already at your discretion.

As a result, we should get such a large egg:

Doesn't it make for a great gift, doesn't it? It can be presented for the New Year, for a birthday, and for any occasion! And you can also make a kinder personalized, stick your child’s favorite cartoon characters on it, write a wish and in a word there is a place for fantasies to roam!

You can make not only a kinder, but also a big mmdms or a smiley.

And so that the crafts are not matte, you can give them gloss with varnish!
Giant egg made of paper and plaster - New Year's gift 2018
Every child will be delighted with such a New Year's gift, without a doubt! And if you fill it with your favorite sweets and surprises, then the joy will be doubly!
We already know how to make a huge papier-mache kinder surprise, but how to give it strength, make it smoother? Gypsum, putty or self-hardening clay will come to our aid.

Initially, we need to glue the balloon with paper as described at the beginning of the article. We glue in three layers and give time to dry well. Then, when the balloon is completely dry, you need to burst the balloon and pull it out through a small hole. Then this hole also needs to be sealed. Here's what should happen:

Next, you need to prime the egg - apply a uniform layer of gypsum or putty on it, completely covering the papier-mâché. All irregularities will then be sanded with sandpaper, you should not pay attention to them at this stage.
When the plaster or putty dries, this process will not take much time, since these materials dry quickly, you need to make a hole for gifts, in the form of a door that will be removed. You need to cut it with a clerical knife.

In order for the door to be removed, you need to glue a magnet into it and glue it with paper on top in several layers. We glue the cardboard into the base, a magnet on it and also glue it with paper using PVA.

After making sure that the lid is tightly held on the magnet, you need to sand the egg and the door with large sandpaper, in this way we will make the kinder smooth.

After the egg was sanded, depressions and pits became noticeable, you need to re-apply gypsum on the deepest ones, wait until it dries and sand it again with fine sandpaper.

The next step is painting. We paint the egg white with acrylic paint, forget about the door, magnets and gaps. Then, on the bottom of the egg, you need to make waves and paint it red. We print the inscription on a color printer and cut out each word, then glue it on the egg.
Here's what should happen:

Perfectly even Kinder is ready! Is it really similar to the real thing?
Mega big Kinder from chocolate at home
We already know the technology for making a giant paper kinder, and now let's look at how to make it from chocolate. Yes, yes, you heard right, you can make an egg like a real kinder and let's look at how ...

Required Ingredients:
- Dark chocolate - 10-15 bars,
- White chocolate - 5-7 bars,
- Balloon,
- Cream injector
- First of all, you need to rinse the balloon well and dry it with a stream of warm air with a hair dryer so that the balloon is dry on the inside.
- Next, you need to melt the chocolate in a water bath, pour 1/3 of the water into the pan and put on fire. Grind the chocolate into pieces, transfer to a deep container and put on a saucepan so that the chocolate begins to melt. In the process, you need to stir it until it becomes homogeneous without lumps.

3. The chocolate should cool slightly so that it is not hot, but not too cold - it has a viscous consistency.
4. Now, at the confectionery syringe, you need to unscrew the tip (cap) and carefully put on the balloon. Then take out the piston and inflate the balloon to the desired size, twist the tail for a while so that it does not deflate.

5. Spin the ball, fill it with chocolate through a syringe using a spoon.

6. When all the chocolate is in the ball, we tie it up and begin to slowly rotate, tapping a little, so that all the walls of the ball are completely colored. We turn the egg vertically, the remaining chocolate will drain down to the bottom and the kinder will become stable.

7. Congratulations! The hardest part is over. Now the ball needs to be sent to the refrigerator so that it freezes properly. After about 1.5 hours, the egg must be removed so that the chocolate does not begin to melt, put on rubber gloves.

8. To make the second layer of white chocolate and fill the egg with a surprise, you need to put a deep plate on top, draw a notch line and carefully cut off the top.

9. Remove the ball.

10. Now we coat the inside with white chocolate, and send it back to the refrigerator.

11. For the second time, we take the egg out of the refrigerator, if desired, put a surprise in it and use a heated knife to draw along the edge, the chocolate will melt and firmly connect to the top.
Inside the chocolate kinder you can put a gift, sweets or real kinders.

12. The seam can be filled with chocolate from a syringe, and wipe off the excess.


13. Perfectly even, smooth kinder surprise is ready! Such an unexpected gift will pleasantly surprise and be remembered for a long time!
And to give it authenticity, you can make the original packaging. To do this, cut out two ovals from the foil so that there is another 10 cm of free edge. Draw a wave from below and paint over with a spray can in red, then covering the painted part - paint the foil white. Do the same with the second sheet. Then put the egg in the center on the bottom sheet, and close the second one on top, carefully connecting the edges. Print the inscription on the printer and attach with glue or tape.


Now the giant chocolate egg is ready! I can’t believe my eyes that you can create such a huge kinder at home!
Video plot on how to make Kinder Maxi in stages from chocolate
This is a master class on making a large chocolate egg, or as it is also called Kinder maxi. A cool gift for any holiday in which you can put an individual gift. However, it is worth the trouble to make it, but it's worth it!
By the way, this egg can be put into a paper kinder! Great idea, isn't it?
I hope you liked the idea with homemade kinders, please write in the comments. Would you like to make such surprises with your own hands?
That's all for you!
Until new posts!
Frankly, I adored these chocolate eggs as a child. The figurines were so cute, and a sweet souvenir was given only on special occasions ... Now parents have much more opportunities to please the baby with Kinder Surprise than in those distant 90s.
The ideas presented are for adults, not for children! Justice triumphs, a super-use for yellow plastic capsules has been found. From the first idea I'm crazy! By the way, who else does not know why he is yellow? The container is the yolk of the egg!

Crafts from Kinder Surprise
Practical Ideas
In a plastic testicle it is convenient to carry earphones. They will not get tangled and will also be protected from moisture in a sealed package!

You just need to drill holes in the miracle container, and the container for storing toothpicks is ready!

Great tip for travelers! If you cut a grater from the side of a matchbox and glue it inside a plastic egg, you get a waterproof box. We put matches inside and go hiking!

We make a hole in the bottom of the capsule with a drill.
The cover for Chupa-Chups is ready! In case the cub decides to save the treat for later: the candy will patiently wait in a sterile environment without hairs and dust particles. Crafts from Kinder Surprise eggs will become your child's favorite little things, there is no doubt.

Making a bigger hole...

The toothbrush case is ready! This is something really needed.

Tiny holes can be made with a needle. The result is a brightly colored salt or pepper shaker that's easy to take with you on a picnic!

By gluing the sharpener inside the capsule and making a hole equal to the diameter of the pencil from the bottom, you will make a sharpener with a sawdust box! Here's what a useful thing you can do with your child.

DIY crafts from Kinder Surprise so useful at home! But the capsules themselves are a godsend, it is convenient to store spices, beads, beads, various little things that can easily be lost in them ...
Chocolate eggs with a toy inside have delighted children and adults since 1972. To get your own original "surprise", you do not have to wait for every seventh egg. It's enough just to work with your own hands!

If you are fascinated by these ideas, show them to your loved ones. By reusing a plastic capsule, we are doing a good deed and helping the environment!
Crafts from containers, not all children will be able to do, for example, absolutely kids are not capable of this. But many crafts are designed for them, in order to save the budget. You can create baby slings, rattles, garlic pendants.
garlic rattle
During infectious viruses in kindergartens, you can protect your child by making such a wonderful pendant. And before he goes to the garden, hang it around the baby's neck. For the pendant, you must have a kinder egg, a colored cord, accessories for jewelry, scissors, a needle with thread and an awl.

The box is pierced with an awl in various places, and the top is threaded with a colored cord. Do not forget to put garlic inside, and for decoration, you can add beads or other details. Tooth should be changed at least once a day.

Slingbuses
Safe and versatile beads are made by hand from kinder and yarn. For manufacturing you will need:
- threads of different colors, cord and hook;
- containers from kinder, awl, needle and thread;
- an awl, scissors and a variety of beads, stones and cereals.

In each box from under the kinder we place cereals, beads and pebbles. The number of boxes depends on where you are going to hang the beads: a lot for a stroller, less for a game. The string is threaded through two sides of the boxes, it is important to secure each one so as not to break it.

Locomotive
One of the varieties of the slingbus is a train, the creation is identical. The difference is the whistle sewn into the locomotive, as well as all the details are sheathed with multi-colored threads, we sew on buttons instead of wheels. The child will be delighted with such a locomotive, which can become a flower teacher.

Kindergarten crafts
Crafts from kinder eggs are created not only for very young children, but kindergarten age is also suitable. Here are some options:
Creating a minion from plasticine and kinder according to a pre-printed picture.

1st option. Prepare an egg carton for him, and with plasticine he can make eyes, pants and other accessories. In this way, you can make not only him, but a dog, a cat, a frog and other animals.

2nd option. We make hair out of wire, create a couple of holes in the lid and skip pieces of wire. On the inside, secure the wire with paper or glue. For the eyes, you can use pill packs by placing a black bead inside. Pants can be created from plasticine or sewn from a piece of fabric. From plasticine we create a frame for glasses, legs, hands and gloves with boots.

Making fish from multi-colored wrappers and kinder, a hole is made in it at the top and a loop is inserted. The loop will help to hang the toy on a Christmas tree, a chandelier or any other place. A hole is made under the tail in the back of the box, a candy wrapper is inserted. The fins are made according to the principle of the tail, only connected at the point of separation of the container parts. Two eyes are attached to the body, made of shiny paper with black pupils.

Creating massagers, an example, as a birthday present for grandma. Use several egg containers connected in a row tightly with string. A cord or ribbon is stretched on both sides, forming beads. Pens are made from toilet paper rolls, rolling pins or plastic bottles.

Funny piggy bank penguin
If you are tired of storing small details in ordinary boxes, then go ahead to create a fun penguin. For it, you will need acrylic black and white paint, wire, an awl and lace. Create a semi-circle with white paint on the bottom of the container, this will be the stomach, and after drying, cover the rest with black.

It is not difficult to draw a muzzle, a couple of dots-peephole and beak. Make a loop by pulling it through the lid. This craft can be used not only as a piggy bank for things, but also as a Christmas tree toy.

Double massager
To create such a tool, you will need about 20 boxes from the same size kinder, fishing line, ribbon, scissors and an awl. Poke holes in each box on both sides and thread a fishing line so that they can rotate. Handles from the tape are placed on both sides, we make two rows of containers, we connect the rows crosswise with threads.

Striped worker bees
A very beautiful and cute craft - a worker bee, it can be used as a children's toy and as a decoration for your garden. The proposed option is not the only one for creating such bees. The number of containers from Kinder Surprise is determined by the number of desired bees. Prepare fishing line, thick cardboard, dark fluffy wire, glue and marker.

The creation process begins with the wire wrapping of the main part - the box, making 3 circles. We make paws from the wire that sticks out from the extreme circles, and from the central one - a very long mustache. We make the face of our funny bee with a marker. We use cardboard to make honeycombs by rolling it into a tube and bending it along the ribs. We cut the pipe into several rings and get honeycombs to which you can glue bees.

For schoolchildren
Extraordinary little men
In this toy, in addition to kinders, bottle caps are used, it is necessary to work with a thick strong rope. Covers with boxes, with holes made, are put on it. Feet and hands, head and torso are made of containers, and the limbs themselves are made of covers.

Christmas gnomes
Kinder eggs will be very useful during the New Year holidays, because there are just a huge number of crafts. You can make a toy of a mischievous gnome, whose hats you will make from threads of different colors: knit or a bunch of them. On the main container we depict a funny face, we attach the prepared hat to the top. In order for the toy to be hung on a Christmas tree or somewhere else, attach a loop.

Delicious bright berries
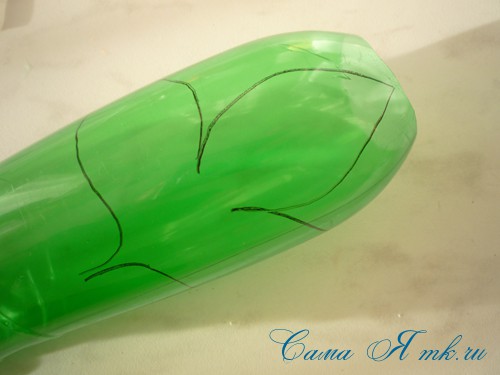
Such years are not easy to distinguish from the real ones, plucked from the garden. They will delight you with their fruits both in winter and summer. You can install them in the house, and in the garden, and on the site. Here is the full will of your imagination. Prepare a couple of boxes, wire, a green plastic bottle, an awl, scissors, glue, marker and red paint.

Take the paint and apply it to all the egg containers, and while they dry, take care of the leaves. We wrap the wire with cut strips from bottles, a candle will help. We cut out the sheets from the same green bottle, you can cut it yourself, or you can use a template. Draw dots on the dried berries, and now we will assemble the entire constructor. The berries are fixed on the stems, after making a hole with an awl, insert the wire into it and fix it with glue inside.

Goldfish from ribbons and sequins
A beautiful craft can be used as a New Year's item, or you can use it as a detail to decorate the decor. For the fish you will need:
- container from kinder;
- colored ribbon and three beads;
- eyes, sequins, decoration;
- fishing line, needle and glue.

We make the tape in the form of a spiral using scissors, after which we collect it several times. A hole is made in the container on one side, a fishing line with a bead is threaded from the inside (the action is carried out 4 times), and a tail is obtained. We glue the body of the fish with sequins, and after drying we glue the eyes, nose and mouth. You can also come up with your own additional decorations.

Now you understand that it is very simple to come up with a use for Kinder Surprise boxes. And from simple, empty and unnecessary containers, you can create insanely beautiful and interesting crafts and toys. With these instructions for creating toys, every child can handle.

When you are engaged in the creative process with your child, you get closer to him. The child understands that he is not indifferent to you and he becomes interested in you. Classes with small details contribute to the development of fine motor skills, develop children's creativity, imagination and thinking. And most importantly, this creative process is fun and exciting.
A very cute craft can be made from a green plastic bottle and containers from kinder surprises. It will be almost a real mouth-watering strawberry that can decorate your home or summer cottage. A whole bush of such luxurious strawberries with berries and flowers looks beautiful.
To make crafts, we need a lot of things:
- wire,
- cases from kinders - 5 pieces,
- green plastic bottle - 1 pc,
- scissors (for leaflets you can use curly scissors),
- acrylic paint in red, black and yellow,
- brushes for applying paint (medium and thin),
- green insulating tape
- some styrofoam (so that it fits snugly in the pot you are using),
- small planter pot or any suitable jar,
- some green sisal
- candle,
- pot decor - optional.
So, let's begin:
To begin with, I prepared a pot for planting our strawberries, which can be arranged in any way possible. First, place a piece of foam inside and decorate. I decorated with jute rope, for children's crafts you can use corrugated paper and other suitable materials.

Each container from Kinder Surprise must be pierced with scissors or an awl and a wire inserted into this hole, which needs to be bent a little.
We close the container and so all 5 pieces.
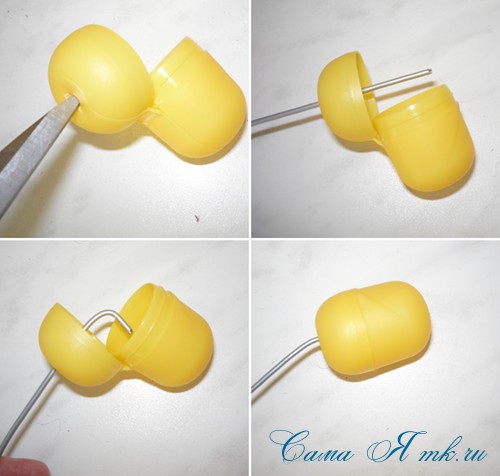
Here are some preparations...

Painted with acrylic paint...

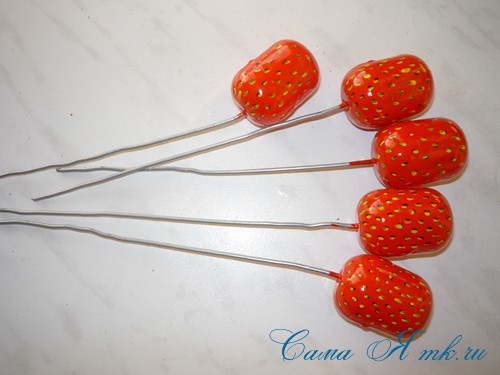
Leaves must be cut with cuttings to make it easier to strengthen them on the stem.

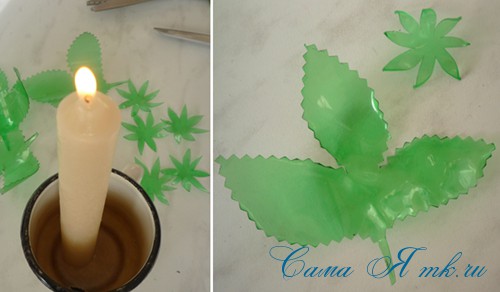
Sepals and leaf blanks can be slightly heated over a candle so that they are slightly deformed and take on a lively look.
We pierce the sepals with an awl or scissors in the center and put them on the wire to each berry.

Then, with a green insulating tape, we wrap the stem-wire in a spiral, attaching the leaves. Insulating tape can be replaced with corrugated paper, teip tape or green yarn.
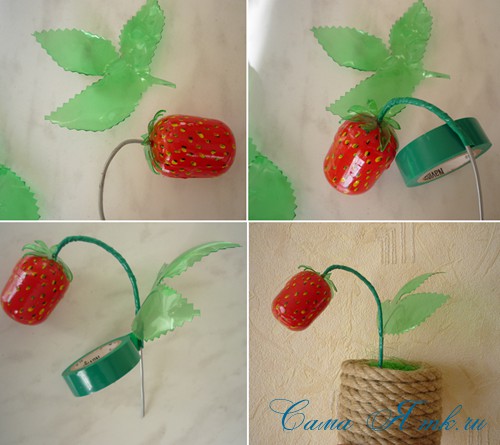
From such blanks we make a bouquet, piercing the foam plastic in a pot with a wire.
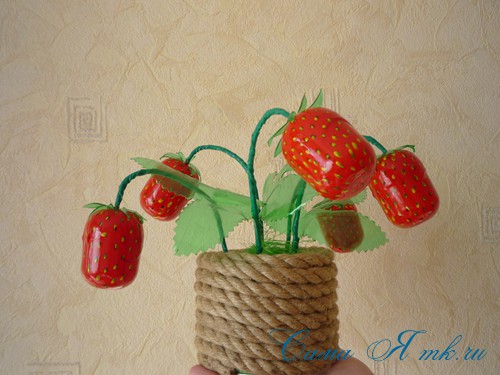
For beauty, add a few flowers.
They can be made from any material at hand, I have white felt and ready-made centers for flowers. You can use a white bottle or yogurt jars. As a middle, we also use any suitable material, you can even cut it out of a bottle and paint it with yellow acrylic paint.
We fix the flower on the wire ... Depending on the material used, the wire can be slightly bent at the tip, glue the middle on top of the glue for a moment. We wrap the stem-wire with electrical tape and plant it in a pot.
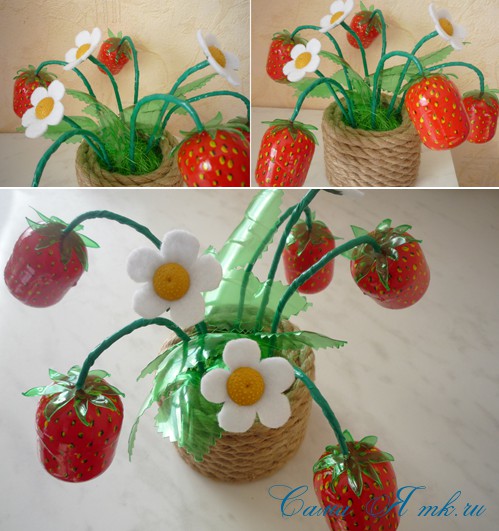
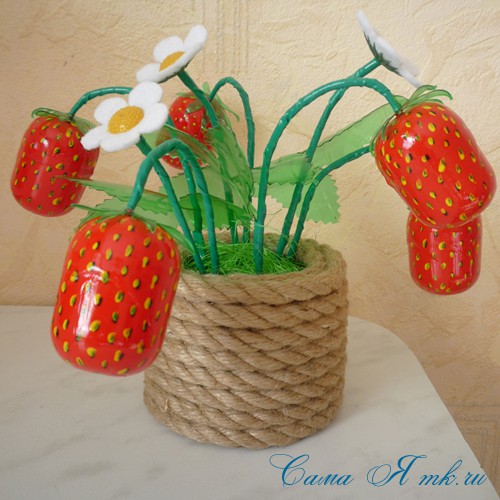
An attractive strawberry bouquet of kinder surprises will look good both in the interior and on the backyard. And it can also become a wonderful handmade souvenir gift, for example, by March 8!
Create with pleasure!
I was glad to help!
Natalya Borodkina
The master class is designed for children of preschool age.
This master class will be of interest to teachers and parents.
Tasks:
Arouse interest in manual labor through work with waste material;
To develop fine motor skills of hands, artistic and creative abilities in children.
For work we need:

Colored paper, with printed butterfly and bee wings
Scissors
Decorative fluffy wire
Pencils or markers
Capsule from a Kinder Surprise toy with pre-drilled holes. (for a spider, 8 holes on one side - these will be paws, for the remaining 6 holes on one side and 2 on the opposite side - antennae)
Finished eyes for decoration
Colored self-adhesive paper
Double-sided tape
Let's make a spider to start:

1. Insert the wire into the hole for the paws and fix it inside

2. We form the wire in the position of the legs of a real spider

3. Cut out the mouth from self-adhesive paper and glue it under the eyes
4. Using double-sided tape, attach the eyes
Our spider is ready!

With the acquired skills, we can easily make a butterfly:

1. We cut the wings along the contour, if desired, they can be patterned with felt-tip pens

2. In the capsule on one side we have 3 identical wires (paws, the end of the wire is inserted into the hole on the capsule and released into the adjacent hole

3. On the other hand, in the same way 1 wire.

4. From the ends of the wire we form antennae and paws.

5. Glue the eyes, mouth and wings.
Our butterfly is ready!

Such insects can decorate indoor plants, and if you make more holes on the capsules and cut garlic there, you get a wonderful amulet against acute respiratory infections.
Related publications:
While you are preparing dinner, or is your wife doing it and you need to take the child here in the kitchen? Take plastic containers of Kinder Surprise.
Master class on making crafts "Chicken in an Egg". This craft will be relevant during the Easter holidays and not only. I want.
Purpose: to teach from waste material, to create beautiful crafts. The craft is easy to manufacture and does not require special costs, older children.
Hello colleagues! This week we had the theme "Animals of the Arctic". And on this topic, the children and I performed a very interesting craft.
Christmas tree "Surprise" Kinder surprise - who does not know this chocolate egg wrapped in thin foil that has captivated the hearts of children for many years.
Tasks: 1. Development of skills to see a common feature of objects, the ability to distinguish and group by color (red, blue, yellow, green) ..