Maple leaf origami: step by step instructions. Autumn Origami: Best Tips for Masters of Different Ages Origami in elementary school on an autumn theme
The article presents a variety of paper accordion leaves, templates and step-by-step instructions for creating a particular sheet. Such leaves can be in very different colors, for example, if they are timed to coincide with autumn events - it is better to use colored paper in yellow, orange and red colors, for spring - leaves of light green and green shades would be a good option. Even for winter celebrations, you can make leaves from silver or white paper.
For work you will need the following materials:
- Colored paper of a variety of colors suitable for leaves;
- Scissors, glue stick, simple pencil.

Paper accordion leaves step by step: 8 options with templates
1 option. Maple leaf paper accordion

You will need yellow or green colored paper. Cut off an arbitrary rectangle from it.

Fold it in half.

Redraw or print your template. Cut it out and attach it to the colored paper folded in half, keeping in mind that the straight long side on the template falls into the fold.

Circle with a pencil. The fold is on the left in the photo. And in the future, all the steps presented with paper folded in half will be folded to the left.

Cut out the blank, carefully cutting off all the wavy lines.

Now open it. You should get a similar detail, with symmetrical extreme sides.

At this stage, it's time to make a paper accordion. It is better to start from the bottom, widest side. Bend a small fold, no more than 7 mm wide, but extending over the entire sheet area. Carefully press, and then bend the same fold in the other direction. Repeat this process until all the paper has turned into an accordion.

For convenience, turn the harmonica with the long side up.

Find the middle and fold in half. Press well, especially around the bottom fold, and glue the inner sides together. In the photo, this area is shown by arrows.

Depending on the structure of the paper, sometimes it becomes necessary to glue two or three lower folds of the sheet. Most often they diverge in very thin paper. Dense holds well all the folds together and without glue.
The accordion paper maple leaf is ready, straighten its folds and glue a thin stem.


Option 2. Autumn sheet of paper accordion

Of course, it can be not only autumn. If you make it from green paper, the leaf will be quite spring or summer.
To create it, you also need a piece of rectangular paper.

As in the first option, the paper needs to be folded in half.

Then you should use a template or draw a simple zigzag line that resembles one part of a Christmas tree. 
This line should start at the fold of the paper and end at the bottom of the paper.

Cut out the pattern obtained using a template or your own efforts.

Open up the sides.

Make small folds, length from one side to the other, and 5-7 mm wide. If the sheet is large or the children are small, the folds may be larger.

The accordion is made, for convenience, turn it over with the wide side up.

Mark the middle and carefully fold in half. Press down, especially at the very bottom.
Apply glue to one of the inner sides and glue them together. In the photo, this area is shown by arrows. If necessary, glue a few folds at the very bottom of the leaf.

In the end, straighten the sheet with an accordion a little and glue the petiole, which is a thin strip of colored paper from which the sheet itself is made. But such a stem is not strong, it can only complement the leaf, and, for example, gluing leaves to a homemade tree will not work. It is better to use colored cardboard for these purposes, or colored paper twisted into a flagellum and threaded through a hole in the bottom of the sheet.

3 option. Oak leaf from paper accordion

The outline of this leaf is similar to an oak one, only the longitudinal folds impair this definition a little. But as a variety, this version of the sheet is also useful, especially in those works or events where you need a lot of leaves of various shapes.
Cut out a square from paper.

Fold it in half, the fold is on the left.

Use a template or draw large waves yourself, starting from the side of the fold and reaching to the bottom side. 

Cut the part through two sides at once, but without touching the left. She must be whole.

Open the paper.

And, as always, make thin folds starting from the widest part of the paper. Gently fold all the paper into an accordion, one fold in one direction, the next in the other. For convenience, the paper can be turned over during operation. In extreme cases, draw light longitudinal lines with a simple pencil and fold the leaf along them.

Place the resulting harmonica with the longest side up.

Find the middle and fold the accordion in half. Glue the inside sides.

Straighten the folds, glue the petiole and the accordion oak leaf is ready.


4 paper accordion sheet option

This species is similar to a hornbeam or beech leaf. Yes, and on the leaves of many other trees. The main thing is that no templates are needed for it, it is extremely simple to make it.
To make this oblong leaf, you need triangular paper. You can first cut a square out of paper.

Fold in half, joining opposite corners.

Cut in half and you get two triangles.

One sheet will need one triangle. Turn it wide side down and start making folds there, like an accordion.

Turn the whole triangle into an accordion.
For convenience, turn it over with the longest side up.

Find the middle and fold exactly in half, connecting the tips. In the middle, apply glue to one of the sides and glue the side parts together.

Spread a little and glue the stem. The sheet is ready.

5 paper accordion sheet option

The most common type, the shape resembles the leaves of poplar, linden, birch. For a change, let it be green, although the leaf is no less interesting in the autumn, yellow-orange version.
It needs a not very wide paper rectangle.

Fold the rectangle in half, the fold in the photo on the left.

Use a template or draw your own convex line, the beginning of which is from the side of the fold, and the sloping slope reaches the bottom side of the sheet folded in half. 
There are no exact proportions and markings. If you need a more prominent narrow tip, the indentation on the line can be made more pronounced.

Cut out the pattern without touching the left side.

Open the paper.

Make an accordion, starting with a straight, longest side. As usual, the width of the folds is ideal in the region of 5-7 mm.

Flip the accordion straight side up.

Fold in half and glue the insides. If necessary, glue the bottom folds.

Straighten the leaf and glue the stem.


6 option. Another maple leaf made of accordion paper

There are quite a few varieties of maple leaves made from paper folded into an accordion. It all depends on the template. There are very simple ones, which can be drawn almost arbitrarily, and more complex patterns, which it is still desirable to follow as accurately as possible. In the second case, maple leaves are more perfect, close to the original.
Despite the fact that the very first I already showed one type of maple leaf, I still can’t resist and show another one that I really liked.
For it you will need square-shaped colored paper.

This square then needs to be folded in half.

Print the template and carefully reproduce its lines on colored paper, considering that the fold is on the left. 


Then everything is as usual. Open paper detail.

Make narrow folds, starting from the straight, wide side of it and all the way to the top.


Find the middle and fold the accordion-folded paper in half. Here you can see that this yellow paper is thinner than the previous ones, at the very bottom the folds are not held together. Therefore, they need to be forced to do this with glue. You can safely apply glue at the fold on the three lower folds. And, of course, glue the inner two sides, where shown by the arrows.

Straighten the folds a little, glue the stem and a beautiful, in this version, autumn maple leaf is ready with an accordion.

7 variant accordion leaves

A simple round leaf. It can be a variety of colors inherent in the leaves.
You will need a rectangular piece.

Fold it in half.

Using a compass or something suitable round, draw a rounded line connecting the sides of the paper. Fold in the photo on the left.

Cut along the contour.

Open, and you get an even semicircle.

Make small folds, starting from the straight side of the semicircle and up to the very top.

Turn the accordion piece over with the long, straight side up.

Fold in half and glue the insides.

Gently straighten and glue the stem. The round sheet is ready.

8 option. Thin oblong accordion leaves

The form is inherent in the leaves of willow, olive and some others.
To make such a sheet, you need a rectangular, rather narrow strip of paper. The narrower it is, the thinner the leaf, although it is more difficult to make very thin.

Fold the strip in half.

Draw a slanting line. Please note that in the photo the fold of the paper is on the left.

Cut along the line and you get a double triangle.

Explore its parts.

Fold into a small fold. As you can see, it is problematic to make even folds on very narrow paper, but this will not be displayed on the sheet.

Turn the long side up and fold the harmonica in half. Glue the center.

It will turn out such a narrow sheet of paper accordion.


Autumn leaves are a wonderful material for creating interesting crafts. But sometimes they themselves can become crafts if you create them with your own hands. We offer you several master classes on creating origami. Autumn paper leaves can be made both by yourself and with children.
What do you need to create crafts?
The first thing you need is paper. It can be either white or colored. If you decide to make leaves from white papyrus, then you will need to color it with pencils, felt-tip pens or paints.
Color preference:
- red;
- orange;
- yellow;
- brown;
- green.
And it will become possible to make the leaves more original if you use special paper with an ornament (or packaging). The main thing is that its shade should be from the autumn palette, with hints of red and yellow. You can choose any ornament: geometric (stripes, diamonds, checkered, and so on), abstract or even with the image of leaves).
You will also need scissors and glue. In some cases, it is more convenient to use a glue stick. An alternative to glue can be double-sided tape.
Paper Leaves: Form #1
Instructions for creating paper autumn leaves of the first basic form (for example, like a birch):
- We take sheet A4.
- Fold it in half.
- Cut along the drawn line.
- We leave the part that unfolds (picture 1).
- We fold the resulting triangle with an accordion, as in picture 1.
- We make a stem from the remnants of paper (picture 2).
- We glue the leaf and the twig (picture 3).

The autumn leaf of the first form is ready!
Paper Leaves: Form No. 2

Instructions on how to make autumn paper leaves resembling maple leaves using origami technique (second main form):
- Take A4 and fold it in half.
- We draw a line with a pencil from one corner to the opposite.
- Draw a zigzag, herringbone-like line on top of the straight line.
- Cut out along the outlined outline (picture 1).
- We fold the resulting sheet of paper with an accordion.
- We make a stalk (picture 2).
- We glue the parts together (picture 2).
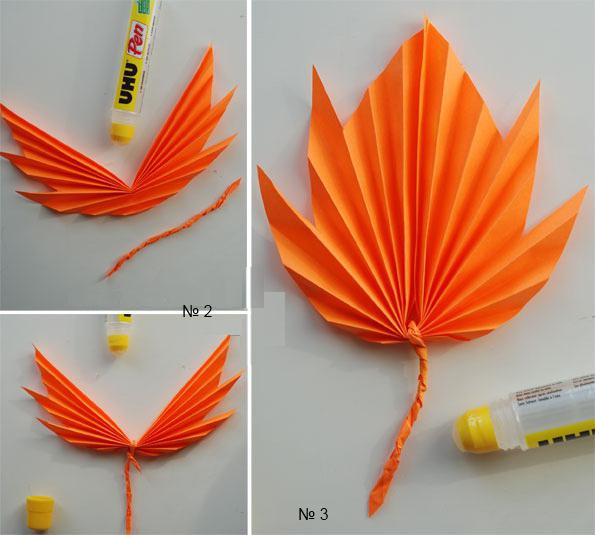
The autumn leaf of the second form is ready!
In this way, you can make any leaflets. To modify them, you just need to change the contours (edges), along which you will then cut out the craft.
Wreath of paper autumn leaves

To make autumn leaves out of paper for such a wonderful wreath on the door, you will need ten sheets of colored 8 x 8 centimeters per leaf. You can use smaller or larger sheets, as long as it is a square.

Instructions for creating a wreath of autumn paper leaves:
- Take one sheet of paper.
- Fold it in half to make a triangle.
- Unfold the sheet and lay it with one of the corners up.
- Fold the left and right corner of the diamond to the center fold line, as in picture 1.
- Wrap the new left and right corners of the figure again towards the center, as in picture 1.
- Make three pieces of such details as in point 4.
- Make six pieces of such parts as in point 5.
- Take one piece from step 4 and two from step 5.
- Fold the three pieces as shown in picture 2.
- Lubricate the upper part with glue and glue the bottom two to it.
- Do two more parts in the same way.
- Glue all three components together, as shown in picture 3. Each component must be superimposed on the other. As a result, you will get a finished leaf.
- Now you can make a branch. Glue paper to the back of the finished leaf so that one corner (rhombus) peeks out.
- Trim the glued sheet of paper on both sides and fold it as shown in the picture below.
- One autumn sheet of paper is completely ready. Make a few more leaves and connect them into a wreath shape.

Magic autumn leaves from colored paper
To make such a wonderful leaflet, you will additionally need to take a set of needles, pins, tweezers and a board.

Instructions on how to make magical autumn leaves out of paper:
- We take a regular sheet of paper and draw on it a maple leaf with several veins (picture 2).
- We impose a sheet with a pattern on the board (picture 3).
- We cut a bunch of multi-colored strips up to a centimeter thick and about 10-15 centimeters long (picture 5).
- We insert pins along the contours of the drawn sheet into its sharp corners.
- We fold each strip of the same color in half and cling to a pin (pictures 6-9).
- Lubricate the contour with glue, each strip.
- We take a strip of a different color, twist it and put it into one of the contour cells (picture 10).
- We fill in this way all the cells of the frame.
- We make a stalk (picture 11).
You can give the leaf a special color - the transition from one shade to another. To do this, we dilute the paint of red, orange and each in a separate container. We take a sponge. We moisten it in red and blot the finished leaf from above. Then we dip the sponge in orange and give color to the middle. At the end, paint the bottom of the leaf with yellow paint.
Autumn leaf is ready!
simple autumn leaves
The easiest way to make autumn leaves out of paper with your kids is to use a special shaped stapler (sold in large stationery or specialty stores). If this is not there, but you don’t want to buy, then you can resort to the old method: fold five pieces of paper (or take one and fold it several times), draw the outline of some sheet (for example, aspen) and cut it out.
With the help of such blanks, you can make original wreaths.

To get such wreaths as in the picture, you need:
- Make a lot of multi-colored paper leaves (at least fifty pieces).
- Cut out a circle of any size from cardboard or other dense material.
- Glue the leaf blanks to the circle, starting from the outside, and not from the middle. To do this, you can use both glue and double-sided tape. In the second case, tape should be pasted over the circle, not the leaves.
- Glue a cord on the back of the circle, for which you can then hang the finished wreath.
- Decorate, for example, with a bow.
The wreath is ready!
Use the tutorials below if you don't know how to make autumn leaves. perform, so you can involve children.
The bouquet presented in this master class is a combination of two types of work with paper at once. Firstly, as the name implies, this is an application, that is, drawing up a pattern from pieces of paper. Secondly, it is origami. After all, the pieces of paper themselves, of which the pattern is composed, are details made by folding paper (the word "origami" is translated from Japanese as "folding paper").
Only two details in this application are not made using the origami technique - these are the stems, as well as the center of one of the flowers, similar to an eight-pointed star. All other details: spikelets, flowers and leaves are made from a square by folding. Moreover, the size of the square for all these parts is the same.
Spikelet.
The central product in this bouquet, of course, is the spikelet. It is with a description of its manufacture that this master class will begin. We divide the A4 sheet into 20 equal squares (side 5.25 cm). The remaining edge is cut into three strips for spikelet stalks.

Let's make the Kolosok module. Step 1. Fold in half. Step 2-1 and 2-2. Bend and unbend:

Step 3-1 and 3-2. Bend the sides to the center line:

Step 4-1 and 4-2. Fold in the top sharp corners. Main module received:

Each spike contains several main modules and one module each with the name "upper" and "lower". The "upper" module is derived from the main module, folded in half along the center line. The "lower" module is obtained from the main module by bending the lower corner away from itself.

The following photos show the spikelet assembly of 6 modules (1+4+1):
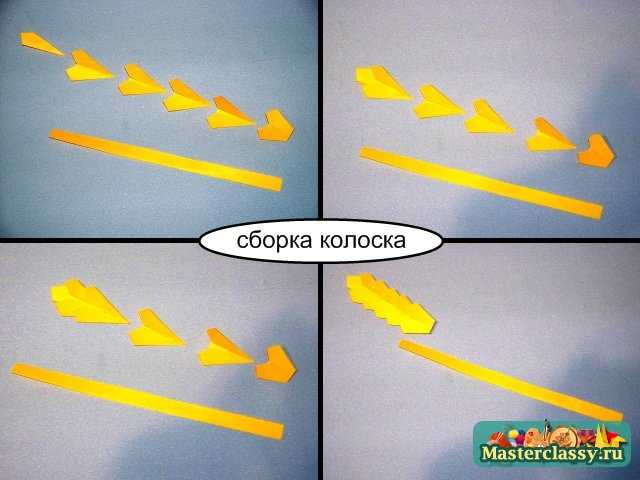
We will collect spikelets from 5, 6 and 7 modules:

flower 1.
The application presented here contains 3 types of flowers. The first flower (orange) is assembled from the same modules as the spikelet. You will need 8 main modules "Spikelet". The acute angle of the Kolosok module is 45 degrees. And since 45 x 8 \u003d 360, then exactly 8 modules will close in a circle. Carefully place the modules next to each other, sticking them on a small piece of adhesive paper (for example, window tape):

Glue 2 squares (2.5 x 2.5 cm) into the center of the flower, getting an eight-pointed star:

flower 2.
Assembling the petal for the second and third flower is only slightly different from assembling the Spikelet module. This module will be called "Petal". Step 1, 2 and 3. In the square we outline the diagonals:

Step 4 We bend one of the corners to the center. Step 5 Bend along a long diagonal:

Step 6-1 and 6-2. Bend the sides to the center line. Step 7 Flip:

Step 8-1 and 8-2. Fold the top corners down:

Step 9-1 and 9-2. Bend the bottom corner twice (zipper pleat). Step 10 Flip:

Make 5 petals and stick them on paper, aligning the bases of the petals.
Step-by-step instructions for origami or how to fold a sheet.
Origami
Sheet
Bouquet materials:
Square sheets of multi-colored double-sided paper for leaves. Twigs or sticks (wooden skewers), glue.
 |
|
 |
|
 |
|
 |
|
Now we glue all the leaves on the branches at a slight angle with glue. It is desirable to have 2-3 leaves on each branch. We make several branches and make a bouquet of autumn leaves.
Add a few strips of paper twisted into spirals to complete the composition.
Here is the finished bouquet.:
This is more of a spring craft, but also on a plant theme.
- flat flowers for decorating postcards and creating voluminous applications.
I present to you a step-by-step overview of how you can make an origami maple leaf in the easiest way. It’s not scary that it consists of many parts, anyway, the process is not complicated, unlike those options where the leaf is created from one sheet of paper.
What will be needed for work?
- Colored paper matching maple leaves. Also, the choice may depend on which sheet is needed. If autumn, then it can be yellow, red, orange. Spring-summer version - green.
- Ruler, scissors, simple pencil, glue stick.

Maple leaf origami step by step
Part preparation
The sheet consists of 10 square parts. Therefore, measure and cut 10 squares from colored paper. 9 per leaf and 1 per stem. The sizes can be very different. My red is quite large, the sides of the squares are 8 cm. The leaves have smaller sides of 5 cm.

Place one square in front of you.

Bend it in half, connecting the opposite corners. It should be a triangle. Press the side of the fold well.

Open the triangle, in the photo the fold line is indicated by a dotted line.

Bend one side of the square first, aligning it with the fold line.

Then the second side. You should get something like this.

For a maple leaf, you will need 3 similar parts and 6 more complex ones.

Let's move on to a more complex detail. First you need to do all the steps, as in the previous three. Let's take one square.

Fold it in half, marking the fold line along which you need to align the sides.

Fold in the middle on both sides.


And then the second.

We need 6 of these parts.

Thus, we now have 3 simple parts that have two sides folded on one side, and 6 more complicated ones that have both sides folded and 4 sides.

Assembling an origami maple leaf
Now let's start assembling. At this stage, the sheet will consist of 3 parts. Each part will consist of 3 folded parts.
Take 1 simple part and 2 complex ones.

Connect two complex parts in the area of the sides. Apply glue as shown in the photo. Note that these parts are not glued yet, the third simple part will connect them together.

Glue it on top.

Make 3 such parts of the petal. The photo shows their view from the back, the main side.


Glue the third part in the same way, which will overlap on the second.

The maple leaf is almost ready, but you still need to make a stem for it.
To do this, take the remaining square of colored paper and apply glue to half of it.

Glue on the back of the sheet, holding all 3 pieces even more together.

This is how it will look from behind.

Cut the visible triangle, but not to the very end. An area of approximately 7 mm should remain between the side cuts. She will be the stem.

Fold the future stem to one side.

Then to another.

Cut off the excess and glue the bifurcated parts of the stem.

Everything, the origami maple leaf is ready.

It is beautiful in different colors.

Interesting with eyes.
