How to make a rug from ribbons with your own hands. How to make original rugs with your own hands
The art of creating carpets has a long history. For exclusive floor coverings, you can use leftover yarn, threads, pieces of fabric or fur, old terry towels, T-shirts, sea pebbles, clothesline, plastic bags, lids, corks, banknotes. How to make a carpet with your own hands? It is enough to show imagination, patience, and perseverance to sew, knit or weave a unique decoration to decorate your home. The mat will turn into a massage mat if you insert a removable pad with an abrasive filler into it.
You can knit a carpet with your own hands using a photo, make it from pre-made pom-poms or thread pile, weave it, weave it.
Knitted
You will need cardboard, a black marker, threads of various thicknesses, scissors, a hook from No. 7 and above (or knitting needles). To determine the width of the future rectangular product, the required number of air loops is collected. To knit a round rug, 5 air loops are connected into a ring and then loops are added in a circle.
It is more convenient to knit several parts, then crochet them or sew them with a regular needle (this technique is called “patchwork”).
You will need leftover yarn, a hook, scissors, and a thin construction mesh with cells for the base of the rug. Thread balls are made by winding yarn around fingers or cardboard. Then it needs to be tied with a long thread in the middle and carefully cut along the edges. The closer the pompoms are placed to each other, the more beautiful and effective the rug will be. The edges of the base should be treated with strips of fabric, ribbon or tied. For such a rug you will need threads, scraps for the base, and cardboard. Threads are tightly wound onto two 3 cm wide cardboard strips folded together. Then you need to secure one side of the strip with stitches and cut the other. Several such fringe blanks are made, which are adjusted along the contour of the base of the rug towards the center. You can use two or more colors of thread, creating, for example, a heart in the middle or an ornament over the entire area. A beautiful carpet is woven with your own hands, using thick cardboard for the base, multi-colored thick and thin threads, and twine. Cut a circle out of cardboard, make cuts to secure the twine at the ends of each of the 32 sectors marked with a pencil. Then you should wind the twine from one sector to the adjacent one through the central point of the circle. You need to intertwine the threads with twine from the center and monitor the density and evenness of the resulting rows. Upon completion of work, the base must be removed. By connecting several rugs of different diameters together, you can get a unique product to decorate your home. In the process of carpet weaving you will need: a frame, a stick, threads for the warp and making piles, a cardboard strip 3x20 cm, scissors, a thick needle. Hand-woven carpets consist of longitudinal and transverse layers of threads intertwined in a checkerboard pattern. The pattern on both sides is the same, so the product is used as a double-sided product.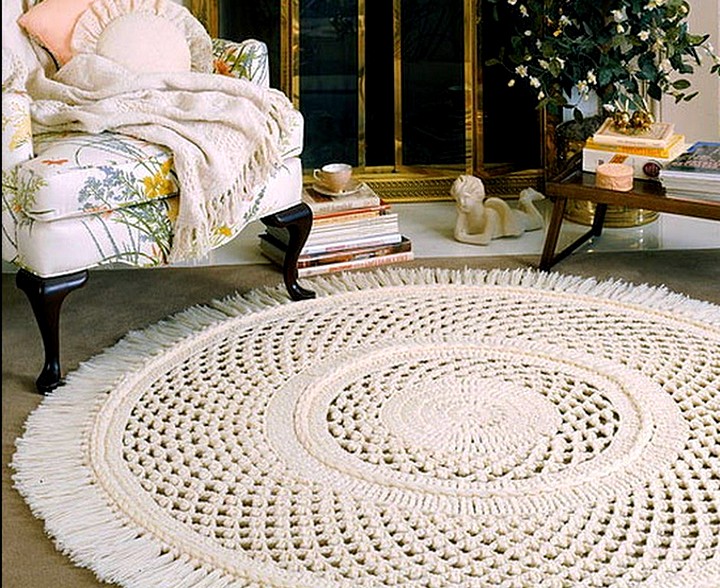
From pompoms
From thread pile
Wicker
Woven
There is no need to explain why there is a carpet in the house. Many DIY enthusiasts make rugs with their own hands, making useful products from leftover threads, yarn, or simply unnecessary rags. Among the samples of home carpet weaving there are not only those that are not inferior to the best industrial designs, but also unique, highly artistic ones that are not subject to machine technology, see fig. And all this with minimal costs, or even for nothing.
Archaeologists consider a carpet to be the oldest household item: before realizing that one could wear the skin, a person laid it out for himself. Carpet weaving and carpet weaving are also the most ancient crafts, and here handmade work still firmly holds its position. For example, a mat made of pom-poms lends itself very difficult to automation. But at home, you can make a bedside rug from pompoms in half a day, and it will be more convenient than a factory one, and it will look better, see below.
Homespun and homemade rugs
The same applies to rugs made from old things. Their disposal using industrial methods is not very profitable and purchase prices for used rags are not encouraging. And unwanted clothes transformed with your own hands into a carpet will still serve usefully on the farm.
In this article we will look at what and how to make rugs for your home and garden with your own hands. But, unfortunately, large floor and wall carpets and rugs will have to be touched upon only in passing; this is a separate big topic. And napkins, table runners, furniture covers and small wall rugs woven using the macrame technique will only have to be mentioned - this is an equally extensive topic, technologically weakly related to carpet weaving.
In this publication we will deal with small rugs, colloquially called rugs. As you can see in the photo above, they are not necessarily “grandmother’s”, nestled in the kitchen or in the nook by the door, although rugs are needed there too. A rug can be a highly aesthetic product that decorates the living room, and a durable hygienic product in a room with high humidity and/or in a room prone to pollution. Or even street, if the rug is intended for the dacha. All this diversity rests, in general, on three pillars: material, execution technique and supporting base.
Technique and basis
The variety of homemade floor mats is mind-boggling. But according to the technique of execution, they are divided into a relatively small number of varieties:
- Sewn- technologically the simplest, but requiring additional materials (threads) and industrial equipment: a sewing machine. Using an ordinary household 1-needle machine with a needle up to No. 100, it is possible to sew a completely high-quality and beautiful rug.
- Braided (knitted) rope mats- no extras no materials needed. Very practical, stable, but the appearance is quite monotonous, although elegant. They require increased attention and accuracy in work, but to a connoisseur the product speaks volumes about the skill of the author.
- Woven from scraps of fabric– they require quite a lot of labor, but not complicated; The material is suitable free waste. The appearance of patchwork carpets made from skillful hands can be simply stunning. To make them you need a simple hand loom - a crosny - see the video below. Crowns for small rugs can be made at home in half an hour to an hour from scrap materials, see below and at the end.
Video: do-it-yourself rug made from shreds
- Braided (crocheted). Rugs are not knitted on knitting needles, because... knitted products are designed primarily for vertical loads. Whole-knit rugs are most often made round (see figure below); A round rug made using a different technique will not be durable. Whole-knitted rugs require quite a lot of skill, but a novice craftswoman can quickly and easily crochet blanks for sewn rugs.
- Knitted on a woven or semi-rigid mesh base– these are fleecy carpets up to “real” patterned and “grass” rugs for the bedroom or nursery, in which the foot gently sinks. “Grass” rugs are no more complex in technique than sewn ones and are less labor-intensive, but you need a purchased base; however, inexpensive, see below. Patterned fleecy carpets, not inferior in appearance to Persian or Khorasan ones, can be woven at home on bedsteads, but a lot of work, attention and artistic taste will be required.
- Knitted without warp– are most often made from pieces of plastic film, for example, used bags. It is possible to discern the artistic merits in them only with a fair amount of imagination; the service life is up to 6 months, but such a rug can be made in literally half an hour. They are hygienic, have shoe-cleaning properties and are easy to clean: dry them, shake them thoroughly - and that’s it. Ideal as door guards at the dacha and in the shower/sanitary block there. Not recommended for living rooms: static accumulates intensively in a dry room with a non-conductive floor.
- Composite from natural solid mineral or elastic organic materials or their imitation with or without a base. Natural mineral ones are very expensive, and if made independently, very labor-intensive. Organic matter (wood, cork; occasionally horn and bone) on the floor is not very hygienic; when wet, it is slippery and wears out quickly. Imitating minerals is quite labor-intensive, but can be done at home (see below), the raw materials for it are inexpensive, and the aesthetic effect can be magnificent. Mats made in this way are suitable for both indoor and outdoor use with virtually no restrictions.
The traditional base of the carpet is a coarse, knotless mesh. Colored threads, giving a fluffy front surface with a pattern, are either woven into it during weaving, or, bent in half, are caught by the weft threads to the warp. The contours of the drawing are drawn in advance on a base stretched on the machine. For floor carpets, incl. typesetting, construction fiberglass mesh is perfect as a mesh base; in this case, the threads that create the face are tied to it. For sewn rugs, the basis is most often taken of coarse natural technical fabric, cotton or linen: canvas, tarpaulin, matting, burlap. Wool and silk are not suitable because... easily electrified. Synthetics are suitable for clothing: nylon, lavsan, etc.
Rags and rugs
Homemade rugs are made mainly from natural plant textile and knitted materials: old clothing, yarn, thread, rope (twisted rope) or cable (braided rope). Synthetics in rugs for indoor use should only be used for wearable items due to the same static electricity; it, through bare feet or in slippers, has a very bad effect on health. We will return to imitation of natural mineral materials later, but enough of what has been said above about solid/elastic organics.
In terms of all its qualities, the best material for a floor mat is denim, especially since a lot of old jeans often accumulate in the house. And the easiest way to sew a rug from jeans is to cut them into pieces of the desired shape and sew them from the inside out, top left in Fig. A denim rug (above right) will look acceptable in any interior, as will denim clothes in any setting, except for a prim and formal one.

Appearance and methods of making denim carpet
If you’re not too lazy to “give the jeans a cooler style,” you can trim the blanks around the edges with braid in a contrasting color (middle left); such a rug will fit into a modern interior. And for rooms with an archaic-rustic design or, say, a dacha, you can weave a “grandmother’s” rug from jeans unraveled into ribbons by whipping up crosses (see at the end). Elementary techniques of “grandmother’s” weaving are shown in Fig. at the bottom. 2 denim colors, face and back, are enough to get a nice pattern. A torn old sheet will be used as a basis; the strips are twisted into bundles.
Note: In the process of weaving a denim carpet, it may be necessary to connect strips of weft, either to bring out the pattern, or simply not enough. The weaving knot is not suitable in this case, because The fabric is dense and the knot will be large. Jeans ribbons are connected in the same way as when weaving a patchwork rug without a machine, see below.
Tights
The second class of items suitable for rug wear are tights. How to make a mat from tights, see the tutorial video below:
Video: DIY pantyhose rug
Other junk
Lightweight wearable items can be placed on the mat in a variety of ways, see for example. next video. However, when they are trampled while lying on the floor, the wear resistance of the products leaves much to be desired.
Video: how to make rugs from old clothes
If the original item is knitted, say, a rug made from old T-shirts, then larger pieces are cut out of it without seams, piping, etc. Pockets are paired. Then the blanks are unraveled into ribbons, braids are woven from them, and a rug is sewn from the braids, see fig. Threads – no thinner than No. 20. Hemming the base made of technical fabric is mandatory; without it, the tights will soon stretch and quickly fray.

Making a patchwork rug made from braids

Weaving strips for a rag rug
This technique is not suitable for printed fabrics: threads will crawl along the edges of the tapes, and holes will creep under the fastening threads. In this case, the workpiece is first cut into even strips 5-7 cm wide, each strip into 4 more identical strips, without cutting all the way through. Then the straps are woven (see the picture on the right), and from the straps a rug is woven/woven on a sheet base, like a “grandmother’s” denim rug. The finished rug turns out respectable: the double texture indicates a high-class workmanship.
Note: sometimes one-piece rugs are woven using the same technique, cutting the workpiece at once not completely into 8, 16, 32, 64, etc. narrow stripes. But due to the displacement of the transitions of the ribbons, the carpet turns out to be either oblique or with a zigzag edge, depending on how the adjacent quadruples are woven, one into one or mirrored.
Here the question arises: how to cut thin fabric into strips of the same width, especially narrow ones? To do this, the workpiece (and then the wide ribbons) are folded like an accordion, leveled (ironing doesn’t hurt) and pinched with clothespins. Next, little by little, cut through all the bends at once, starting from the end, and remove the clothespins as you cut.
Braided mats
Rope mats are distinguished by their enviable resistance and durability. They look good too. They are mainly used as bedside footrests and tabletops, because... their length is 40-45 times the diameter of the rope, and their width is approximately 1.25-1.5 times less. You don’t need any materials other than rope, or any special experience. Schemes for weaving rope mats are shown in Fig. Based on the first, pos. 1-5 – regular straight knot. It is woven with one end (running) in 5 passes. The rope will need 35-37 mat lengths, i.e. 1200-1500 of its (rope) diameters. It’s not scary, in meters it will be 13-17 m.

Schemes for weaving rugs from rope
The sea rug (pos. a-f) is so named because it was an indispensable accessory to the sleeping place of a sailor of old times. In the sailing fleet, a sailor who did not know how to make himself a hanging hammock bunk and weave a mat for his feet along with it was considered a loser, regardless of any merits and length of service. The sea rug is knitted in 3 passes while hanging. The rope (approx. 20% longer than the previous one of the same length) is bent in half and braided with 2 ends. The sea rug is narrower and longer, its weaving is more frequent and finer. The labor intensity is the same as before, because You need to straighten not 5, but 3 ends.
The variety of rope rugs woven using the same or other flat knots is not limited to these samples, pos. 1-3 on the next rice. But this work is much more complicated, the details of which are not possible here. As for carpets made of rope decorative elements (brandenburs, etc.), sewn onto a woven base (pos. 4) or glued from a single piece of rope, pos. 5, then in terms of strength and durability these products are more decorative than for everyday use.

Rope mats
Let's try to weave...
To make a small, approx. up to 40 cm long, a woven rug made of threads, yarn or fabric ribbons/bundles is not needed at first. A rectangular piece of cardboard and a dinner fork will be enough. Using a fork, immediately poke holes for the base: lines are drawn along the short edges of the cardboard “machine”, at a distance of 3-5 cm from it. The first 4 holes are pierced along the line with a fork, then the fork is shifted by 3 tines so that the outer one falls into the last hole that has already been pierced, 3 more holes are pierced, etc. The cardboard is cut to the holes; The warp thread is carried out in one piece, placed in a loop under the edge petals - “pegs”. Leave the ends of the base free for approx. 10 cm each.
Note: There is no need to take cardboard longer than 40 cm; it will bend under the tension of the threads during work.
Then we weave, as usual, pos. 1-2 Fig., but instead of a shuttle you will have to use a gypsy needle; the shuttle will not fit between the cardboard and the fabric. Having carried out 4-10 threads of weft, depending on its smoothness, we tamp the fabric with the same fork, pos. 3. We obviously unwind the wefts in excess, because the missing thread is tied from the inside out, which is not possible in this case.

How to weave a rug without a loom
Next, the ends of the worked weft threads are left at approx. 10 cm and glued to the “camp” with tape, pos. 4. When the entire warp is woven, they are carried out with a needle under at least 8-10 weft transitions from the wrong side to the face, pos. 5, and trimmed.
The next stage is to remove 3-4 loops from the petals at one end of the base and insert the free end into them, pos. 6. We tighten it a little, but don’t cut off the “tail” yet! We do the same with the other end of the warp thread.
Now the base can be completely removed from the pegs. Place the rug approx. for a day on a flat, smooth surface for self-tightening of the fabric under the influence of residual stresses in the threads. If the loops of the base have not yet tightened completely after this, smooth the rug, tighten it, and shake it until they tighten. Now you can cut off the “tails” of the base - the product is ready for use!
In a similar way, you can weave rugs from leftover yarn or patchwork rugs from ribbons/strands (remember - jeans, tights, rags?) Both materials can be used together, but the warp and weft must be uniform. They are assembled from separate threads/ribbons, secured with knots, on the left in Fig. It remains to decide how to connect threads/ribbons that are not long enough, or to bring out the pattern. As for the threads, there is no way on a cardboard “loom”, you need to take whole ones. And 2 ways of connecting tapes are shown there in the center and on the right. You can connect very short ribbons first, but the joint will be visible. The second joint is invisible, but the overlap of the ends is needed from 4-5 cm.

Weaving a patchwork rug on a piece of cardboard and methods for joining the patches
... and knit
Carpets, as already mentioned, are crocheted. In general, this is no simpler than knitting, only the properties of the finished products are slightly different. There are many patterns for crocheting rugs on the Internet, but for beginners, in order to even understand the symbols of loops and operations, they would have to learn too much educational material. So let's start with the basics.
How the first loop is made when crocheting is shown on the left in Fig. This is already enough to, by passing a loop into a loop, tie a braid for a sewn rug. And on the right there it is given how to tie the next row to the previous one.

Basic crochet techniques
This way you can make a whole knitted rug, even a round one, see another video:
Video: knitting a round rug
This is where it happens to experienced craftswomen when a problem arises: I knitted it exactly according to the pattern from the recommended material, but it took it and pushed it out with a hump (cap, dome). The fact is that you can only increase the length of the outer rows by passing 2 of their loops into one of the previous ones by using an integer number of loops. It cannot be irrational, like π. The exact length of the row is adjusted mechanically by an experienced knitter by tightening the loops. But a person is not a robot, everyone’s working skills are different. A scheme developed by someone under their own hands may not be entirely correct for another.
However, there is no need to unravel the finished rug and bandage it, and it won’t do any good. If it doesn't look exactly like a jester's hat, you can align it using the following instructions:
- We prepare hotter water for soaking, 55-60 degrees (the hand can barely tolerate it);
- We dilute PVA in it at the rate of 1.5-2 tbsp. spoons per 10 l;
- Soak the rug without creasing it;
- While it gets wet, prepare a hard, smooth, moisture-resistant substrate. Ideally - a piece of plywood covered with plastic film in 2-4 layers;
- When the water has cooled to lukewarm (32-35 degrees), remove the mat and lay it out on a mat to dry. There is no need to keep it in water until it has completely cooled down, the effect will disappear;
- If the backing is plywood or wood, we additionally spread out the mat with push pins;
- Once completely dry, the mat knitted according to a proven pattern will definitely level out. No - look for flaws in your work. An insignificant admixture of PVA will not prevent the product from dissolving.
This method of molding woven products was once invented by Soviet black market workers and underground workers in order to make “homemade” jeans stand up like a “firm”. At the same time, knitting lovers also adopted it. The quality of jeans of that time is long gone, but the PVA doesn’t seem to have deteriorated...
More about round rugs
Round rugs made from shreds can be excellent and even outstanding in aesthetics, see fig.

They don't necessarily have to be all-knitted. Firstly, they can be sewn, as described above, on a coarse textile base from braided or knitted braids (in this case, only from braids), wound in a spiral. But the strength and durability will not be higher than that of other sewn carpets.

Weaving a round rug from patchwork braids on a hoop
The second method is to braid braids along a radial base of rope on a hula hoop, see fig. on the right, it gives a good-quality product, but the “blob” in the center is a rather difficult problem, as a result of which this technique is rarely used.
Very beautiful and quite durable round rugs, and patchwork sewn ones, are obtained in the so-called. patchwork technique. Its essence is that patchwork parts are sewn into fragments of a pattern, which are sewn onto a coarse woven base, see the plot:
Video: rug for home in patchwork technique
Fluffy grass
Real patterned fleecy carpets are an immense topic, like the entire history of carpet weaving. But making a small, simple grass mat at home won’t be too difficult. The first method is tying with knots to a construction mesh. Propylene (this plastic is practically not electrified) or nylon fluffy cord allows you to get a pile up to 5 and even 10 cm high, pos. 1 on next rice.
If you don’t want grass, but something like a densely planted lettuce, you can knit a fluffy rug from scraps. In this case, so that the pile does not fall off, the scraps are taken wider so that the knots slightly expand the mesh cells, and knit in a checkerboard pattern, pos. 2.

Two easy ways to make fluffy rugs
In both cases, if there is a pattern, it is drawn in advance along the base grid, pos. 3. Knit a simple bayonet in knots. This knot is very reliable, cannot be felt with bare feet and is easy to knit either by hand or by crochet, pos. 4 and 5.
The second method, firstly, gives a soft mat that can be rolled up and washed in a machine. Secondly, ordinary knitting yarn produces a dense, non-falling pile up to 7 cm high. How such a rug is made is clear from the poses. 6-9. The width of the cardboard mandrel for winding pile strips is according to its desired height. The finished strips are attached to a coarse woven base.
Some explanations, however, will be needed regarding pos. 6 and 9. If sewing is not intended to be done immediately after winding the strips, then you need to baste the uncut edge of the layer using a basting of 1 full and 3/4 of a half eight, this is the so-called. eight 7/4. How it is done is shown in pos. 10. The number of turns in one tack is not necessarily 4, it can be 10 or more, depending on the smoothness of the yarn. The hairier it is, the more turns you can grab with one figure eight loop. A strip swept in this way can lie in the chest of drawers as long as you like without spreading.
During final sewing, the first strip of pile is attached, straightened. Then its threads are bent to the non-working side and the next one is attached as close as possible, etc. The edge of the base in the finished rug will show through a little, so it is trimmed with braid.
Rug made of pompoms
It's time to remember such cute, soft and original pom-pom rugs. They are made as before. case: pompoms are tied to a construction mesh or sewn to a fabric base. But how to make the most pom-poms? Are there many of the same or given sizes, beautiful, neat?
There is no need to look for drawings and descriptions of certain devices or machines for making pom-poms, as some sources advise. Excellent pom-poms are obtained as shown in Fig. “Technological equipment” made from a couple of reusable cardboard scraps; In any case, it’s enough for a whole carpet of pom-poms.

Making a pompom for a rug and other purposes
Pompoms can also be multi-colored if they are wound from threads of different colors, but of the same thickness. There is no need to connect the ends of the threads somehow; the twist will be cut anyway.
What if you want the pompoms to be smooth? Also no problem: take a piece of padding polyester or fleece, crumple it into a ball, cover it with a suitable fabric and tie the tail with a thread. The fabric, by the way, can also be silk: padding polyester and fleece have antistatic properties and will remove electrical charges.
Video: do-it-yourself pom-pom rug - master class
Video: an alternative option for making a rug from pompoms
Where and how is plastic good?
Hobbyists sometimes make rugs from plastic film that are amazing in appearance and fine workmanship. But we still cannot recommend them for residential premises. In dry rooms, plastic is easily electrified, and, say, in a bathroom, water stagnates in its folds. What kind of living community will soon form there is best not to look under a microscope. Especially those familiar with the principles of microbiology.
Plastic film mats can find other uses, e.g. as door and/or street at the dacha. A properly made plastic bag mat will remove dirt from shoes, although not as well as special cleaning mats. Cleaning it comes down to drying and shaking it out, the material costs pennies, and you can make a new rug like this in 10-30 minutes as follows:

- The package is rolled into a flat roll and tied with tape; You can also use a rope made of film, pos. 1 per rice;
- The tourniquet is pulled tightly, the edges of the bag are cut off, pos. 2;
- The workpiece is fluffed by hand, pos. 3;
- Several blanks are tied into something like a pompom, pos. 4;
- If the diameter of the pompom (20-35 cm depending on the size of the bags) is too small, several of them are tied together or tied to a construction net.
Rug made of... stone 
Artificial stone rug
The stone mats are original, see fig. on the right, and massage the feet. True, standing barefoot on a cold stone is not always pleasant, but that’s not so bad. The main thing is that it is simply unrealistic to find in nature as many smoothly rounded pebbles of equal thickness as needed, and it is unrealistically expensive to buy a choice.
In all respects, a rug made from substitutes for rounded pebbles made from polymer clay (plastic, cold porcelain) is better than a natural stone rug. You can make polymer clay with your own hands at home in the kitchen; starting materials (starch, PVA) are inexpensive. One starter (leavening) is enough for 1-3 pebbles, depending on their size, and you can imitate not only cobblestones, but also many semi-precious stones, see figure: selenite, jade, amazonite, jasper, onyx, carnelian, agate, even lapis lazuli , malachite, heliotrope and charoite. A rug made of gems that doesn’t even keep your feet cold – who’s to say that’s not cool?

Some semi-precious stones
The use of plastic for the manufacture of stone rugs has, in comparison with its other applications, some features:
- Prepare a substrate in advance - a solid shield covered with film.
- The base of the mat made of construction mesh is laid on the substrate.
- Containers (vessels) are also prepared for ripening a mass of total volume, obviously greater than the total volume of stones, in an amount equal to the number of flowers used.
- The mass of required flowers is prepared quickly so that they all ripen at about the same time. Each color ripens in its own separate container.
- Immediately after the mass has ripened, without putting it into storage, stones are sculpted and placed on the base of the mat, pressing lightly so that the mesh is pressed into them. This should be done wearing latex gloves that are thick enough so that there are no palm marks or fingerprints left on the stones.
- After 2-3 hours, when the crust has dried on the stones, they are leveled in height, pressing down the protruding ones. Be careful not to crack the thin crust!
- Transfer the drying tray to a warm, dry, shaded place.
- Dry until completely dry, based on a complete hardening rate of 2 mm per day.
- The almost finished rug is carefully turned over. Falling stones (rarely, but it happens) are glued with PVA.
- Apply 1-2 drops of PVA from a medical syringe without a needle to the crosshairs of the mesh that fall on the stones.
- Dry for another 2-3 days, and the rug is ready.
Carpet weaving has always been and is a highly profitable occupation among all peoples, under any political system and economic system. A margin (rise) of 200-300% is an ordinary phenomenon in this business. But do not rush to get into the credit swamp to purchase equipment and start a cottage industry based on theory alone: the requirements of potential buyers for the quality of carpet products are also traditionally very high.
To get started, it wouldn’t hurt to watch a master class on making homespun carpets.
Video: making homespun rugs - master class
Then, get a carpet weaving loom. Simple and inexpensive, but suitable for the production of commercial-grade products. Its basis is a strong frame; wooden - from timber from 40x40 or plywood from 20 mm, pos. 1 in Fig. If you have an old window frame lying around somewhere, carpentry work is no longer necessary.

Weaving equipment from scrap materials for carpets
The following are guide pins for threads and pegs. Here, modernity is better than antiquity: push pins-markers with a long neck (item 2) are just what you need. For handicraft work, they have a number of advantages compared to steel and wooden pegs:
- Cheap per piece.
- Installed by female forces. Screwing in several hundred threaded steel pegs or installing the same number of wooden pegs is a job even for a hardy man, and even a child can push buttons into pine.
- They are easily rearranged, practically without damaging the wood.
- The size, if inserted close to each other, is just right for weaving rugs.
- By placing the pins in a checkerboard pattern, you can give the warp and/or weft to the fabric more tightly, and by placing them at intervals - less often.
- When installing pegs from buttons, both the thread and the plait or braid will pass as tightly as possible into the windows between the necks.
- Smooth, slippery necks of the buttons will ensure uniform tension of the fabric threads.
Your dearest believer can and should also be harnessed to make the machine: let him make a comb the entire width of the frame window for stuffing the weft from a wooden (preferably oak) block and pieces of knitting or bicycle needles. In extreme cases, you can stuff it with a fork, as described above, but with a comb the work will go faster and better.
Next is the shuttle. A fishing shuttle is not suitable for weaving nets; it is designed for rather complex manipulations of knitting knots. When weaving, you will have to turn it over all the time, and throw off the consumable loops, making movements with your fingers, which is very tiring in an already difficult weaving job. A salted and tanned fisherman who has just tied his net can be recognized by his crab-shaped hands. The smooth spool shuttle easily dives into a very dense base, but it also needs to be turned over, which slows down the work, and the manufacture will require high-quality materials and metal work.
For weaving rugs, the old-style handloom weaving shuttle is best suited. Its drawing is given above at pos. 3. Material – hard wood, plywood, hard plastic 2-4 mm thick. How the thread is wound onto this shuttle is shown in pos. 4. The consumable skein is thrown onto the beak with loops alternately on one side and the other. To remove the next loop, the shuttle is pushed back, it will come off the beak itself. This should be done when the shuttle is outside the base.
Finally, tying a new thread to the end. How to extend tapes and strands was described earlier. And the thread is tied with a simple weaving knot, pos. 5. There are other weaving knots, but for fairly thick and strong carpet thread, this is the most suitable.
Well, if things have gone well, you liked your creations, and the buyers liked your creations, then you can think about how to make or order a real weaving loom for carpets with your own hands.
There are too many things accumulated in your closet that you can’t wear, and it’s a pity to throw them away? No problem! You can use them to make an excellent designer rug for your home using the ideas and technologies described in our article.

What is needed to make a rug? Yes, anything! Open the closet and examine things with a critical eye. The list of materials that can be used is very large:
- old knitted items - T-shirts, sweatshirts, jumpers;
- thick fabric from jeans, coats, jackets;
- remnants of knitting threads, rope or cord.

Advice! Materials can be combined, giving free rein to your imagination, as a result the house will be decorated with an original and unique carpet that keeps the warmth of your hands.


When choosing a technology, take into account the characteristics of carpets made of different materials. Patchwork and fleecy ones are suitable for the bedroom, they are pleasant to walk on barefoot, but they do not last long. Knitted and woven carpets are stronger, but tougher; they are best laid in the hallway and kitchen. Bathroom rugs should absorb water well, dry quickly and not fade.

Rugs for the front door need to be washed and cleaned frequently; it is better to use waterproof materials for them.

Also consider the style of the new item and its compatibility with your interior. Motley multi-colored carpets will fit perfectly into the design of a children's room, wicker and woven rugs will decorate a kitchen or country house.

A strict openwork carpet or a product with a classic ornament will take pride of place in the living room, giving it charm and comfort.

Types and methods of manufacturing
A colorful homespun rug or a patchwork rug – what should a novice craftswoman choose? The techniques for making carpets for the home are very diverse. If you exclude completely unique ideas, they can be combined into several groups.
Sewn– a decorative covering sewn to a dense base, or individual elements sewn together. This group includes shaggy bathroom rugs and “grandmother’s” rugs made from braided braids, as well as pom-pom rugs for children.


Knitted– rugs of rectangular, round or oval shape, crocheted or knitted. To give them volume, not only threads are used as material, but also strips of any non-flowing fabric.


Nodular– many pieces of soft fabric, rope or thread are tied onto a mesh base with a knot, imitating a long pile of grass. The base is polypropylene mesh from a hardware store.


Woven– for them, the traditional weaving technique with longitudinal and transverse threads and a simple homemade weaving “mill” are used. The basis of such rugs can be scraps of any fabric and thread. Durable weaving will prevent the fabric from fraying.

Wicker– they are mainly made from durable cord. These rugs resemble a mat, they are extremely strong and durable, but they are not very pleasant on the feet, so they are usually used in the hallway.

Glued– carpets made from original materials, glued to the base with a suitable adhesive. Any elements are suitable for their manufacture: leather, thick fabric, corks, pebbles. The main condition is that it should be pleasant to walk on them.

The tools needed to make a rug with your own hands are in the arsenal of any needlewoman: knitting needles and a hook, needles of different thicknesses, a sewing machine, as well as skillful hands and imagination.
Advice! Don’t be afraid to try new techniques that are unknown to you – mats can be a great way to practice and hone your skills.
Shaggy knotted rug
The basis for such a rug is a construction polypropylene mesh or a mesh for needlework. The pile can be made from any soft, non-flowing material - knitwear, fleece, terry cloth or thick knitting threads. Craftswomen often use old T-shirts to make it - this rug is soft and does not require extra costs.

Table 1. Knotted rug made from old T-shirts - master class.
| Steps, photo | Description of actions |
|---|---|
| Prepare strips of knitted fabric: open the sleeves and neck of the T-shirts, open the seams. Cut them using sharp tailor's scissors into strips 3-4 cm wide. The length of the strips depends on how long the pile you want to get, 10-25 cm is enough, taking into account tying a knot and further leveling. |
| Spin the resulting knitted strips in the washing machine without detergents on the shortest setting, for example, “rinse”. This is enough for them to curl into tubes. If you are using knitwear in several bright colors, make sure it does not fade, or wash different colored pieces separately. |
| The resulting blanks will be almost dry after spinning; they need to be dried completely in a dryer or scattered on a large terry towel - it will quickly absorb the remaining moisture. |
| While the knitted pieces are drying, prepare the mesh. Cut it to the size of the rug, give the base the desired shape. If the edges of the mesh are unraveling, tape them on both sides with adhesive tape. |
| To thread the pieces through the mesh you will need a crochet hook. It is brought from above into one of the grid cells and taken out into the adjacent cell. Grab a loop from a knitted tube folded in half and pull it into the first cell. The ends of the workpiece are threaded into the resulting knitted loop and the knot is slightly tightened. It’s more convenient to do this using the same crochet hook. The ends are straightened, their length is equalized if necessary, and only after that the knot is tightened tightly. When making a plain rug, it is more convenient to start from one edge and, moving in rows, fill the grid. If you want to make a rug with a pattern, it is better to create a template in advance and color the grid with multi-colored markers - this will make it easier for you to fill the pattern with scraps of the desired color. |
| The rows are filled in a checkerboard pattern - this will ensure uniform thickness and density of the pile. Check the underside of the rug from time to time and straighten out any knots if necessary. |
| The pile of the finished rug can be trimmed with scissors, and the edges can be trimmed with fabric to give it a finished look. To extend the life of the rug, you can sew thick fabric to the bottom. |


A similar rug can be made without a mesh; instead, you will need a dense base fabric. Knitted fabrics are made using the above method.
The base fabric is cut to fit the size of the rug. Glue a strip of narrow double-sided tape, and attach knitted tubes to it with the middle part, close to each other. They are sewn on a machine directly over the tape.

The first row of scraps is folded back, a second strip of tape and knitted blanks are glued at some distance, and stitched. Continue this way to the opposite edge of the base.
Advice! Rugs made from knitted patches can have any shape: heart-shaped, star-shaped, fluffy cloud. This will not complicate their production - it is enough to prepare the base of the desired shape.


Rug made of fabric braids
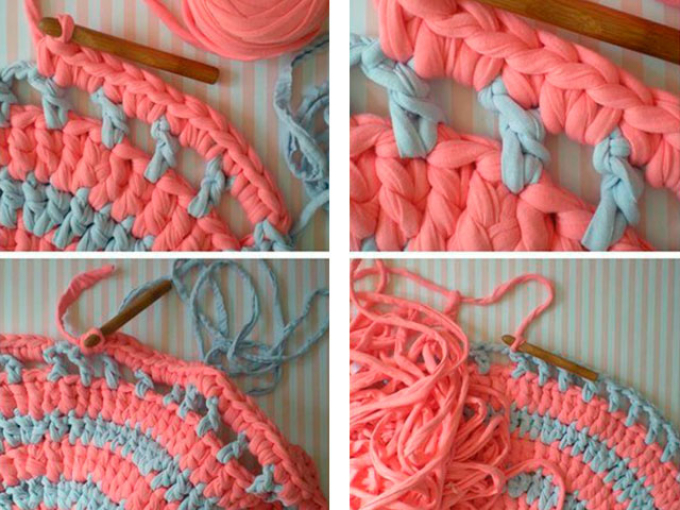
It differs from patchwork rugs in its dense woven structure and original variegated colors, which are achieved by interweaving knitted stripes of different colors.

For such a rug you will need knitted ribbons of different colors. The thickness of the finished product depends on their width; for a dense thick rug it is better to take ribbons about 5 cm wide. How to get a long ribbon without knots from a T-shirt is shown in the video.
Video - How to make a knotless ribbon from a T-shirt
Table 2. Carpet made of knitted braids - master class.
| Steps, photo | Description of actions |
|---|---|
| Cut old T-shirts of different colors into strips 4-5 cm wide as described in the video, this will avoid unnecessary knots. To make the strips curl into ropes, you can moisten them and dry them. |
| Fasten three strips of different colors at the ends using a strong thread. Start braiding them into a regular braid, not pulling them too tightly. Gradually roll the braid into a spiral. |
| After laying the next turn, it is necessary to secure it from the inside out using a needle and strong thread - no less than No. 20. |
| Gradually adding ribbons of a different shade, you can achieve the desired color scheme. It is convenient to connect the ends of the ribbons without knots using a needle and thread. The coils can be temporarily secured with office clips. |
| After laying the last turn, the end of the braid is carefully brought inside out and secured with threads. |


To make the carpet stronger, you can use a sewing machine. In this case, a long braid is first woven, and the winding is carried out directly under the machine’s foot. They wind the end of the braid, lower the needle to its beginning and, turning the product, lay the next turn. Sew with a zigzag at the junction of the turns.

Rug made of braids - manufacturing stages
A rug stitched by machine is more durable and rigid, lasts longer and looks neater, and this method also saves time.
Advice! When making a rug, it is better to use sewing machine needles marked H-S or H-SUK - these are needles for knitwear; they easily move apart knitted loops and do not tear the fabric.
Video - Rug made from old socks
Knitted rugs and rugs
Knitted rugs, which were very popular in the times of our grandmothers, are coming back into fashion. And this is not surprising - the knitting technique allows you to create uniquely beautiful things that fit into any interior.

Simple Crocheted Round Rug
The simplest option, which even a novice craftswoman can handle, is a two-color round rug knitted with double crochets. It will require knitted or thick wool yarn and a No. 10 hook.
Row 1. For the first row, you need to knit a chain of 6 chain stitches and close it into a ring. Threading a loop into the resulting ring, knit 2 chain stitches to lift the row and 11 double crochet stitches.

Row 2. The second row is knitted with a thread of a different color: 2 chain stitches and 2 double crochet stitches in each loop of the first row.

Row 3. Change the thread again. Knit two chain stitches, then alternate a double crochet and two double crochets in one loop according to the pattern.

Row 4 and further until desired rug size. Knit 2 chain stitches, then double crochet stitches in each loop and two double crochet stitches in one loop at the end of each sector. The color of the threads is alternated to create an ornament.

The last row is tied with a contrasting thread in single crochets and the last loop is tightened tightly. Cut the thread at a distance of 5 cm and hide the tail using a hook on the wrong side of the knitting.
Rugs can be knitted either crocheted or knitted. Mostly the simplest techniques and loops are used, but experienced craftswomen also surprise with complex openwork products. Patterns of knitted rugs are given below.


Video - Oval mat made from plastic bags
Homespun rugs and rugs
Classic homespun carpets and rugs have excellent thermal insulation and create a special atmosphere of comfort. In addition, to make them you can use scraps of any fabric - knitwear, calico, calico. The more varied the colors, the more fun the rug will be.

Woven rugs and rugs are made rectangular, their width is limited by the width of the weaving mill. How to make a simple woven rug is described below.
Table 3. Do-it-yourself woven rug from fabric scraps - master class.
| Steps, photo | Description of actions |
|---|---|
| To make a rug you will need a wooden frame that is the size of the product. It can be made from a board or block with a cross-section of 20x40 mm, connected with corners and self-tapping screws on the reverse side. Small nails are attached to the top and bottom bars of the frame - the warp threads are secured to them. Carnations can be replaced with push pins. Two removable wire rods are attached to the sides of the frame - weft threads will be attached to them; they are needed for the rug to keep its shape. The frame can be placed on a stand or placed on a table. |
| Strong threads or strips of neutral-colored fabric are used as warp threads. They are hooked to the nails on the top and bottom bars with a snake. Attach to a knot at the starting and ending points. |
| For weft, the fabric is cut into strips 1.5-2 cm wide. You can immediately tie individual strips into a common thread and wind them into small balls. The weft thread is attached to the corner nail and weaving begins. Thread the weft through the warp threads with a snake, either from above or from below the warp, alternating the position of the weft in each subsequent row. The edges are traced through the knitting needles on the side strips to ensure even edges. |
| It is convenient to weave from both sides from the edges to the middle. In this case, it is necessary to maintain the pattern and the same tension of the threads so that the rug turns out even. The wefts are pressed tightly against the previous row. |
| By gradually changing the color of the fabric stripes, you can create ornaments and smooth transitions. The optimal solution is to use fabric of different colors, but of the same structure. |
| At the final stage of weaving in the middle of the rug, it will be difficult to thread the balls between the warp threads; it is easier to use separate strips of fabric and a crochet hook. |
| The ends of the fabric strips are carefully tucked into the already woven rows by 10-15 cm, this will allow them to be well secured. After this, the free ends are cut off. Remove the base from the nails, take out the removable knitting needles and remove the rug from the frame. |


Video - Master class. Homespun rugs
Children's play mats made of pompoms
Bright soft rugs that even the little ones can sit and lie on are a great idea for a child’s room! To make such a carpet you will need multi-colored pompoms made of thread or fabric.
A pompom rug can be made from threads literally in one evening. For it you will need multi-colored knitting threads and base fabric. To make pompoms, a skein of thread is stretched between two supports and firmly tied at a distance of 5 cm with a thread of the same color, leaving the ends 10 cm long. Cut it between the constrictions and scissors to give the pompoms a round shape.

The ends of the tightening threads are pulled through the warp fabric or mesh and tied firmly with a knot. Place the pompoms quite tightly so that there are no tears in the mat.

An educational mat made of soft knitted pompoms is a more complex product, but it is simply irreplaceable for a child’s room, because even babies can be placed on it.
Table 4. Pompom rug - master class.
| Steps, photo | Description of actions |
|---|---|
| 1. Hot glue gun 2. Tailor's scissors 3. Strong thread and large eye needle 4. Cardboard template 5. Old T-shirts or knitted fabric in different colors 6. Thick fabric or non-woven fabric 7. Furniture foam rubber 8. Sintepon 9. Oilcloth for mattress 10. Bright fabric for a mattress cover 11. Zipper for mattress cover |
| A round template with a diameter of 12-15 cm is cut out of cardboard. Blanks for pompoms are traced using it and cut out from multi-colored knitwear. Their number and colors depend on your imagination. |
| Using a “forward needle” stitch, sew a circle along the edge with an indentation of 0.5 cm, and tighten the edges slightly. Scraps of furniture foam rubber are wrapped in synthetic padding so that there are no protrusions. |
| Pompoms are formed from fabric and filling, the edges are finally pulled together and sewn up. |
| Prepare pompoms of different colors in the required quantity. They are laid out in bags so that later it is convenient to create a drawing. |
| The base of the rug is cut out of thick fabric in the form of a circle with a diameter of 1.5-1.6 m. The pompons are glued to the base using a hot glue gun, following the chosen pattern, in this case a rainbow. |
| Having completely secured the design, you can begin making the mattress. It is made from furniture foam rubber with a thickness of 50-100 mm. Cut out a circle with a diameter of 1 m, cover it with oilcloth, securing it with hot-melt adhesive. |
| A mattress cover is sewn from soft, bright fabric: two circles with a diameter of 1.1 m are sewn from the wrong side to 2/3 of the circle, turned inside out and a zipper is sewn in. Place the cover on the mattress and place it on the mat. For fastening, you can provide Velcro on its underside. |


Braided rope rug
A very practical and durable rug can be made from thick rope - nylon, jute or cotton. For a rug measuring 0.85 x 0.6 m you will need about 60 m of rope with a thickness of 1.2 mm.

For convenience, it is better to weave on a flat surface on which the dimensions of the rug are indicated - this makes it easier to maintain its proportions. The ends of the nylon rope must first be burned to prevent it from unraveling. The ends of jute or cotton rope can be secured by wrapping them with strong thread.
The weaving pattern is shown in the figure. First, weave the first row of the pattern, then repeat it several more times until the mat is completely filled.

Prices for bath mats
bath mat
Video - DIY jute rug
A homemade rug is not just a new life for old things. Small details made with your own hands give the home a unique flavor, create a positive attitude and an atmosphere of comfort.
There is no need to explain why there is a carpet in the house. It quietly and imperceptibly entered a person’s home and became a real stronghold of warmth and comfort. This yarn product has an ancient and rich history. Interesting fact: archaeologists believe that man first laid a fur skin on the floor, and only then realized that it could be put on his body. In the East, in European countries, for centuries, a carpet was considered a symbol of wealth, and sometimes an object of art, because its production required long and painstaking manual labor of craftsmen.
Today, resourceful needlewomen weave, knit from threads, sew rugs from scraps or old things with their own hands, and all this with minimal monetary costs, and sometimes for nothing. There are many ways to make a masterpiece of carpet weaving at home, one of the simplest is to weave a rug from threads. Do you want to decorate your home with an exclusive fluffy rug? We offer several simple home crafts master classes.Cozy shaggy rug
To make a soft carpet that can adequately decorate your home, you will need carpet canvas or fillet mesh. This knotless base is traditional. It is better to use canvas, tarpaulin mesh, burlap or matting. Synthetics, wool or silk can become electrified and slide across a smooth floor. Carpet canvas can be bought in a store; as a rule, it is sold in rolls 1 m wide. For the decorative part you will need threads. You can use any leftover yarn; the more shades, the more fun and bright the product will be. A hook with a foot will be useful for this work, but you can also use a simple crochet hook.
Shaggy rugs


To make it more convenient, we will divide the whole process into several stages:
- The first step is to prepare the threads that will become a decorative component of the future carpet product. Cut the yarn into pieces of equal length. The “fluffiness” of the pile will depend on the chosen length of the threads.
- Let's proceed to the most labor-intensive but interesting stage - tying the threads on the warp. Using a hook, we pass the thread through the canvas square and tie a knot. So we “dive” the hook into each cell and fill each one with yarn.
Advice! The rug can be made monochromatic, made into an ornament, or made into a whole picture. For patterned weaving, you can use embroidery patterns or apply the design directly to the base. When marking, you need to leave a couple of centimeters around the perimeter of the product for the canvas.
- At the final stage, we need to “comb” our rug a little so that it looks neat. During the process of tying the threads, their length may differ slightly from each other, so the pile must be trimmed. The principle is as follows: the shorter the pile, the more clearly the pattern is visible.
Tips for beginners. Master class on crocheting a rug.
There are several ways to tie threads to the base. For example, using a special hook with a foot, you can make loops that do not need to be trimmed at the end of the work. In this case, the knot is still tied, but the ends of the threads are not pulled out completely. For this technique, you can also safely use embroidery patterns.
Making a rug with your own hands
Shaun the Sheep made from pompoms
Another simple way to make a rug from threads with your own hands is from pompoms. These rugs can have a classic geometric shape, or you can get a little creative and give the product the shape of an animal. This rug will be an original addition to the interior of a children's room.
 Rug in the shape of a lamb made of pompoms
The essence of the process is simple: you need to attach fluffy pompoms made of thread to the base. How to make them?
There are several ways, each needlewoman can choose the more convenient one for herself:
- Tool. In craft stores you can buy a special template, which you can wrap around to create a perfectly shaped ball. It can be used repeatedly.
- Cardboard template. The most common method for making thread balls is using cardboard circles. To do this, two “donuts” of the same diameter are cut out of thick cardboard. The principle is as follows: a thread is inserted between them and wound tightly onto the pattern. The thicker the layer of yarn, the more voluminous the ball will be. At the end, move the halves apart a little, tie them tightly in the middle with thread, and then cut along the edge.
- Fork. An ordinary cutlery can be a convenient tool for making pompoms. To do this, the thread is wound crosswise around the teeth, and then cut on the sides. The result is a dense but miniature pompom.
Pompom on a fork
To make a rug in the shape of everyone's favorite cartoon character Shaun the Sheep, you will need white and black wool blend yarn, mesh or fabric for the base, scissors and decorative eyes.
The algorithm is as follows:
- Draw a pattern in the shape of a sheep on cardboard and carefully cut it out. You can use a ready-made template or draw it yourself. Transfer the template to fabric or mesh and cut it out. The edges can be immediately processed - hemmed or crocheted.
- Let's prepare the “wool” of the sheep. Using any convenient method, we will make pompoms from threads, white ones for the back, and black ones for the paws and head of the ram.
- We begin to attach the blanks.
Advice! If the product is made of mesh, the pompoms are simply tied on, and if the base is fabric, then the pompoms are sewn on. We make sure that the balls are located tightly to each other, so the rug will turn out fluffier.
- When all the balls are fixed, we sew the eyes to the muzzle. A beautiful and fluffy rug for the nursery in the shape of a cheerful lamb is ready.
Shaun the Sheep pompom rug
In a similar way, you can make a rug in the form of a juicy watermelon, a multi-colored butterfly, the sun or your favorite cartoon character, decorating the children's island in the house in an original way.
Ladybug pompom rug
Fantasy is the engine of progress in creativity. Using the ideas of experienced craftswomen, you can make luxurious home decor from the most ordinary things. It is interesting that many needlewomen have made the production of rugs with their own hands from threads not only a favorite hobby, but also a way of doing home business. Making interesting and simple crafts can be used as lessons on developing motor skills for children, turning the process into an exciting family game.
How to quickly make a lot of pompoms
Rug made of pompoms

DIY carpet made from old things
Before starting work, we need to prepare the “yarn”. Knitwear (T-shirts, T-shirts, blouses) is best suited for knitting rugs. It will be great if things turn out to be bright and natural, then your DIY rugs will be rich and pleasant to the touch. Spread the prepared item on a flat surface.

Cut off the bottom finishing seam.

Then we cut a strip 2-3 cm wide from one seam of the product to the opposite one. Before cutting 3 cm to the second seam, we stop.

And with such strips we cut all the fabric up to the armhole line.


As a result, we get one whole tape. In this way you can cut any thing, even children's tights. Please note that the width of the tape depends on the thickness of the fabric you are cutting. The thicker the fabric, the narrower the ribbons should be.


The remaining part of the item can be cut in a spiral. Round the right corners on the spiral tape. Tie or sew the resulting ribbons of different lengths. Using the “spiral” method, you can cut the smallest scraps and tissue remnants.
We wind the resulting ribbons into balls and take the next thing. It is better to wind ribbons of different colors into different balls, so when knitting it will be more convenient to select the color. The more multi-colored balls you get, the more interesting it is to work and the more fun the rugs will be. New life for old things: 10 witty ideas.

DIY knitted carpets
Even a beginner knitter can handle knitting a rug. We will need a hook (from No. 7 and larger) and your balls. Before you make your own knitted rugs, decide where you will place the rug. Then it will be easy to calculate the required size and choose the color scheme.


We collect the required number of air loops - this is the width of the future rug. And we knit the rug in the simplest way - single crochet. Knit the first rectangular rug - this one is easy to knit. Let the next one be round. To do this, connect 5 air loops into a ring and then knit in a circle, not forgetting to add loops.


DIY carpet made from yarn
Nice rugs are made if you make 2-3 rows of the same color, then change to another color and return to the first one. It all depends only on your imagination and the availability of multi-colored material. I really like the finishing touch to the whole piece. The advantage of this method is that you can knit a rug that fits perfectly!
Weaving
To weave a rug, you will need a frame (a photo frame will do). You can make it yourself in dimensions of 30 by 45 cm with rows of nails with small smooth heads stuffed along the long sides. The distance between the nails is 2.5 cm.

We stretch the warp threads onto the nails in pairs. The base can be a neutral color. If you pull the rows tightly together, it will not be visible at all. If you weave loosely, then keep in mind that it will be visible.

Now take the working thread and begin to pass it either under the warp thread or above it.

When the first row ends, pass the thread through the last warp thread and point it in the opposite direction. At your discretion, make the desired number of rows.

When you decide to change the color of the working thread, simply cut and tie the end with a thread of a different color. If you want to make a rug with fringe, connect the ends of working threads of different colors, leaving “tails”.
Periodically pull the woven rows towards the very first row. Place all knots and seams on the wrong side and carefully remove the item from the frame.

The rug is ready! Add some fun ponytails and try them on!


These are just a few options on how to make a carpet with your own hands. They seem to me the simplest and most entertaining. The kind that you can do even with children.