How to make flowers from plastic bottles with your own hands for the garden. Flowers from plastic bottles
Helpful Hints
These flowers can decorate gifts, rooms and/or postcards. Not only do they look beautiful, but they will forever "blossom".
And since plastic bottles are used in the manufacture, you are also helping nature - plastic products can decompose 450 - 1000 years. To date, about 90% of all plastic bottles are not recycled and we want to change that.
Making beauty out of garbage beautiful and noble in relation to our planet. We offer you several color options made from plastic bottles.
Flowers from a plastic bottle. Option 1.

You will need:
Plastic bottles
Scissors
Lighter or candle
Pliers or tweezers
Tip: try to work indoors with good ventilation, on a balcony or outdoors. If you decide to make plastic flowers at home, then open the windows and leave them open during and, for some time, after work.
1. You can use the center, bottom and/or top of a plastic bottle.

First you need to draw a template for your flower and cut it out.


3. All flower petals need to be bent in one direction.

4. Get your lighter ready. Take the flower with pliers and bring it to the flame. As the flower begins to heat up, its petals will begin to deform.
Be careful not to overdo it with heat, otherwise you will spoil the flower.

One by one, form all the petals.
5. It is worth doing several of these blanks.

6. You have semi-finished products ready. Now they need to be connected together in the middle. Prepare 2-3 blanks. The connection can be made using the same heat.
You can also pre-make two holes in the middle of the blanks and sew them together, attaching a decorative button on top in advance.
Flower from a plastic bottle. Option 2.

1. You need to make 7 blanks, but each should be smaller than the previous one. To make them, first draw 7 patterns (see picture).

2. Trace the templates on the pre-prepared parts of the plastic bottles and cut out the quatrefoils.


3. In the middle of each workpiece, you need to make a small hole with an awl.

4. Now each blank needs to be melted over the fire. Use a lighter or a candle and, as in the first example, start heating the workpiece, while bending the petals up in turn.

5. Prepare a green plastic bottle to make a corolla of sepals. Make a whisk, like the previous parts, i.e. melt each petal a little and make a hole in the middle.


6. The flower stem with leaves is also made from a green bottle and wire. From the central part of the bottle you need to cut a spiral. Its width should be about 1 cm.

7. Prepare the wire. It must be wrapped with a spiral cut from a bottle. It is worth noting that when winding, you need to heat the spiral over the flame.


9. Press the beaters firmly against each other to release the end of the wire, which in turn needs to be bent into a loop.

10. Prepare a leaf stencil from construction paper and use it to cut out the leaves from a green plastic bottle. Like the rest of the details, the leaves need to be melted and twisted a little (see picture).


Flower from plastic bottles. Option 3.

You will need:
Plastic bottles
Scissors
Spray paint cans
1. Prepare paints of two colors. With one can, paint the entire bottle, and with the other, draw several different stripes.

2. When the paint is dry, cut each bottle into 2 pieces (you can choose any size).

3. Start cutting out the petals. To do this, you need to make cuts on each part of the plastic bottle. Do this so that you get stripes resembling petals.

Plastic bottles. Flowers. Master Class. Option 4.

You will need:
Plastic bottles
Stationery knife
Bead
1. Prepare plastic bottles and cut off the bottom of each of them.

2. Hold the tips of the petals over the candle for a more realistic look.

3. Choose a paint color, like orange, and paint the flower. You can also color the tips of the petals by applying a thin green line.

4. Heat the dot in the middle and glue the twig to it.

5. Use green paint to color the small flower.

6. For beauty, you can attach a bead to the center of the flower.

7. Now you can connect all the details.

How to make flowers from plastic bottles. Option 5.

You will need:
Plastic bottles
Markers
Scissors
Decorations for flowers
Glue (preferably superglue)
Baking tray
Oven
1. Wash and dry the plastic bottle.
2. Cut off the bottom of the bottle with scissors. Feel free to experiment with the shape, but you should still end up with a flower-like shape.


3. Make sure the room is well ventilated. Prepare an old baking sheet and place the bottoms of plastic bottles on it.

Turn on the oven and bring the temperature inside to about 200 degrees. At this temperature, you need to hold a baking sheet with plastic flowers for about 10 minutes.
4. Remove the tray and let the molds cool. Remove them and start decorating to taste. You can use markers, or glue beads in the middle of the flower.


How to make a flower from a plastic bottle. Option 6.

You will need:
Plastic bottles
Stationery knife
Scissors
Acrylic paint and brush
Glue (glue gun is better)
Drill (for holes)
Buttons
Connecting rings
Candle, lighter or heat gun
baking sheet
Oven
Pliers
1. Cut off the bottom of the plastic bottle to get a flower-like shape.

2. With an awl, make 2 holes in each "flower" - the holes should be on opposite sides, on the edge of each petal. With the help of these holes it will be possible to connect all the flowers with rings.
3. Place the blanks on a baking sheet. While holding the flower with tweezers, start heating the flower with a flame or heat gun. Do it carefully and don't overdo it. It is also worth remembering about the safety and ventilation of the room.
The flower petals will begin to bend during heating, so stop heating when the petals are in the shape you want.


4. Start painting flowers with acrylics. Next, let the paint dry. It is not necessary to paint on both sides.

5. Make two holes in the middle of each flower to sew on buttons.
![]()
Today, DIY is a fairly popular activity, and craftsmen often choose materials that can be called garbage, such as used plastic bottles. You can just throw them in the trash, or you can turn them into something beautiful.
Flowers from plastic bottles can become a decoration of a personal plot, a playground and even a home interior. For such a handmade, you do not need to purchase expensive fixtures and materials, and the result can be a real delight.
This bulbous plant, common among gardeners, blooms with a beautiful lush raceme consisting of many small fragrant flowers.
Of course, you can’t make fragrant hyacinth from bottles, but you can create a magnificent copy, it’s enough to have materials at hand, desire and step-by-step instructions:

Using the same method, you can make as many luxurious plastic hyacinths as you want - for the garden, home or other needs.
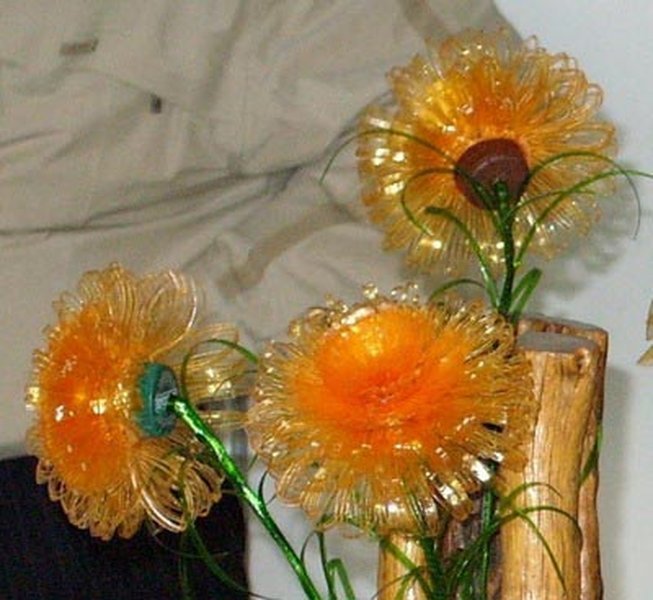
bright sunflowers
Perhaps the large, sunny inflorescences of sunflowers are the most summer flowers - mini-suns. And if you make a flower out of plastic, then it will delight with its brightness all year round.
You will need the following materials:
Making a sunflower is quite simple, the instructions will help you navigate the process:
- A plastic bottle is cut into 3 parts - the neck and bottom are cut off.
- The remaining part is cut into large petals, but not completely.
- After all the petals are bent so that the product takes the shape of a flower.
- Then they need to be painted on the outside and inside - you can use acrylic or spray paint.
- The same must be done with the remaining plastic bottles.
- When all the parts are dry, they must be assembled like a nesting doll - one part is inserted into another, and glued together.
- After that, a core is inserted into the middle of the flower - the bottom from a dark bottle and is also glued.
In order for such crafts from plastic bottles to become full-fledged flowers, you need to make a stem from metal rods. In conclusion, it is necessary to paint it with a green tint, attach a few leaves - and that's it, the decoration for the garden or home is ready!
Lush chrysanthemum
Another luxurious flower looks no less impressive from plastic - a chrysanthemum. To build similar flowers from plastic bottles with your own hands step by step is within the power of beginners, you should prepare the following in advance:

Chrysanthemums - flowers from plastic bottles master class:
- It is necessary to cut a cylinder (about 11 cm in size) from the bottle, using its lower part.
- The walls of the cylinder are cut into narrow strips - 4-6 mm wide and up to 9 cm long.
- Improvised petals are bent outward, and then twisted inward with the help of 2 pencils to make spirals.
The result is fluffy chrysanthemums, not yet very similar to real ones. You can “revive” them using acrylic paints or nail polish - in color they turn out to be very bright and beautiful.
But the masters of maid-made have more than one way to make flowers from plastic bottles. For example, you can apply another method:
- The neck and bottom are cut off from the plastic bottle.
- The cylinder is cut into narrow rings - about 6 mm wide - how many parts you get depends on how fluffy the chrysanthemum head turns out.
- One tiny hole is made on each ringlet (not wider than 1 mm).
- 2 small holes are made in the bottom of the bottle, and a fishing line is passed through them. It is tied in a knot on the inside.
- All plastic rings are strung on the fishing line, and the latter is tightly shifted to the base. Fluffy petals will turn out of them, and the chrysanthemum will be magnificent.
- The petals are fixed with a paper clip, and the end of the fishing line is tied into a knot.
You can make several flowers and collect them into a magnificent bouquet.
Bottle pots and vases
A plastic bottle is a versatile ornamental material from which a variety of things are made, in addition to flowers - weave baskets, build flower beds, seedling boxes, garden displays, and so on.
You can also make a great flower pot from a plastic bottle if you need it, but there is no free one nearby. The easiest way is to build a pot using a plastic bottle and a disc - CD or DVD. In addition, you will need a hot glue gun and paint.
The manufacturing process consists of the following steps:
- Make marks on the bottle so that it is evenly cut into 2 parts. Also, the edges can be made wavy or triangular. If you do this with a soldering iron, the edges will turn out smooth.
- From one bottle, two products are obtained - a pot from a part with a bottom, the other - from a disk and a part of the bottle.
- Using a glue gun, the disc is glued to the bottle neck with the middle.
Each flower pot can be decorated as you wish - you can cover them with paint, make an ornament with a stencil, glue them with artificial pebbles, shells or other materials.
In addition, beautiful vases are obtained from bottles, in order to make a nice product, you should prepare:

When everything is ready, you can start making a vase:
- the upper part is cut off from the bottle;
- the edges of the part are glued with electrical tape so that they do not cut the flowers;
- in order for the paint to better lie on the surface of the future vase, it is necessary to cover it with a primer;
- when the primer dries, you can apply a coat of paint;
- if there is a desire to show imagination, then you can gradually paint the vase in several colors - first cover it with one layer of paint, let it dry and glue some areas with electrical tape, and paint over the rest (the tape can be removed only when the paint dries well!).
Plastic vases can also be decorated to your heart's content or left untouched. In addition, whole compositions can be made from them, using several products of different sizes, but made in the same style and color.
Products made from waste material, including plastic bottles, sometimes attract admiring glances, they are so elegant and neat. Flowers can be a real decoration, it is enough to make a minimum of effort and use a creative approach.
Modern designers do not use anything in their work, so if you want to learn how to make flowers from plastic bottles with your own hands (step by step for beginners), then you can also be called partly a designer. Well, or at least just an original creative person.
The process itself is not too complicated, but there are some nuances. Plastic is not plasticine, you can’t just give it a shape, you need heating. So let's start with safety.
Operation Precautions
As already mentioned above - the plastic will have to be heated. To do this, you need the most ordinary candle. You should not use a lighter, because a long delay in its lit state can lead to overheating and an explosion.
Be sure to cover the work surface with thick paper. Plastic can melt when heated, and drops of hardened plastic from the tables are usually scraped off along with the paint, forming ugly burns.
Speaking of burns. Be careful - drops of plastic and wax from a candle can fall not only on the table, but also on your hands. Do not wear rubber gloves, otherwise you may get a double burn. It is better to carefully monitor the process and the resulting drops.
Also, do not forget about safety measures when painting products - use a respirator when working with spray paint.
The room in which you are going to make crafts must be well ventilated. In general, it is better to do it on the street.
Tools for the job
You will need for work:
- Plastic bottles of different sizes
- sharp scissors
- Construction (large clerical) knife
- Candle
- Lighter or matches
- Wire
- Beads and large beads
- Glue, tape, awl
- Paints
Scissors should be hard with sharp noses and good sharpening. Glue choose PVA or similar, but with good tenacity. Glue should not be taken for a moment - it hardens very quickly, and not always the product can be immediately folded as it should be.
Let's move on to crafts
Now we go directly to the instructions on how to make flowers from plastic bottles with your own hands (step by step for beginners).
Before you start cutting bottles, make stencils of petals and other cut-out parts from cardboard, so it will be easier to mark the cut-out parts. Neither a pen nor a pencil sticks to the plastic, so it is best to mark the boundaries of the cuts with a needle or an awl. You can slightly warm the tip, then there will be clearer traces.

After all the necessary parts are cut out, they need to be burned and smoothed. For this, the edges are heated with a candle. After heating, the edges not only become smooth, but also slightly wavy, giving the product a more natural look.
Clivia is considered the easiest flower for beginners. You don't even need to cut anything to make it. Cut off the bottom of the bottle. Cut the top into 6 approximately equal strips to the neck. Slightly round the top of the strips. And treat each petal with a candle.
 Now make a core of beads. To do this, beads are strung in one row on one end of the wire, and then the second end is passed through all the beads, except for the last one, in reverse order. Simply put, the wire is folded in half, a bead is hung in the middle between the halves. And the rest are strung on both ends at once.
Glue can be used to connect the core to the flower. But it will be more reliable to make several small holes in the lid with a hot awl, thread the wire through them and twist from the outside.
The stem of the flower can be made from narrow bottles, for example, from shampoo. Several bottles are connected to each other in a stem using wire and electrical tape. Then a flower is attached to the stem with the help of electrical tape.
Now the design can be painted, dried and installed in the garden!
Video: do-it-yourself flowers from plastic bottles step by step for beginners
These are very simple, but pretty enough flowers from plastic bottles that you can do yourself, besides step by step for beginners. With a little practice, you can create masterpieces like rose bushes or miniature sakuras, violets or tulips. The number and shape of plastic crafts are limited only by your imagination!
Recently, lawns and adjacent areas in the city are decorated with plastic crafts. When the snow melts and buds appear on the trees, flowers from plastic bottles already flaunt on the lawns. We will consider a master class on field, indoor and garden plants from this material in the article.
Basic rules for working with plastic bottles
It is better to work with plastic for adults or older children under the supervision of a mentor. The fact is that in this work you have to work with prickly tools (scissors, an awl, a knife, a cutter), spray paints, fire, which can lead to injuries if you are inattentive.
The technique for making flowers is simple: draw a template, transfer it to a plastic base. Next, cut out the leaves, petals or finished flower. Poke a hole in the middle of the flower blanks with an awl or soldering iron and give them the shape of petals with the help of fire. First, singe the edges, then from the wrong side of the petal under the flame, create a bend in much the same way as when creating flowers from satin ribbons. Use tweezers when performing this procedure.
You can make flowers from a plastic bottle from its top. In this case, a hole is pierced in the lid itself, which fixes the position of the stamens and pistils. Leaves are attached with fire or green electrical tape. The stem can also be wrapped with melted plastic or duct tape. To make the plants look like real ones, it is advisable to paint them with rain-resistant alkyd spray or acrylic paints.
Decorations for wicker fences and trees
A variety of fences for flower beds are woven from branches. Different flowers are attached to the interweaving of branches for beauty. Trees are also decorated with flowers and other plastic crafts using rope or wire, without deforming the trunks.
Consider how to make small five-petal flowers from plastic bottles. The master class is very simple.
- Draw a five-petalled flower on paper.
- Transfer this template onto the bottle with a marker.
- Cut out the blanks.
- Bend the petals to the sides with your hands.
- Flame all the edges of the flower so that the cuts become smooth.
- Then run flames under the petals to give them a curve or slant.
- Try on the workpieces to each other.
- Determine the middle of the flowers and pierce with an awl in two places.
- Connect the workpieces with a wire, on which thread two or three beads.
- Twist the wire from the wrong side and cut off the excess ends.
- Now the flowers can be attached to the hedge. If you do not want to make holes, then the first blanks can be made from the top of the bottles, where the mount goes through the lid.
Roses for street and home
To make roses, you need to draw patterns of different sizes. The more elements, the more magnificent the flowers from a plastic bottle (a photo of roses confirms that layering is created due to petals of different sizes).

Draw on paper seven patterns of rectangles and squares (these will be the elements for one rose). Within their borders, display a flower of four petals, in which the margin has a concave cut. Now transfer the rectangular and square blanks to the bottle. Cut them out with flower patterns.
Use an awl to make a hole in the middle of the rose. Now singe all the flowers over the candle, lifting the petals up. Remember that melted plastic can burn you badly, so use tweezers.
The formation of roses
Wrap a thick wire with a plastic strip, which is melted over the flame. Leave one edge of the wire for flower blanks and sepals (you will put them on in descending order). The middle of the rose can be decorated with a bead and secured with wire. Or cut a small circle out of the bottle, cut it into strips, singe it over a fire, forming stamens, and attach it to the middle of the flower.
Next, from the green bottle, cut out a leaf template on a 3-petiolate stem. Scorch the workpiece over the candle. Twist the leaf petioles under the flame and attach the leaf to the base of the rose stem, wrapping it with the melted plastic edge. According to this scheme, make yourself a whole bouquet.
Flowers made from plastic bottles will be more realistic if they are tinted with paints. For example, veins or dark parts can be drawn in leaves; in the petals to enhance the color or add an additional shade. To simplify the work, you can wrap the stems with green electrical tape to match the color of the leaves.
Weird flowers from plastic bottles
The master class is a very interesting way to share experience, as it shows how to make real flowers out of plastic.
- From seven plastic transparent bottles, cut off the top with a lid.
- Cut 6 strips, form petals and singe them over the flame. In this case, first bend each petal. Then singe around the edges and again walk through the middle of the petal.

- Paint the blanks with red spray paints.
- Once the surface of the petals is dry, apply yellow paint to the center of the flowers.
- In the lid of each flower, use an awl and scissors to make a hole of such a diameter that the pistil and stamens that will be made of beads can crawl through.
- Color it green (this will be the sepal).
- For a pestle, string a large bead on the wire, which will be its stigma, twist the ends of the wire. Only then dial 22 pcs. green beads.
- Make stamens in the same way from glass beads and 19 pcs. blue beads.
For one flower, you need to collect the pistil and 6 stamens in a bunch, wrap them with thread and insert them into the lid with glue.
We collect flowers in a bouquet
Our flowers are similar to clivia, so consider their location on the stem in any photo. Flowers from plastic bottles for one plant need to be made seven pieces. While the stamens are drying, make 8 large leaves from a green bottle, four medium and small oval leaves each.

Work each petal over the flame and straighten it a little. Make a hole at the base of the leaf and attach the wire. Now, for the stem, take a meter thick wire or cable and start placing the flowers in the desired position: one flower on top, then, after 20 centimeters, 3 flowers, and after the same distance - 3 flowers that look in different directions, since their stems bent 90 degrees.
Then, after 10 centimeters, leaves are fastened in 2-3 pieces, starting and ending with the smallest ones. That is, the arrangement will be as follows: two small, four rows of large leaves, two rows of medium and two small leaves. The stems are attached with green electrical tape. Such flowers can be installed in a flower bed.
Palm trees - interesting crafts from plastic bottles
A flower is often made from transparent bottles, but what to do with brown containers? And let's make a palm tree out of them! We need brown and green bottles. For the trunk of a palm tree, you dig a cable into the ground, which must withstand a strong wind. Brown bottles will need to be cut from one end with 8 pointed teeth. If you leave the bottom, then make a hole in it, but if you use the top of the bottle, then unscrew the cap.
You put on tooth-shaped brown blanks on the cable, while straightening the leaves to the sides with your hands or with the help of a flame, creating the effect of a tree bark. As soon as you have reached the desired length of the palm tree, fasten the leaves that you make from green containers.
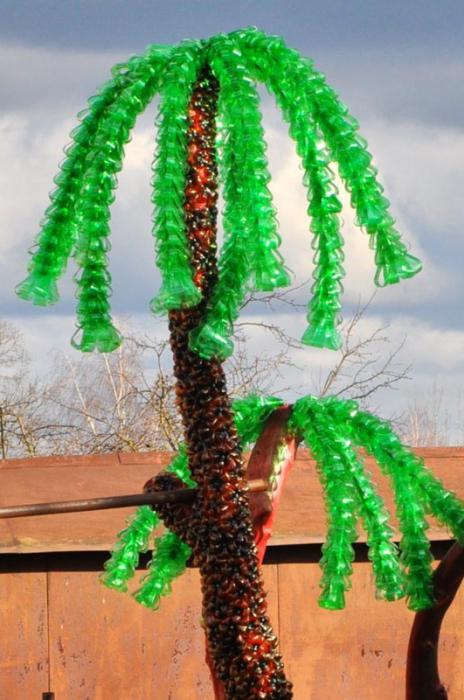
For foliage, the bottom of the bottles is cut off and long strips are cut to the top. Covers are not needed in this case. Next, leaves of the desired length are put on the cable and attached to the trunk of a palm tree. The more branches you make, the more magnificent the tree will be, but then take a thick cable.
yellow elegant flowers
Consider how to make graceful flowers from plastic bottles. The master class is as follows.
- From transparent bottles cut off up and down.
- Next, draw ordinary petals on them, similar to a rose: narrow at the base and with wide edges.
- Scorch each petal over a candle.

- From a transparent or green bottle, cut out individual leaves without petioles and sepals with 10 teeth, which you also melt over the flame.
- Paint the blanks with acrylic paints: the petals are yellow, and the edges are red, the leaves and sepals are green.
- Make two holes in the leaves so that they can then be attached to the stem.
- Now cut in half.
- Color it in and the bottom - in green.
- Make an incision in the middle to insert a petal, which you twist into a bud with the help of fire.
- Insert the rest of the petals with a tip, if necessary, creating one or another slope.
- As soon as the flower is collected, turn it over.
- Insert a kebab stick painted green into it.
- String a sepal and a leaf on it.
Create a whole bouquet according to this scheme.
curly flowers
Now let's look at the master class. Plastic bottles (flowers - from transparent, leaves - from green) prepare according to the standard scheme, cutting off the tops and bottoms. For leaves, cut the bottle in a spiral 10 centimeters wide. Draw leaves on it on a long branch, cut it out and melt over the candle, twisting the petioles in some places.

Then make patterns in two colors with five petals: large and small. You also burn with a candle and paint with paints. In the middle of the flowers, make holes and connect the two patterns with wire, taking a few beads for the stamens.
The next step is to pierce holes in the leaves in the right places on the vine and fasten the prepared flowers, cutting off the extra ends and hiding the wire in the foliage. Next, all the curly branches are connected into one bundle, fastened and hung on a nail or in a flower pot.
As you can see, from plastic bottles you can make a wide variety of flowers for the garden and home. And naturalness and naturalness can be given to them with the help of paints.
If you think that this is not for you, that you have both hands “left”, you could never even make crafts for a child in the garden, then do not rush to conclusions. You can create beautiful DIY plastic bottle flowers in minutes. It's very simple and all you need from the materials you probably have at home. In addition, such crafts are an excellent budget option for decorating for a summer residence, for a home, such flowers are also suitable as crafts for children in a kindergarten. So let's get started! We will tell you simple master classes for beginners.
- Before you start working with plastic containers, you should wash them well, clean them of paper or plastic labels.
- To make your crafts more lively and different, it is better to paint the bottles. For this, it is best to take acrylic paints, but they will have to be fixed on top with varnish. It is better to immediately purchase an acrylic varnish with a colored base. You can also use spray paint.
- In order not to cut yourself on the uneven plastic edges of the bottle or burn yourself from the fire, and without it you cannot get flowers from plastic bottles, it is especially important for beginners, always use gloves.
- To make it easier for you to make a good shape of flowers, always draw them first on cardboard in the form of templates. And already on them make plastic clippings. To outline, use a marker, awl or thick needle.
Materials for creating flowers from plastic bottles
Of course, in order for you to know exactly how to make flowers from plastic bottles, you need to know what you will need. There is nothing complicated here.
So, you will need:
- of course, the bottles are many and different to create different options;
- paints and brush for application;
- candle;
- pliers;
- wire;
- beads, beads or buttons for decoration;
- hot glue gun for clutching parts or thick threads;
- cardboard and scissors;
- marker, awl.
So let's get started.
DIY plastic bottle flowers step by step for beginners
Method 1. We make simple, spectacular flowers.
To make such a flower you will need literally 10 minutes. By the way, you can create a lot of them, and then make a large bouquet by attaching the stems. They can also be used individually, for example, to decorate the surface of a fence or wall with them. You can create a whole panel of multi-colored flowers.
- So, first draw a flower on cardboard. One of which will be larger, the other smaller. It is better to take different shades of plastic, as shown in the picture.
- Transfer the templates to the bottles with a marker, outline them. You can make a big flower from the bottom of a cut bottle. Then you just have to make cuts on both sides above each recess at the bottom.
- The blanks are ready, take them with pliers and heat them over a candle. But don't overdo it. Be careful and use gloves.
- When the plastic becomes warm, bend the cut edges of the bottom of the bottle, as shown in the figure. It will be a big flower.
- The small one you just cut out and lightly heat to give it a concavity.
- Between themselves, the flowers can be connected with hot glue or threads. Decorate the middle with a beautiful button, bead and beads.
Method 2. Making daisies

- You will need white plastic bottles. These are often found in dairy products. But choose that they are without ribbed walls.
- The bottom of the bottle must be cut off.
- To make daisies, you just need to cut out neat petals. To make them even, first draw a template on the bottle with a marker. Or cut first into two even parts, then into four and then into six. Then round the edges of the petals. But it's easier to draw first. Cut the petals to the top.
- To make the chamomile believable, look for bottles with an orange cap, or find one separately, or paint it.
- Connect the two bottles together and secure them with wire or thread, having previously made holes in the lid with a hot awl.
- For daisies, you can make a wire stem, decorate it with green leaves from bottles. To do this, again, draw patterns, cut and shape on fire.
Method 3. Making Roses

- Draw patterns in seven colors, different sizes as in the picture. These are all components of one flower.

- Cut them out of plastic. Take different shades of bottles for each flower.
- In the blanks, make a hole in the middle with an awl to fasten the petals together.
- Next, bake each plastic flower over the fire so that the edges are deformed.

- Combine all seven colors into one, add a beautiful button or bead to the center.
- To make a stem, take a green bottle, cut it into a spiral. Then heat over the fire and wrap around the wire.
- Add leaves to roses.
Method 4. Making zinnias and chrysanthemums
- We cut the bottle in half.
- Next, cut it up to the lid into thin strips. We make 2-3 more such blanks. You can take smaller bottles to make the flowers look more voluminous. These blanks can be cut off the neck.
- We heat the blanks over the fire, twist thin strips in the opposite direction with a knife or scissors. We do this with all bottles.
- We insert one flower into another and fasten them with hot glue. The middle can be made from a lid, so the flowers will look more like zinnias. If left without it, then the flowers will be similar to chrysanthemums.

- We make a stem from wire.
Method 5. Making sunflowers.

- We take the bottles, cut off the bottom from them, two bottles are needed for one flower. We do not throw out the bottom and paint it brown, if it is not.
- We paint the bottles equally in yellow and green.