The scheme of how to make a New Year's toy with your own hands. New Year paper crafts
To decorate the Christmas tree with "precious paper stones", you just need to print out the ready-made templates, cut them out and glue the paper Christmas decorations.
Before you completely glue the craft, attach a loop from the inside, for which you will then hang the toy on the Christmas tree. Finished paper stones can be covered with sparkles for beauty.
Small size templates: template-1 template-2 template-3 template-4 template-5
On the same site, you can download a template for another, more difficult to make New Year's paper craft - a paper diamond. It can also be used as a Christmas toy or Christmas decoration. Download template >>>>

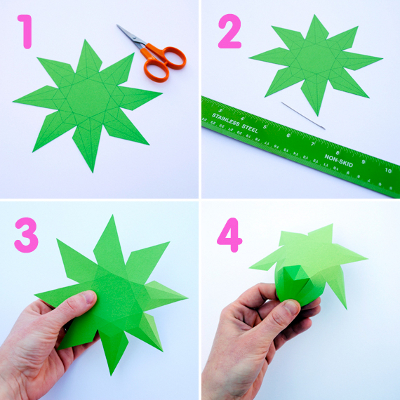
Print the New Year's diamond scheme on thick colored paper, cut it out. Before gluing the craft, carefully, along the ruler, scratch the fold lines (marked with a dotted line) with a needle to make it easier to fold the paper. Note: if you suddenly printed the template from the link above, but the dotted line is not visible on it, you can use this template. Here everything is the same, only there is no dotted line.
And more Christmas paper crafts from www.minieco.co.uk:
paper Christmas decorations


2. New Year paper crafts. New Year paper toys
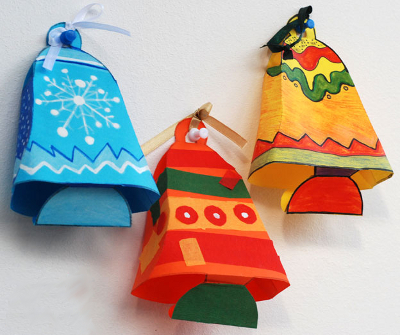
paper bells
3. New Year's decoration. New Year decoration
The Creative Park site from Canon, which is probably already known to many, will help you decorate the New Year tree with handmade paper toys. Christmas toys - bells, hearts, candy canes, Christmas tree decorations in the form of Christmas boxes - all this and much more you will find on the Creative Park website.


4. DIY Christmas decorations. How to make New Year's
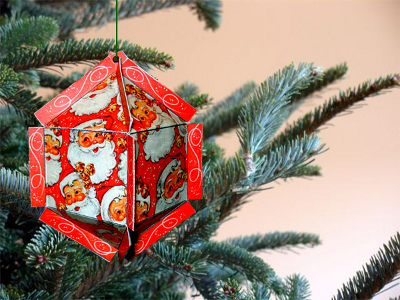
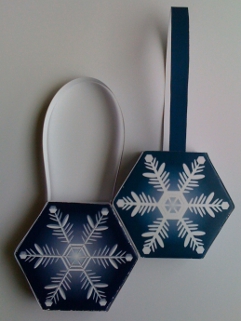
We suggest you make simple Christmas tree decorations out of paper, decorated with photographs of family members. To do this, you need to download templates for Christmas tree decorations from the link, cut out individual squares, bend their corners and glue them together. For a New Year's toy made of blue paper, it is necessary to cut off, round off the corners. See photo below.

In the photo below, a New Year's paper toy depicting Santa Claus is made in a similar way. You can download the template.
5. New Year's ideas. New Year's master class
Another interesting New Year's idea is an origami wreath Christmas decoration. To make such a paper wreath, you will need to cut beautiful paper into strips 4 cm wide and 8 cm long. You need 8 strips in total. Each strip must first be folded in half lengthwise, and then in half across. Holding the blank with the open edge up, bend its top corners down as shown in the photo. See the New Year's master class at the link >>>> From the resulting blanks, assemble a New Year's wreath by inserting them one into the other.

6. Christmas toys made of paper. How to make a Christmas toy
Most people associate ice cream with hot weather and summer vacations, however, Christmas decorations in the form of waffle cups with delicious treats look very festive and original on the New Year tree. To make these New Year paper toys, you will need Kraft paper (for cups) and corrugated paper of different colors for the ice cream itself.

Cut out circles from craft paper, cut them in half. From each semicircle, fold a cone, glue it. Crumple corrugated paper of different colors into lumps, for one Christmas tree toy you will need two such lumps. Now you need to string "cups" and "ice cream" on a thread, making loops on top, for which you will then hang New Year's paper decorations on the Christmas tree. See the New Year's master class at the link >>>>
7. Christmas toys made of paper. New Year's schemes
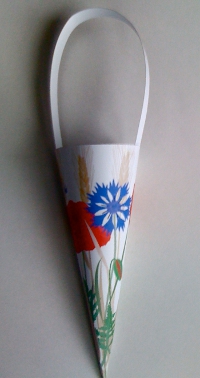
In Denmark, there is a tradition of decorating the Christmas tree with heart-shaped wicker paper baskets. The photo below shows traditional wicker baskets made of paper. They can be hung on the Christmas tree empty or filled with small sweets, nuts, cookies.

To make this Christmas paper decoration with your own hands, you need to print the following template on two sheets of paper in different colors. Cut them out, fold in half, make three cuts. You should get these two blanks.

Now you need to weave them together to make a paper heart basket. For a detailed New Year's master class on how to weave a paper basket, see the link >>>>


Here are a few more New Year's paper baskets for the Christmas tree:
With snowflakes

Homemade Christmas tree toys can be made not only by a needlewoman. There are quite simple options that do not take much time. They can be done with children or on your own. The most important thing is that your fluffy beauty will not be like the others. And the warmth of your hands, transferred to the toy, will be noticed by all relatives. 
Greetings to all readers of my blog, the New Year is a magical holiday! It carries so much warmth, kindness and inspiration that should be enough for all the next 365 days! Preparing for the New Year is a real sacrament. Buying (or even better - creating with your own hands) gifts for relatives, friends and relatives, planning a New Year's menu, decorating apartments and houses, and, of course, the most important New Year's process ... It's time to decorate the Christmas tree!
But now the next question arises: why? Surely in every house there is a box with Christmas decorations. Someone has old, still Soviet houses with a snowy roof, ruddy Santa Clauses and bullfinches. They, of course, are dear to the heart, but they are already old, tired, and the paint has worn off. By the way, I advise you to read, because the holidays are so fleeting.

Others have bright identical balls in the color of curtains and golden bows.

Stylish, no doubt. But the same - like everyone else. And what to think? The answer is simple: make homemade toys for the Christmas tree! Everything is perfect in this process: from the search for ideas to the preparation of materials, from the first detail to the final result.
Flight of fantasy is not limited! You can create from any materials, by any means and any crafts. But sometimes it's hard to come up with some kind of image on your own. In this case, it is not at all shameful to look: how are others doing it? And taking the proposed options as a basis, come up with something of your own, or just repeat some very cute little thing.
That is why I "climbed" the Internet in search of everything tasty and interesting. It is not for nothing that mine was opened. There are a lot of tips. We will look at some of them.
Paper Christmas toys
Cardboard, paper and glue are the most widely available materials. They are always in the house, especially when the baby grows. In addition, such homemade Christmas tree toys are easy to make, do not require special needlework skills and can be made by a child aged 8-10 years old on their own or with a little parental help if your child is younger.
paper balls
These balls are pretty easy to make.
 Decoupage glass jewelry with old German newspapers
 Source
We will need:
- 1 ball (you can use foam or plastic balls, which are sold in needlework stores as blanks for Christmas tree decorations) or a hemisphere (for example, molded from plasticine);
- glue (liquid is better, it would be ideal to dilute the paste, but PVA can also be used);
- newspapers;
- thin wire (you can use a paper clip);
- a thread;
- glitter, stickers or scrapbooking paper - optional.
We tear the newspapers into thin strips, spread each of them with glue and gradually glue the ball over them. As soon as the base is not visible under the layer of newspapers, put the product aside and let it dry - 40 minutes. Then we create layers 2, 3, 4 and 5 - similarly to the first. If a ball base is used, it does not need to be removed. If you made only half of the base, then you will first have to make the decoration in separate parts, and then glue them together.
After complete drying, you can apply a layer of varnish and pour sparkles. Homemade toys for the Christmas tree are valuable because they can be decorated as you like and with anything!
When the ball itself is ready, we proceed to the manufacture of the "top". If the work was carried out with New Year's balls, then we fix their holders on top. It’s even easier to glue a tinsel bow to the ball and tie a thread or ribbon on top so that you can hang the product.
To make "named" balls, it is enough to attach a leaflet with a name to the tinsel with a thread. You can write wishes, compliments and any other pleasant things on such stickers.
Gift wrapping with vintage paper
In the same source, I saw a New Year's craft, which is done in 10 minutes! From a sheet with notes, you need to make an “accordion”, alternately bending the paper with strips of 1-2 cm either in one direction or the other. Repeat steps with one more sheet. Bend each harmonica in half and glue along the free side to make it look like a "half-toy". Then connect the resulting semicircles to each other along the sides remaining without folds.

It can be used as a gift for someone dear to you. Take a simple box that you can find at any craft store, decorate it with an antique map and the resulting paper toy.
musical muse
To make beautiful homemade toys for the Christmas tree with your own hands, you need a true love of music!

Source
Required:
- glue;
- scissors;
- old notes;
- rhinestone (you can just cut a circle out of cardboard in color).
We cut three A4 sheets with notes each into 4 parts. From the first two we will make large rays, and from the third - small ones. We turn the quarter of the sheet into a cone and glue the junction. Please note that first the glue will need to be applied so that both sides of the cone stick together into one. And then carefully glue the rest. You need 8 such elements.
The next step is to cut the quarters of the last sheet in half again. We get 8 parts. The scheme is the same. After that, each beam must be glued to a rhinestone or a cut out circle. The back part can be closed with a layer of music paper, and a thread can be glued under it.
Another tip: to age the paper, you need to soak it in a bowl of strong tea, and then dry it. After wrinkling and ironing with a minimum temperature. I really like how the paper looks burned around the edges.
Be careful, set fire to the sheets only in close proximity to the water source!
DIY vintage toys
Such vintage toys for the Christmas tree with their own hands will harmoniously fit into any interior.

Source
To make such a New Year's beauty, you will need:
- colored paper (or scrapbooking paper);
- glue;
- scissors;
- wooden stick for the base.
Cut out strips from colored paper. Their length should be the same, but the width of each next one should be 1 centimeter more than the previous one. The number of strips and their size can be any - it depends on how you want to see homemade Christmas toys for the Christmas tree.
Twist each strip into a tube, glue the joint. Then connect all the strips together and all of them together - on a wooden base (can be cut out of cardboard). Don't forget the star and thread!
If ordinary colored paper is used, then I would additionally decorate such a madam with cut-out circles, stars, sparkles, pieces of tinsel. Give space to your child's imagination. Let him paint the stripes, stick bright stickers. Homemade Christmas tree toys for the New Year can be arbitrarily colorful and catchy. The main thing is with the soul!
Christmas tree toys made of cardboard
If the New Year's homework is a do-it-yourself Christmas tree toy for school, then you can make just such an owl.

Source
For this you will need:
- toilet paper sleeve;
- dye;
- glue;
- scissors;
- colored paper;
- white stickers with glitter.
It will be necessary to glue the edge parts of the base, paint the product with white paint. Cut out all the details from paper and place them on top. I would also knit scarves for the owls and add tassels on the ears of thread.
Another interesting and unusual idea is to make a cup of hot chocolate out of the sleeve.

Source
You will need:
- sleeve;
- tube for a cocktail;
- colored paper;
- glue;
- scissors;
- cardboard.
We prepare a paper cylinder from the sleeve - we cut it to the desired size. Then, from thick cardboard, we cut out one cylinder of the same diameter - for the bottom, and the other - for "coffee" - a little smaller so that it fits inside, but does not fall out. Spread a small circle with glue and put a slightly larger circle of brown paper on top. Next, let's deal with the mug itself. According to the "recipe" we are offered to glue it with a strip of colored paper, leaving a protruding part on both sides. At the bottom, cut it with a “fringe” and glue each of its fragments to the bottom separately.

But I would just wrap New Year's homemade toys on the Christmas tree with packing material, fixing the joints with glue or a stapler. Or even just foil! But if according to the recipe, then do not forget to glue the circle to the bottom.
After the packaging is ready, you need to put our "hot chocolate" inside, applying glue to the paper from the inside. After we deal with the upper edge: carefully cut the free edge, glue it piece by piece. We insert the “drink” into the vessel. Here, in the side edge, we make a hole for the future thread.

Now for a pen: rolled paper soaked in water and left to dry is fine. Glue to the circle.

The base is ready, then - decorations. There are no restrictions here: you can do it like the author’s, you can decorate it differently, for example, add a “lemon slice” using a curly eraser, or draw a “foam” pattern using a corrector or contour. Homemade Christmas tree toys for the New Year can be very non-standard.
There are many guides on the Internet on how to make Christmas tree toys with your own hands, incl. video. For example, to make a ball, you need:
- foam base;
- many different buttons;
- hot glue;
- ribbons.
We glue the ball with buttons, make a bow from a ribbon - and you're done!
For me, threads are a closer material. About how many different favors you can tie, write and write, this will be a life-long post. In addition, this activity is for moms, hardly for a child. So I'll just show a few interesting things that I found, without details.

Source

Knitted ball can be made in any color and any size. The thread is easy enough to sew on. You can tie a foam base, or you can fill a toy with padding polyester or other similar material.

Source
But from threads you can make things much easier. Homemade Christmas tree toys made of thread always look very interesting, tasty and unusual.

Source
These wonderful decorations can be ordered, but easier to make!
You will need:
- leg-split;
- foam base for the ball;
- double-sided thin tape or hot silicone;
- scissors;
- lace.
If you do not have adhesive tape, you can try to do it with silicone, but this is more painstaking work. Carefully, one row after another, it is necessary to wrap the base with a rope, gluing the thread.
If you decide to use adhesive tape to make these homemade toys for the Christmas tree, then it’s enough to make a “belt” for the ball from an adhesive strip (from left to right), and then two more lines perpendicular to the belt (from top to bottom).
Be careful not to glue one strip on top of the other so that there is no problem removing the protective tape. Attach the rope to half of the balloon. Then form the free part by unwinding some twine, and, as if making a “dead loop”, return to the winding of the ball in the same direction as you started. Once the first round is over, fix the "reference point" with a small pin or carnation. And start moving around this pin, gluing, when necessary, new fragments of adhesive tape.
In principle, you can use any thread - thin or thick wool, yarn. In addition, felt strips, woven from fabric or pigtail threads and anything else are suitable. When the winding is finished, you need to let the product dry and soak, if an adhesive mass was used, and then proceed to decorate.
Here you can learn how to decorate the base for the ball with twine. In addition, a wonderful option is offered to decorate the resulting craft with ribbons, lace and beads.
In the same way, you can wrap any figures. The convenience of this manufacturing method is that the subsequent decoration can be made by any elements. They can be sewn, glued, tied, attached with Velcro and anything else you can do with them!
Here is another option - this is the famous striped candy wrapped in twine. Fortunately, now these plastic imitations can be bought in bags and quite cheaply. Working with them is easier than with balls. You just need to fix the twine with silicone from a hot gun, and then wrapping it along the entire length, do the same from the other end.

Source
And another option is to do without foam at all. For example, as in this video on how to make toys for the Christmas tree with your own hands. The neck of an ordinary plastic bottle is used as the basis. First, close the cover area with mounting tape, making it even. Then put the bag on the bottle. And with the help of glue, carefully wrap the container to a certain level (depending on what size you want to get the bells in the end. As soon as the product dries, you should remove it from the neck and release it from the bag. And the final step is decoration.
Homemade toys for the Christmas tree can be made from threads with your own hands, using practically nothing but this very thread!

To make such an adorable snowman, you need:
- white yarn;
- a small cardboard box;
- scissors;
- needle;
- some felt.
The whole action is based on the principle of making pompoms for a hat. You have to wrap the cardboard in 30 circles with wool, cut the thread. Carefully remove the resulting skein, bandage it in two places, preparing areas for the head, abdomen and legs. Prepare another hank, smaller, for the hands. Remove it from the cardboard, make two narrowings. Then push the threads apart in the second segment in the frontal plane and thread the future handles through the hole.

Schematically, the snowman is ready. Cut the loops of thread on the arms and legs. And then start decorating. Trim all the ends of the wool so that nothing sticks out. From felt, you can make our gentleman a face and a scarf, as well as a hat. And you can link. Decorate a belt or buttons on the stomach. Tie a thread so you can hang the toy.
Christmas tree star
So, the decorations for the branches are ready! Now our beauty is waiting for her "finest hour" - when we put a star on her top. But how, from what can it be made?
While I was flipping through the pages in search of something interesting, an idea came to my mind: why not decorate the Christmas tree ... with a Christmas tree ?! And here is an option!

We will need:
- a sheet of cardboard;
- glue;
- green tinsel thread;
- candy bag.
We make a cone from cardboard, glue it along the joint. Glue a layer of tinsel on the base. Then - a layer of sweets, one by one. Then again tinsel, and again sweets! And you can replace sweets with a garland of lights and then our top will sparkle and shimmer, as it should be in the New Year!
If you made musical decorations, which were discussed at the very beginning of the article, then the star must also be musical!

Source
You can do this by cutting out the details by template. Then you have to fold along the dotted line, glue the joints - voila, you're done! The only difficulty is that you will have to redraw the template, or print it initially on music paper. However, you can use any other material.
For balls pasted over with newspapers, an appropriate star is suitable.

Source
Making such a decoration is quite difficult. There is a special master class for its manufacture, consisting of two parts. The first is about how to make an even pentagon, and the second is about how to make a star out of it.
A star can also be made from book pages, just like a toy can be made from musical notes.

Source
You have to fold the cones-rays from the pages or their fragments and stick them to the base.

A good option would be to make a three-dimensional star, for example, from papier-mâché, cardboard, or buy a blank.
- We dismantle an old book.
- Divide each page in half.
- From half we make an envelope.
- A cardboard or plastic blank of a star is pasted over with ready-made envelopes according to the diagram in the photo.
- Grease the edges with PVA glue and sprinkle with sparkles.
To make it more convenient to install such homemade toys on the Christmas tree, I would advise you to make one large cone as a support. In addition, in order for the star to turn out to be voluminous, the rays must be glued not only on one side of the base, but also on the other.
Christmas is a holiday, for many, as important and significant as the New Year. Therefore, a festive tree must be decorated with themed decorations.

You can make them, for example, using:
- a wooden ring (you can use a special blank, a spare ring from the eaves or a foam ring);
- several beads;
- cap for beads;
- roundel (separator);
- crochet hook;
- scissors;
- threads.
To make an angel, you need certain curly beads. On the thread you need to string a bead-ball, then a lily, then a cap, wings, a ball and a separator. We “press” all of them so that they fit snugly against each other, and we tie the thread. You can buy such parts in handicraft stores. I can also suggest using old jewelry.

Next, you have to tie the base with yarn. But if you do not own a hook, you can simply wrap a thread around a ring, the result will not be worse - look at my five-year-old son. He did the craft for the advent calendar last year, even before he started collecting these ideas for inspiration. Both tying and wrapping should be very tight so that such home-made Christmas tree toys do not lose their appearance. Clockwise 12, 15, 18, 21 hours, you can reinforce the efforts with glue. Once the ring is completely wrapped, tie the thread.

The photo of the author suggests attaching 3 threads on each side and, braiding them into a pigtail, make a loop.
Another option is to cut off a piece of thread (about 12 cm, but be guided by the size of the product and the branches of your New Year's tree), fold it in half. Then put the ring on a double thread, tie the free end and the loop into a knot. Then the loop will remain, and the remaining ends of the thread can be hidden with a hook under the winding of the ring.

But this DIY Christmas tree toy can be made only if shells are lying around in the house. However, today it is not so difficult to find decorative material in stores (in the same Leonardo chain, which has representatives in 35 cities of Russia).

Source
To make such a charm, you will need:
- shells of different sizes;
- hot glue;
- a thread;
- jewelry for every taste.
In my opinion, it would be superfluous to talk about the production process, everything can be seen without words.
This master class tells in great detail how to make an angel from a sheet of cardboard, thread, Christmas ball, ribbons and a set of decorations. These homemade Christmas tree toys are suitable and can be used as New Year's or Christmas table decorations.
I sincerely hope, dear readers, that such a selection of tips on how to make homemade Christmas tree toys will help you find your inspiration, catch a wave and get carried away with work! I wish you new ideas and great results!
Good afternoon. Today we will do crafts for the New Year from paper and cardboard with our own hands. I collected the most accessible and easy-to-use crafts for children and adults. You can find here ideas for kindergarten activities for the new year (applications and paper crafts). Also here you will get ideas for home decor for the new year from paper and cardboard.
Let's start making a New Year's fairy tale with our own hands, turn paper into a smart New Year for our family. Let's apply our good mood and skillful hands and spin the round dance of New Year's crafts.

Candlestick for the New Year
(from colored paper and white cardboard).
These cute cardboard snowman candlesticks can decorate your New Year's interior.

Each paper snowman unfolds like a regular postcard. And it can be placed vertically on the edge (like a postcard). Punctured holes in cardboard allow you to use this paper craft for the New Year as a festive candlestick. Let me tell you in detail, step by step, how to make such a quick and simple craft with your own hands.

How to make this New Year paper candlestick craft.
Step 1 - on plain paper (draft), print or draw any graphic pattern (the one you want to pierce on the snowman's abdomen)
Step 2 - From thick white cardboard (preferably glossy, double-sided), cut out the silhouette of the snowman's body. This will be a silhouette in the form of a hill with rounded edges, growing from left to right (as in the photo above).
Step 3 - we apply our draft with a pattern to this silhouette and fasten it with paper clips. We put a terry towel in 2-3 additions on the table. On a towel we put a cardboard with a draft, a patterned draft side up. We pierce the drawing on the draft with a needle. So that the needle passes through the draft, through the cardboard silhouette of the snowman's body lying under it, and sticks into the towel. We cut off the whole drawing in all places.
Step 4 - from the same cardboard we cut out the oval hands of a snowman and a round head. Cut out a nose, a cap, eyes, and a mouth from colored paper. We paint the cap with colored felt-tip pens or markers. We assemble the craft entirely from these paper parts. And we get a beautiful handmade paper New Year's gift
And from the remnants of white cardboard, you can make just such a clamshell craft for the New Year. From colored paper we make candle flames and green holly branches with red berries.

It is also very beautiful to make Puff crafts in the form of houses and Christmas trees from white thick paper for the new year. Placed on the edges of the folds, they will be held vertically straight - between the rows of houses you can lay out a Christmas tree garland and turn it on - the garland lights will illuminate the windows, draw out silhouettes.

Snowman for the New Year
from paper.
From white paper rounds you can make funny puffy SNESHARIKOV. Decorate them with hats of different styles, tie them with colored satin ribbons (like scarves). Glue the paws and noses and draw a dotted smile and eyes with a black marker.
This craft is suitable for children of the middle group in kindergarten. Only the ribbons will need help to tie.

You can make a snowman out of three cardboard circles of different sizes. Between the layers of the rounds, lay a three-dimensional gasket (a thick piece of cardboard, a folding paper spring, thick Velcro tape, etc.). So the snowman will be voluminous puff. We attach paper paws to the first lower layer, put a scarf on the second round, and a nose, eyes, and a hat on the upper round. This paper craft for the New Year is suitable for children in the older group of kindergarten.

Here is a craft idea for the little ones. On a sheet of blue cardboard we attach a white snowdrift at the bottom. We stick a leaflet with a calendar print on it (it can be printed from the Internet and photocopied according to the number of children in the group).
It remains for children to glue round snowman muzzles, round pens on top of the calendar sheet. Then cover your head with a hat, add eyes, nose - draw a smile later with a marker. Decorate the blue background of crafts with paper snowflakes.

And from large sheets of paper (A2 format) you can make a beautiful craft for the window. Such a snowman can decorate the window frames in your child's nursery. And kindergarten workers can turn the group windows into a whole series of funny adventures of the snowman Vasya- here he is sweeping snowflakes with a broom, here he is showing an acrobatic number, here he is with birds, here he is juggling snowballs, here he is sleeping under the tree. The poses are easy to add up and change, just turn the body of the leg and head - and now the snowman himself has turned, rolled over - oh yes, Vasya!

And since we started making crafts for the New Year from white paper, let's continue. And let's see what else can be done from inexpensive landscape or office paper.
Craft - a wreath for the NEW YEAR
(white paper + pizza box).
Here is some beautiful work that can please your children this New Year. From plain white paper and an old cardboard box, you can make a New Year's miracle. Wreath with white lace New Year's silhouettes. All details are cut out separately - and from the side it seems that this is a single large paper cut-out.

How to make the basis for a New Year's wreath.
We take a box from a large pizza. We put on it the largest lid from the pan (or a round dish). Outline with a pencil. We get the contours of the outer ring. We put a smaller plate in the center, circle it with a pencil - we get the contours of the inner ring, that is, a hole. Cut out.
Note - to get an even-sided ring for a wreath, you need to put a small plate (for a hole) exactly in the center - so that the right and left and above and below the plate have the same distance to the edge of the ring.
From ordinary white office paper we cut out the details-symbols of the New Year:
- 3 large snowflakes
- 8 silhouettes of Christmas trees
- 4 house silhouettes
- 1 white ring (2 halves of the ring are possible - from two sheets of paper)
This white ring will lie on top of our round dance of houses of Christmas trees and snowflakes. AND by inner diameter this white paper ring match the inner circle of our cardboard base wreath(which we cut out of a pizza box).
The process of assembling the New Year's crafts.
On our cardboard gray ring we paste in a circle - in any order - all the Christmas trees, houses, snowflakes. We make a round dance of silhouettes - not bringing them much closer to the inner edge of the wreath (since there they will close too much with a white paper ring). The thickness of the ring should not greatly overlap the New Year's paper silhouettes - but only cover their lower part.
We glued the silhouettes in a round dance and then put a white paper ring on top of them - also on glue. It is better to work with a glue stick - it is drier and the cardboard does not warp from moisture and the paper does not wrinkle from dampness.
And here's a snowflake template to help you , which is perfect for this paper craft for the New Year. To reduce the size of the template, press and hold the ctrl button and at the same time turn the mouse wheel - towards you (or away from you) to change the size. Then put a sheet of paper on the monitor screen and circle the contour of the snowflake glowing through the paper.


And here are some more ideas for silhouette round appliqués made of paper for do-it-yourself decorations for the New Year.
Cut out a ring from black cardboard. At the bottom we glue a semicircular white snowdrift. - we attach white silhouettes of Christmas trees to it. With a hole punch in the form of snowflakes or stars, we make a small scattering of stars and stick them on a black ring. With a cotton swab and white gouache, we apply small white dots on a black background.
Or we cut out the silhouette layers from white paper (a number of houses), and red paper (Santa Claus's sleigh and horse). Fold the layers within the round silhouette.

carved crafts
from paper for the New Year.
If the paper cuts are bent from their incised place, then we will get the effect of a voluminous paper craft. Below we see a paper Christmas tree made using this technique. A sheet of paper was folded in half - along the axial vertical line. And they made oblique cuts - 2 small ones at the top, then two more larger ones below, two more more, and so on. Then they unfolded the paper and folded each incised section down - it turned out a carved Christmas tree made of paper for the New Year (left photo below).
You can only make small CORNER cuts with a paper knife - and bend these corners, getting the shape of triangular teeth.

In the same technique, you can make three-dimensional. In the same technique, you can make three-dimensional 3D crafts. This is how it's made Christmas trees for the New Year from paper or white cardboard.
We take a flat triangular piece of cardboard - with a knife or blade we make it on it vertical notches(without touching the edges of the triangle with scissors). And then we bend these cuts - one forward, the other back, the third forward, the fourth back and so on - with alternation. Before starting to bend, we need to fold our triangle in half along the central vertical line - then all these bends will have an even central edge - both in front and behind.
If the cut lines are not straight-horizontal (as in the left photo), but wavy or oblique as on other Christmas trees with a photo, then we will get interesting silhouette volumetric crafts of Christmas trees made of paper.

And also a flat paper part can be turned into a voluminous convex Christmas tree (3D craft) in this way (as in the photo below).
We cut the usual flat cardboard round in a spiral - (we draw a snail on it, and make a cut along the line with scissors). And then we raise the middle of this snail up and teach a spiral-spring in the shape of a Christmas tree.

So that the Christmas tree does not fold back, it can be supplemented with a ROD - an axis holder, so to speak (as it is done in the right photo below). There, a wooden stick on top holds the center of the spiral (on glue), and at the bottom the stick is based on a piece of plasticine or another pedestal.
And pay attention - that the edges of the Christmas tree from the photo are curly to the right (with a lace border). This is achieved if the spiral snail is drawn not with straight lines, but with wavy ones, and cut accordingly along these lines.
And we also have a very large and detailed article on our website. There you will find a lot of ideas for creating paper Christmas trees for the New Year.
And in this article I will give the idea of a very simple Christmas tree made of paper disks. Cut paper circles - 2 pieces of each size. Fold each paper circle in half. We put halves of the same size into each other - a corner in the shape of the roof of a house. It turns out 5 corners of different sizes. And from them we begin to collect our paper Christmas tree - first we paste the TOP PAIR of the smallest on the sheet, then inside it - we put a little more, then even more and so on until we collect the Christmas tree - a great idea for the New Year from white paper, which is always in excess.

Crafts for the New Year
FROM STRIPS OF PAPER.
And here are a couple of ideas for you on how you can make original Christmas wreaths with your own and children's hands from paper cut into short strips.
In the first master class, we cut green (double-sided in color) paper into strips 10 cm long. We fold each strip into a pot. From the pizza box, cut out the ring-base in the shape of a donut. And on this base we glue our pots of paper strips - we glue them with a serrated "scallop" up (as shown in the photo below).

And here is another idea for the New Year from paper - also from stripes and also in the form of a wreath craft. You can cut each strip on both sides into 2 cloves (like a flag). And just glue them on the base ring for the wreath. We glue them - wrapping around the ring and glue the two sides of the flag together. We decorate a paper wreath with sparkles with fluffy balls,
From two long strips of paper, you can roll up a SPRING - glue a bright light from colored yellow and red paper to it - and you get a candle.

Craft-CARD
for the New Year from paper.
For this folding bed craft in the form of Santa Claus, you need bilateral red paper - and a sheet of white or blue cardboard.
- Glue a red silhouette onto a rectangular sheet of paper so that its HANDS extend wide open beyond the edges of the blue cardboard sheet.
- Then it remains on this red silhouette of Santa Claus to stick a white silhouette of a beard, with a pompom and in the middle of the beard, stick a pink face detail.
- With a black marker draw eyes, buttons, pockets. Draw a nose with a red marker. And then draw a line on which the children will glue the chain of flags.

So I drew the outlines of all the details of this New Year's paper craft. You can outline the details of Santa Claus by placing a sheet of paper directly on the glowing monitor of your computer. To enlarge or reduce an image– roll the mouse wheel while holding down the CTRL button on your keyboard.

You will find even more ideas for creating Santa Claus paper crafts and more in our special article dedicated only to this character beloved by all children.
Paper accordion crafts
for the new year.
An ordinary paper fan that children love to fold in hot weather can warm you with a flame of warm ideas on cold New Year's days.
You can make such a multi-tiered Christmas tree out of paper for the New Year. In it, each tier-floor is a long wide strip of paper folded into a small accordion. Each harmonica is glued overlapping each other - starting from the bottom, and slowly moving to the top.

And if such a strip is twisted in a circle, we get the shape of a corrugated pancake. Different sizes of such corrugated rounds will give us a pyramid in the form of an elegant Christmas tree made of paper. For the new year, you can put a real masterpiece made by yourself in the center of the table. Tiers of colored paper can be sprinkled with hairspray and quickly sprinkled with fine nail glitter.

Such a Christmas tree made of paper will look elegant and beautiful if you take ordinary gift wrapping as paper material - it will already have a beautiful color pattern - for example, in cheerful polka dots, as in the photo below.

And from such round accordion fans you can make beautiful New Year's crafts in the form of a snowman or decorative paper snowflake pendant.

We make a round fan out of musical paper (before this we artificially age the paper, yellow tea or grease it with a brush dipped in coffee, dry it, smooth it with an iron). In the center of the round fan on hot glue from a gun klim shop plastic snowflake. And from the old New Year's card we cut out a round element of the picture and paste it in the center - we get a paper snowflake craft for the New Year.
Your round fan does not need to be in the shape of an EVEN CIRCLE. You can give the fan a patterned shape - jagged edges, openwork holes (as in the photo with the snowflake craft below).

Below I found a diagram that shows how to create such a patterned round fan in stages. Please note that the edge cloves are obtained from the fact that the fan, still folded, from one end is CUT OFF.
Holes are obtained from triangular slots in the side of the fan. And so that the fan itself can easily be assembled into a circle, we see a round hole punctured with a needle - from the opposite end of the fan - in this place all the blades are threaded through on a needle and thread - and thanks to this, the fan is pulled together tightly in its center and fixes this screed with a knot of the ends of the thread.


You can of course do and without thread with a needle- fold a round fan from several coal fans. Here is a photo diagram below showing how it is done by hand.

The shape of the teeth of the fan gives interesting shapes to such paper snowflakes. In the photo instructions below, we see different variations of such paper crafts for the New Year. Each new pattern of cuts and cuts gives us an interesting new snowflake when unfolded.


Angels for the New Year
From paper and cardboard.
Using the fan fold technique, you can make an angel craft from white office paper. First, fold a round fan out of white paper (just like we made it for a tiered Christmas tree above - also with the assembly of the middle on a thread). Then, on this fan circle, outline the outlines of an angel (head, wings, dress) on it and cut it off along the drawn line. You get a paper angel craft for the New Year as in the photo below.

And for children at school, you can make such simple crafts as angels from a narrow paper cone. The wings are a semicircle with two cuts in the middle - the top of the cone is threaded through them (see photo below).
Then a face is glued to the top of the cone (a semicircle made of cardboard). Then we make hair - we bend the rectangle of paper - into two unequal parts - a short fold for the bangs, a long one for the back of the hair. We cut each part into a fringe.

You can make such a solid angel from thick paper with a foil side or from shiny cardboard for the New Year. For this craft, we make only one flat blank (as in the photo below). We make 2 cuts with scissors - then we wind the two sides of this workpiece back, dock and put the cuts on each other. It turns out a voluminous New Year's craft Angel (as in the photo below).

But a paper angel - as a window sticker for the New Year. Below I give a diagram for carving such an angel onto a window. You can translate a picture with a pencil directly from the laptop screen by placing a sheet of paper directly on the monitor screen. If you want to enlarge or reduce the drawing diagram, you just need to rotate the mouse wheel while holding down the Ctrl button on your keyboard.


If you have lacy paper napkins, you can make such an elegant angel for the New Year out of this openwork paper. They can decorate a postcard, front door, or use as a Christmas tree toy.

And even more ideas for crafts in the form of angels you will find in our special article.
Paper crafts for the New Year,
cut into strips.
And here is a bag of ideas for crafts for the New Year from paper strips. From colored paper (double-sided coloring), cut out strips of the same width. And by gluing them in a given position of the folds, we get curly-shaped frames - in the form of a snowman's hat, in the form of his body, the head of his hands. By connecting the strip frame parts with each other, we get a solid colored paper craft for the New Year.
For crafts from thin frame parts, it is better to use strips of paper glued to each other (3-4 pieces each, or cardboard (two-color) - this way we get a dense craft that will not deform under the weight of itself.

For the same technique (paper strips), you can use not only colored paper as an ornamental material, but also any other. Ordinary strips of paper can be cut out of a magazine, gift wrapping - as was done in the example of a snowflake scoundrel in the photo below.
After gluing the craft, the end edge of the cut is flat, you can first dip it in glue, and then in nail glitter.

You don't have to be a quilling master to make a fancy paper snowflake. It is enough just to cut strips of paper of the same length, then glue the loops out of them (they will also turn out to be the same size). And then fold these loops in a circle (gluing to the center) - and we get a round base for a snowflake (as in the photo below). We decorate the glued loops in the center with cardboard snowflakes (or plastic ones purchased at the store), then with roundels and small paper fans.

You can come up with a different pattern of paper loops of different sizes - and get new results. For example, you can hang such a paper star for the New Year as a Christmas tree toy.

New Year from paper
for quilling.
In the shops of the city you can find kits for children's creativity using the Quilling technique - these are packages with strips of colored paper - already cut evenly. From these strips you can fold any New Year's paper crafts. There are ready-made Snowflake patterns using the quilling technique, with a ready-made number of stripes of the desired color.

Or you can simply buy multi-colored quilling sets (without reference to a specific craft) and create your own fantasy works for the New Year from them. From paper, you can create whole little masterpieces. Look at the photo below - nothing complicated or scary - all shapes are simple (drops, circles, curved drops). A small Christmas picture inside a single ring.
By the way, the ring can be made from a round wide sleeve from adhesive tape. With a knife (or better with a file), saw off a narrow ring from the scotch sleeve. Paint it in white gouache, spray it with hairspray (to fix the color) or wrap it with a shiny ribbon. And then, inside this closed shape, create your New Year's picture. So you will get a Christmas tree pendant made by hand for the New Year from plain paper.

You can make DENSE cast crafts from quilling material. This New Year's penguin is a large winding in the form of a droplet.

Several droplets of different shapes create the image of an angel using the quilling technique.

By the same principle, you can make Santa Claus crafts from paper rolls.


The youngest children, who are just starting to learn the basics of quilling techniques with their own hands, will be able to try their hand at crafts in the form of a simple laying of droplets. Round. In the form of a Christmas wreath.


Non-standard quilling technique
In crafts for the New Year.
Paper strips can be laid not in round twists, but in puff layers. In this laying technique, the Christmas flower craft was made from the photo below.
You can do the same thing with a regular comb.

Here in the photo below we see a master class on this craft. The paper is twisted through the teeth of an ordinary flat comb (or a special quilling comb).

In this technique, you can make elegant round decorations for the Christmas tree. Or create a decor for a postcard. Decorate the packaging of a gift for the New Year, with your own hands.

These are the ideas I have collected for you today in our article.
I am sure that you will find your craft for the New Year from paper and the magic of your hands. May the holiday be joyful and successful for the accomplishment of good deeds and good desires.
Olga Klishevskaya, especially for the site ""
If you like our site, you can support the enthusiasm of those who work for you.
Happy New Year to the author of this article, Olga Klishevskaya.
If you consider yourself one of the people for whom the cost of New Year's paraphernalia is not among the mandatory purchases, then this article was written especially for you. DIY and paper toys can be in no way inferior to purchased analogues, this approach will not only save money, but also spend time excitingly and interestingly with your children. Yes, and home-made original ideas and toys will be deposited for a long time not only in memory, they will also be able to decorate the Christmas tree in your house for more than one year!

Few people think, but the sacramental meaning of Christmas and New Year is to bring all family members closer together. And what can bring relatives even closer, if not joint creativity? Creating original decorations with your own hands together with the household is perhaps the most exciting thing you can think of before the holiday, after cooking salads.

Creating toys using materials such as beads, porcelain or glass may require not only special skills, but also a lot of time, which is often simply not enough in modern realities. Given this, paper toys may be the best option to do on your own with a child. Below will be presented step-by-step instructions, as well as a video, for making Christmas decorations with your own hands.

Creating New Year's toys using paper does not require any special skills, and such an activity will not take much time.


DIY paper balls
For the manufacture of Christmas balls, a minimum of material is required. By and large, all you need is sleight of hand and patience!

Do not be upset if for the first time the toy does not turn out quite the same as in the photo - such manipulations with paper require some skill, which, if not with the first, then you will definitely have with the second or third toy. Given this, get ready that the first crafts will turn out to be not entirely neat. But this is only with the first, then everything will be much better.
We carry out stencils
Well, to create a Christmas tree ball, you need to do the following:
- First of all, print or draw the stencils yourself. Alternatively, you can use the following blanks:


- Use colored paper, and thicker is better. Circle the stencils on it with a pencil;
You can save a little time and effort if you print stencils immediately on colored paper - the main thing is that your printer allows you to do this!
- Carefully cut the colored paper, cutting out blanks for the toy;
- Arrange the blanks in the shape of a flower, as in the photo below. The center can be fastened with a small circle of colored paper.

Making a toy


Christmas decoration will turn out more colorful and interesting if you use multi-colored paper. You can speed up the process by saving yourself from accidental decay of an already finished toy design using ordinary clothespins that gently pick up the edges from above.
At the end of weaving, the paper ends are simply glued together.

The final step is gluing the tape. To do this, in a circle that was originally glued into the center of the plexus, a small cut is made. A ribbon is inserted and glued into it. It is better to singe the ribbon in advance, thus preserving its original presentable appearance!
Thus, the New Year's paper ball will be ready. Get creative, use different colors and stencils, and repeat the steps to create a new piece of jewelry. Combine different solutions. Several ready-made options are presented below.

Alternatively, you can use cardboard cones that will perfectly decorate the Christmas tree.
In addition to balls, New Year's toys in the form of balls will be an interesting solution. This option of decorating the Christmas tree came to us from ancient times, when it was not easy to get New Year's crafts. Making a flashlight with your own hands is even easier than a ball. Even a child can handle the craft. Detailed instructions are provided below.
Santa Claus from paper do it yourself
Consider another version of the New Year's decoration. This toy is not only easy to do with your own hands, but also develops children's creativity along the way. In addition, the craft is good because it is great for decorating a Christmas tree and decorating various surfaces, whether it be a wall or a table. In addition, paper Santa Claus can be used to embellish a postcard in an original way.

For the toy you will need:
- Compass;
- Glue;
- Colored paper or cardboard packaging.
In our case (see photo), black, red, white, beige and green paper was used, although you can use any colors if you wish.

- Ribbons or threads;
- Scissors.
You can use other additional elements by embellishing the craft - a matter of fantasy!
How to do?
We cut out a hat for Santa Claus from red paper. We cut out a semicircle from beige, and similar diameter like out of red! Combining two semicircles, we get a circle. We make a beard from white paper, for this we cut out equal circles of a small size, as in the photo. One of the circles will go to decorate the hats of Santa Claus. Using the same color, cut out a long narrow strip. A pair of small black circles and one larger red circle will become the eyes and nose, respectively.
Align and glue all the elements together, as in the photo. It is better to make several Santa Clauses at once so that he has a company on the Christmas tree. The thread is attached to the top of the hat. Now an unusual New Year's craft will be ready.
You can make an original postcard for the New Year if you stick Santa Claus on green paper. This craft is sure to please both friends and relatives.
Below are a few more ideas for making paper Santa Claus with your own hands.
Volumetric paper star
No less popular before the New Year are paper toys in the form of stars, because no one can imagine a Christmas tree without this decoration. Such a craft will be very easy to manufacture, especially since all the same materials, plus a thread, will be required for work.

Work order
A pair of squares with sides measuring 10 by 10 centimeters are cut out of colored paper. Color can be used at will, no one limits your imagination. It can be pink, purple, blue, red, or whatever you want! Choose different colors and the tree will be able to sparkle with different colors in the New Year.
Fold the colored paper in half twice, as in the photo, then make two folds diagonally. Tiny cuts along the edges will help to fold the paper into the corners. The corners in the center are glued together so that the rest remains free. Due to such a solution, the star receives volume. Thus we get half a star.

For quick gluing and better quality, the corners should be held with your finger when gluing!
Similar operations are done with the second sheet of paper. After that, both halves are glued together, while not forgetting to insert a ribbon, for which the toy will then be hung. Leave the decoration for 20 minutes so that the glue can dry.

Often, do-it-yourself New Year's decor is in many ways superior to store counterparts.
Below we offer a short video instruction on how to create a three-dimensional paper star.
DIY Christmas lights
A paper lamp for the New Year can be easily made from improvised materials. For crafts, you only need cardboard packaging, scissors, colored paper and glue.

Instruction
- Let's use a pair of colored sheets: let one be purple, the other yellow. It is important that the colors are contrasting. We cut out a couple of rectangles of the following sizes: 180 by 120 millimeters for purple and 180 by 100 millimeters for yellow.
- We glue the yellow rectangle so that in the end we get a tube. We take a purple blank. Fold it in half and make cuts with scissors, leaving some space around the edges of the paper. Similarly to yellow paper, we glue purple in the shape of a tube. The photo below shows the whole process.

- If you did everything right, then the yellow tube should fit easily into the purple one. It is important to note that you do not need to push the tube all the way inside! First, you need to coat the edges of the yellow tube with glue, after which you can completely lower it inside the purple flashlight. A similar operation is done on the opposite side. Pull the purple part up a little to release the yellow. Lubricate the attachment point with glue, then fix the yellow sheet inside the purple one.
- For greater realism, the paper toy must be supplemented with a pen. For this, both ordinary cardboard and colored paper will fit. Cut out a narrow strip and, applying glue to it, fix it in the right place.

Thus, the New Year's lamp will be ready. This is another original decoration that is easily done on your own. Even a child can easily cope with such crafts.
Well, as can be seen from our material, it costs nothing to make New Year's toys and paper decorations with your own hands. Spend time with children, create an original and interesting decor for your Christmas tree and interior.

We hope our instructions, photos and videos have helped you in creating unique decorations with which you will not only beautifully decorate your home, but also have a good New Year's Eve.


Reading time ≈ 9 minutes
With the advent of the winter holidays, it is time to prepare the main symbol of the New Year holidays - the Christmas tree. You can make Christmas tree decorations with your own hands from paper for the New Year 2020 step by step according to the instructions with a photo or use them to translate your own ideas. The article outlines the available ways to decorate the Christmas tree.
paper balls
Ball-shaped Christmas toys are considered the most common way to decorate a Christmas tree. They are easy to make and have many variations.
Sphere from circles
To make such a ball, you will need 21 blanks of paper in the form of a circle of the same size, glue, scissors, thread.

Step-by-step instructions for creating a Christmas tree toy:

Advice! To make the New Year's toy look interesting, use wrapping paper with a beautiful pattern. For a triangle template, you should take thick paper or thin cardboard.
Simple Christmas tree ball
Homemade decorations are fun to make with kids. For a joint lesson, simple New Year's paper decorations are well suited. To make a volumetric ball, you will need several identical blanks in the shape of a circle, but not less than four. The size of the sphere depends on the diameter.

New Year's Eve is done step by step according to the following scheme:
- Using a stencil or template, circles are marked on paper. It is recommended to use paper of different colors and patterns.
- The circles are folded in half with the right side inward.
- The blanks are glued together in half.
- Before installing the last circle, a thread is glued in the center of the sphere. The loop should protrude outward and be easily attached to the branch of the Christmas tree.
- The last blank circle is glued to the first, connecting the structure into a single ball.
- The product is leveled, given the desired shape and dried well.

Note! The more blanks are used to create the ball, the more interesting the final version looks.
According to the same scheme, toys are made in the form of a Christmas tree, stars and other objects. The main rule is that the blanks must be symmetrical.
Spheres from stripes
An easy and quick way to make a DIY Christmas toy is to use paper strips. To create jewelry, you will need a sheet of paper with any pattern, glue, thin wire and beads for fixing.

Step-by-step instructions for making Christmas balls:

Note! The diameter of the toy depends on the length of the blanks. To create balls of a certain size, a mathematical formula is used to calculate the circumference.
Christmas paper lanterns

This Christmas decoration is easy to make with your own hands, working with children. For the simplest flashlight, you will need several strips of colored paper of the same width but different lengths.
- The shortest strip is cut in a single copy, the rest are paired. The length can be increased arbitrarily, but at least 3 cm is recommended.
- The blanks are laid out on the table. In the center - the shortest, on the sides - paired stripes, going to increase.
- The ends of the strips on one side are aligned and fixed with a stapler. This is the bottom of the flashlight.
- The upper part is assembled in a similar way. The ends of the strips are aligned along the length of the shortest workpiece.
- A through hole is made with an awl. A thread is threaded into it and fixed so that the structure does not fall apart. The end of the thread is tied into a loop to hang the toy on a tree.

Paper lantern from a sheet of paper
To make the second type of New Year's lantern, you need a sheet of A4 paper. It is preferable if it is colored paper or with a pattern. Then the decoration will be bright and unusual. You will also need scissors, glue or tape, a pencil for work.

- We cut off a short strip 1-2 cm wide from the sheet. It is used to hang the toy on a tree branch.
- The remaining paper is folded in half and the fold line is smoothed out. The workpiece is not unrolled.
- A strip 1.5 cm wide is marked along the edge. The rest of the sheet is drawn with longitudinal lines. The distance between the lines is from 1 cm.
- Scissors make cuts from the fold to the edge of the sheet along the drawn lines, without going beyond the mark at the edge.
- Unfold the structure and glue the top, bottom and middle.
- A paper strip handle cut off at the very beginning of work is glued to the upper part. With it, you can hang a lantern on the Christmas tree.

Note! Paper decorations are decorative and flammable. Do not use them near open flame sources (for example, candles).
Chinese style lantern
For such decoration, you need to prepare a template. The blanks will differ depending on the type and shape of the New Year's toy.

To implement this idea with your own hands from paper, Christmas toys for the New Year 2020 are assembled step by step according to the instructions with the photo:


Important! The main difficulty of such toys lies in the drawings. It is difficult to apply them exactly on paper by hand. You need to print on a printer or use a pre-prepared template.
volumetric star
The five-pointed star is found everywhere in Russian culture. On Christmas trees, it often decorates the top, but it can be used in other places. To make a simple but effective toy for the New Year, you will need five sheets of paper, glue and scissors.


Note! If the decoration is the top of the tree, then the lower part is not completely sealed. Leave a small space for stringing on top. For a hanging toy, all seams can be removed, and the loop can be fixed with an awl at the upper beam.
Teardrop Jewelry
Using the method of gluing the halves, it is possible to get beautiful voluminous Christmas decorations. If the template has a symmetrical shape, then you can use it to decorate the Christmas tree.

- A drawing of a workpiece in the form of a drop is applied to a sheet of paper. The more details used, the more voluminous the result will be.
- Drops are cut out of colored paper, folded in half and the middle is removed along the line. Similar actions are carried out with the rest of the details.
- Apply glue to one of the halves and connect to the opposite part.
- Gluing continues until all parts are connected into one toy.
- A loop is made from the thread, glued to the top of the New Year's decoration or laid in the middle.

Note! To obtain the volume from the example, 16 parts are enough. It can be adjusted by adding or removing the number of blanks.
Paper snowflake hedgehog
To make such New Year's toys with your own hands from paper, you will need several round blanks. The more details used, the more magnificent the result will be.

- 8 cut lines are marked on the workpiece from the edge of the circle to the center. You don't need to cut to the end. In the middle, leave space for connecting parts.
- Each of the cut sides is twisted into a cone with a pen or pencil and glued to fix.
- Similar actions are performed with all blanks.
- So that when connecting the parts, the knot of the thread does not pierce the paper, a piece of soft rubber is attached to the end.
- A thread is threaded through the center of each workpiece with a needle. When tightening the parts, the spikes of the paper hedgehog straighten in different directions.
- The tie is held in place with a second piece of soft rubber on the opposite side. The end of the thread is tied into a loop for hanging the toy on a tree branch.

Fairy lights
This type of decoration is suitable not only for the New Year tree, but also for the room. Paper garlands are easy to make. Can be done even with small children.

To create the simplest, you need multi-colored paper, cut into strips. First, glue the first link of the chain into a ring and wait until it dries. The next link is also connected by a ring, capturing the previous element. The result is a chain of paper links.
Note! In order not to wait until the glue dries, use a stapler. Staples instantly connect parts of one link and are practically invisible from the side.
To get a more effective result, you should complicate the work. The thread of the garland is decorated with any elements - stars, geometric shapes, volumetric details, animal figures. There is a special place for the symbol of the Chinese New Year - the White Rat.

With the help of instructions and photos, it is very easy to make paper Christmas toys step by step with your own hands and implement your ideas for the New Year 2020. If you liked the information, do not forget to leave feedback in the comments and share this material on social networks.