Yandex chrome plugins. Plugins - Browser
Working with the Internet is rarely complete without the usual browser. With its help, we go to our favorite sites, view media content, communicate with interlocutors and download the necessary files. At the same time, an important place in the work of such a browser is occupied by plug-ins - special software blocks that significantly expand the functionality of our navigator. In this article, I will share the specifics of the plugins in Yandex.Browser, and also tell you how to access plugins in the Yandex browser using the browser://plugins command.
How to open the plugins page in Yandex browser — browser plugins
To gain access to the plug-ins of our Yandex browser, just launch it and enter the command in its address bar:
browser://plugins
You will see a list of plugins installed on your browser.

Classic set of plugins in Yandex.Browser
Initially, they are presented in browser://plugins in a rather compact form, therefore, to display a full display of their characteristics, you must click on the plus sign next to the “More” inscription on the right.

Click on the plus sign next to "More" for full information about the plugins featured
Usually, a full description of a plugin is presented in the form of its name, version, the path of the plugin files on the hard disk, the "Disable" button, as well as the "Run always" option, next to which there is usually no checkmark.
And if everything is clear with the name, version, and placement path, then you need to dwell on the “Disable” and “Always run” functions in more detail.

Modern plug-ins in your browser from Yandex
As you know, a plug-in (module) is a program that is built into the functionality of a modern browser, allowing you to significantly expand the capabilities of the latter. Plugins are often confused with add-ons (programs similar in functionality), but unlike add-ons, plugins do not have their own interface.
Browser Plugins allow you to view videos and animations on the web, listen to music, read specific adobe documents, play online games, organize 3D interaction, and perform other useful procedures.
A couple of years ago, the "gentleman's set" of a standard browser included at least a dozen plug-ins, the level of "Adobe Acrobat Reader", "Microsoft Silverlight", "Java Virtual Machine", "", "", "Apple Quicktime", "WinAmp", " Real Audio Player", various , toolbars et cetera. Over time, some plugins have lost their usefulness, some have been abandoned by many users due to their slow work (the plugins significantly slowed down the browser itself), and in some cases, developers do not want to work with some plugins due to discovered vulnerabilities (“Java” , Adobe Flash, etc.).

Working with plugins in Yandex.Browser
However, a modern browser (in particular, Yandex.Browser) has a number of plug-ins built into its functionality. The launch of the latter requires user approval, thus avoiding the exploitation of plugin vulnerabilities by unscrupulous site developers (as happened with the same “Java” plugin). If the user completely trusts any plugin, then he can go to the plugin settings through the already mentioned browser: // plugins command, and put a checkmark next to the desired plugin on the "Always run" option.
Also, if desired, the user can disable any plug-in, for this it is necessary to click on “Disable” in the above-mentioned plug-in settings, and then restart the browser.
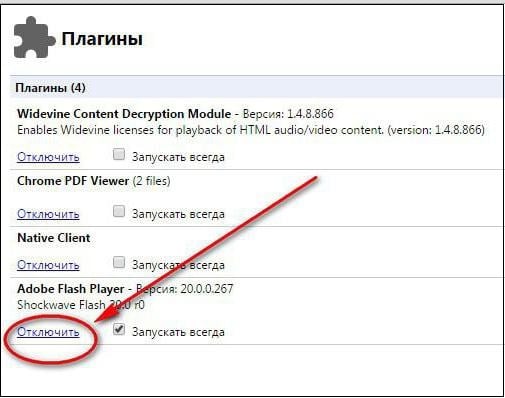
To disable a plugin, click on "Disable" next to it
Removing automatically installed virus plugins
In most cases, an ordinary user does not need to independently search for and install any desired plugin. The latter finds its user on its own, and this usually happens in a situation where, when trying to launch any web content, the user is faced with a site suggestion to install one or another plug-in on the user's PC in order to correctly display the content of the web resource. After that, the site usually offers the user a link, by clicking on which we can download the plugin we need.
External plug-ins installed in this way are usually removed in the standard way, through the system uninstall tool (click on the "Start" button, type appwiz.cpl in the search bar, and press enter). Find the desired plugin in the list of programs and remove it.

Conclusion
To access plug-ins in your Yandex.Browser, just launch the browser, enter the browser://plugins command in its address bar, and press enter. At the same time, I would not recommend enabling or disabling any plugin without having complete knowledge of its functionality - you can disrupt the stability of your navigator.
In contact with
Instruction
Sometimes you can find uninstallers for adequate plugins on the main application developer's website.
Removing plug-ins from the browser (for example, if you get bored with it, or its version is outdated, or to speed up the browser) is also not difficult. For FireFox: select "Tools" - "Add-ons" - "Delete" selected. Reload your browser and you're done.
For Opera: manually pave the path to the Plugins folder (C: Program FilesOperaProgramPlugins), where they are stored as dll-libraries. Delete unnecessary.
You can remove search plugins through the browser menu. The same method can be applied to annoying porn informers.
If it does not help, try to find "infectious" files on C:\Program Files in the browser folder, specifying the search range by date, and delete them. Then delete files with the dll extension from C:\Windows\system32. Be careful not to delete system files.
But sometimes you have to completely “demolish” the main application in which your malicious plugin is lost.
Related videos
You will need
- - text editor.
Instruction
In order not to be mistaken, turn on the display of extensions of registered file types in the current operating system in the menu "Folder Options" on the computer control panel. In the window that opens, go to the appearance settings tab and check the appropriate box, this is necessary if you need to determine the file type.
Related videos
Helpful advice
Spam less, it scares away server visitors.
Installing new plugins in the game Counter Strike is not difficult even for a not very experienced user. The plug-in is enabled using standard system tools and does not require the use of additional software.

Instruction
Download the archive of the selected Counter Strike game plug-in to your computer and unzip it to any convenient folder. Pay attention to the extensions of the unzipped files. They determine where these files are saved: - cfg - plugin configuration file; - txt - optional file, not always present; - amxx - main plugin file; - sma - optional plugin source file.
Call the main system menu by clicking the "Start" button, and go to the "All Programs" item. Expand the "Accessories" link and launch the "Windows Explorer" application. Navigate to addons/amxmodx/plugins and place each downloaded file in the appropriate folder: - plugin_name.sma - in the addons/amxmodx/scripting folder; - plugin_name.txt - in the addons/amxmodx/data/lang folder; - plugin_nameusap - in the addons folder /amxmodx/config; - plugin_name.amxx - to the addons/amxmodx/config/plugins folder.
Go back to the main Start menu and go to All Programs again. Expand the "Accessories" link and launch the Notepad application. Open the plugins.ini file in it, located in the addons/amxmodx/config/plugins folder and type the name of the plugin to be installed at the end of the document. Save your changes and restart the server to apply the selected action.
Please note that for the plug-in to work correctly, there should not be a semicolon (;) in front of its name in the modules.ini file. The display of plugins in the game console is performed by the amx_plugins command. Once all available plugins have been displayed, type amx_plugin_name into the console to enable it.
Sources:
- Installing plugins

Instruction
Call the main system menu by clicking the "Start" button, and go to the "All Programs" item. Expand the "Accessories" link and launch the "Windows Explorer" application. Open the folder in which the Counter Strike game files are saved and find the game configuration file named config.cfg in it. It is usually located in a folder named cstrike or, in Russian localization, cstrike_russian.
Please note that all the above operations must be performed in the cstrike_russian folder, if available. This is explained by the fact that it is the configuration file config.cfg in this folder that is executable, unlike the same file in the cstrike.cfg folder, which is used only if there is no Russian localization.
Sources:
- Remove Counter Strike Ads
- advertising in cs
Disabling a Counter Strike server is not that difficult if you know exactly how it is done. And remote shutdown is also very convenient and useful when the server owner is going to leave somewhere. During this time, players can continue to play.

Instruction
Download the serveroff plugin, which is freely available on the web. It allows you to carry out the procedure for remotely shutting down the CS server. Unzip the downloaded archive to any folder. Copy all the files from the archive and place them in the addons\amxmodx\config\plugins directory.
Launch the standard simple text editor Notepad. You can do this by clicking on the "Start" button on the desktop, clicking on "All Programs", then hovering over the "Accessories" item and left-clicking on the "Notepad" inscription. Open the users.ini file in this program. Alternative option: find the indicated file, right-click on it, select "Open with", and then "Choose a program" and left-click on the word "Notepad", finding it in the list. By the way, the file is located in the server\cstrike\addons\amxmodx\configs\ directory.
In the last line of the open document, enter the name of the plugin you are installing, and then save your changes.
Use the following commands:
Say /serveroff - call the main menu;
- amx_serveroff - server off via console;
- 1 - server shutdown after a period of time selected by the administrator (in hours);
- 2 - server shutdown after the end of using the current map;
- 3 - immediate shutdown of the server;
- amx_serveroff stop - disable the timer.
You can also change the colors of chat messages:
B - blue color;
- w - white color;
- y - yellow color;
- r - red color;
- g - green color.
The full syntax would thus be something like this: amx_serveroff 1 2 r. This means turning off the server via the console after a given number of hours, i.e. 2, while the text of the message in the chat will be red.
Another option to accomplish the same task is also the serveroff plugin, but only the simple version (v 0.7). To use this version of the plugin, simply type /serveroff in the console. And you can select the time interval in hours using the so_timeoff command.
What is a plugin?
A plugin (module) is a software unit that is built into Yandex.Browser and expands its capabilities. Unlike add-ons, a plugin usually does not have an interface. Plugins are used to play video and audio in the browser, view PDF documents, improve web services that organize online collaboration, etc.
Plugin Installation
Typically, the need to install plugins arises when you visit a site that has specific content (such as a video). For the correct display of this content, you need to install one or another plug-in.
Yandex.Browser will notify you that you need to install the appropriate plug-in and prompt you to do so: you will see a notification at the top of the page. You will need to download the latest version of the plugin from the developer's site and install it.
How to disable the plugin?
Disable plugin autorun
By default, in Yandex.Browser, Flash videos start automatically when you open a page. To save RAM and increase security in your browser, you can prevent automatic launch:
Update deprecated plugins
Plugins are not automatically updated and may become out of date. Yandex.Browser detects outdated plugins: if a plugin is outdated, you will see a message about it under the address bar:
To install the latest version of the plugin, select Update plugin.
If you want to perform the required action without updating the plugin, click Run just this time. In this case, the plug-in blocking message will also appear the next time you start Yandex.Browser.
Many users of modern browsers have repeatedly had to deal with the so-called plug-ins (add-ons) that are integrated into the corresponding web browser to expand the possibilities of working on the Internet. Access to their settings in many browsers can be obtained through the command about:plugins, entered in the address bar. How to make settings or fix problems that arise in the operation of a particular add-on will now be considered.
about plugins. Options for accessing settings
For the most part, this command is used in "chromium-like" browsers, that is, in programs created on the basis of Google Chrome. A striking example is the use of the about:plugins command for the "Yandex" browser, Chromium application, etc.
However, in exactly the same way, access to the extension settings is made in the popular browser. As for Chrome itself, two types of commands can be entered in the address bar, depending on the version of the program.

So, in different modifications, the about:plugins or chrome://plugins commands can be used. The second command is used in newer versions. In any case, the user enters the menu, which shows all installed extensions (active and inactive).
about plugins. Plugins
All modules presented in the list can be conditionally divided into two large groups: built-in to the installed version of the browser and downloaded by the user.

An example of built-in extensions in the same Google Chrome web browser can be Adobe Plash Player and PDF Viewer, which are present in the program initially and are in an activated state.
In some browsers, you can find a plugin called AdBlock or something like that. Such extensions allow you to block drop-down menus, ads, banners, and sometimes even questionable content. In this regard, the Chinese browser 360 Safety Browser has distinguished itself the most, since the blocking module in the settings is activated by default. This creates a lot of problems, the solution of which will be proposed below.
Disabling unnecessary or unused add-ons
So, to access the list of extensions, use the about:plugins command (Yandex Browser or Chrome, it doesn't matter). In this case, we are interested in the issue of deactivating plugins.

After entering the about:plugins command, there are two ways to disable a plugin. In some browsers, opposite the line with the name and description of the plug-in, there is a special box in which a check mark is placed to activate it. There is nothing easier than just removing it and restarting the program for the changes to take effect.
Other applications use a hyperlink highlighted in blue to disable. As a rule, it is called “Disable”. To re-enable, the hyperlink changes to "Enable".
Major performance issues
With options for accessing the list of extensions and questions about their activation (deactivation), everything is clear. No one should have any problems here. But after all, there are situations when the plugin seems to be turned on, but its correct operation remains in doubt (it may not work at all). Often, the browser itself starts to display messages that some add-on is not supported, has an outdated version, etc. It is very easy to solve such problems.
and browsers
Let's start with a situation where the extension is not supported by a particular browser or its version. The easiest solution is to search for a plugin specifically for this browser and its modification.
On the other hand, often the problem can be solved by updating the extension itself. In most cases, this applies to Adobe Flash Player and Adobe Shockwave Player. Usually, when installed independently or as a built-in browser extension, they integrate a special updater program into the system that runs in the background and, if there is a constant Internet connection, monitors for new updates.

In the simplest case, you need to agree with the update proposal, download the latest version from the official resource, and then install it using the installation file, run as administrator. Close all browsers before installation. types are integrated into all Internet browsers installed in the system, regardless of their developer.
As for the rest of the extensions, after entering the command to access the about:plugins list, buttons or hyperlinks will be displayed next to the plugins for which there are updates, clicking on which will update them automatically.

Finally, if the extension cannot function correctly for some reason, the problem may also be that the web browser has an outdated version, which is why installing a plugin designed for a more recent modification does not lead to the desired result. In this case, you can do two things: either find the update item in the program settings menu, or simply download the installation distribution kit of the latest version, and then install it, or set the automatic update option.
Please note: for some browsers, it is not recommended to install a new modification over the old one, since a conflict may arise between them, and the system will start rushing around in search of a preference solution for one of them. Therefore, before installing, you should first uninstall the old version at least from the standard section of programs and components (add/remove programs), or use third-party utilities.
For these purposes, the most powerful uninstaller iOBit Uninstaller is best suited, which removes not only the main application files, but also system registry keys. Not to mention the residual components.
Another situation with the inoperability of plugins can only be related to the fact that a certain resource simply does not support its functioning. But this is a purely technical issue, depending solely on the owner of the site.
Web Content Blocking Issues
Separately, it is worth dwelling on the AdBlock module, which in some browsers is built-in and activated by default. The extension is no doubt useful, but its false positives are often criticized.
Of course, when you navigate to the list of plugins with the about:plugins command, you can disable it completely. But after all, this will only result in the fact that the plugin will not block a single page, which will invariably lead to discomfort from intrusive advertising and the appearance of a huge number of self-opening windows.
To avoid this situation, you need to go to the extension settings. It has two types of disabled data: blocking drop-down (pop-up) windows and disabling questionable page elements. It is better to activate only the first parameter.

In addition, just below the blocking enable / disable sliders there is a special button Exception websites, which is responsible for accessing the list of exceptions similar to the one found in antivirus programs. Here you just need to register the full addresses of pages using the http://www prefix, which are not subject to blocking, and save the changes.
Instead of an afterword
As you can see, regardless of the browser, you can configure plugins as you wish without any problems. As for troubleshooting possible problems, you should first find out the root cause of the failure. Most often (and this is confirmed by many users), problems are fixed by updating the software, without involving any system settings or web browser settings. The same option applies to the problem of compatibility of extensions with installed browsers.
In the new version of the browser, or rather, starting from version 56, it is no longer possible to see which plugins are installed in Chrome, since access to the plugin control panel is closed. By default, and at the same time Chrome plugins are updated. In older versions of the browser, you could open a tab with installed plugins by typing chrome://plugins/ or about://plugins/ into the address bar and pressing the Enter key on your keyboard. This tab displayed all installed plugins that could be disabled or enabled as needed. In new versions of the browser, it is considered that all installed plug-ins should work, with the exception of the plug-in for accessing the computer and Flash.
Flash Plugin
Plugins Browser Chrome open through settingsTo get to the settings for these plugins, you need to click on the three dots located in the upper right part of the browser and select the Settings item in the context menu that opens.
 If flash does not work in chrome, it may be disabled for you
 In the settings at the very bottom, click on Show advanced settings.
 In Chrome plugins Flash, you can turn it on or off here
 Then, in the paragraph titled Personal Information, click on the Customize Content button. A window called Content Settings will open, which contains the settings for these plugins.
 Here you can disable or enable flash in chrome
 In this window, find a paragraph called Flash. By setting a dot at the desired item, you can disable or enable Flash in Chrome on all sites.
 Here you can enable Adobe Flash for certain sites in Chrome plugins
 If you need to enable Adobe Flash for a specific site in Chrome plugins, then you will need to add this site to the Google Chrome Flash exceptions. To do this, click on the Configure exclusions button. A window will open in which you need to enter the domain name of the site in a special line, for example garayev.ru, specify the Adobe Flash Chrome rule for it and click the Finish button. To disable or enable Flash Plugin Chrome for this site, you will have to constantly open this window and change the rule, remembering to click the Done button.
Computer Access Plugin
 Enable plugins in chrome
 In the window called Content Settings, find the paragraph Plugin access outside the test environment. By setting a dot at the desired item, you can allow and deny access to all sites to use the plug-in to access the computer. If you need to allow or deny access to a particular site, you will need to add it to an exception by clicking on the Configure exceptions button.
Installing plugins
 Plugins for Google Chrome
 If you need to install some additional plugin for Chrome, then open the Chrome Web Store and enter the name of the plugin or the word plugins in the search box and press the Enter key on your keyboard. These installed Chrome plugins will be located in extensions that open through the browser menu - More tools - Extensions. In order to update Chrome plugins, you will need to update the entire browser.